- Secondary DIMM ("DIMM2") information and procedures
Timeline of 2nd DIMM (DIMM2) progress and milestones
- Nov 2019, discussion of a 2nd DIMM began at the HET Board Meeting rehearsal.
- Initially attempted to put together enough spare parts to make a functioning 2nd DIMM
- Made use of the spare LX200 GPS 12" Celestron, in good shape.
- Mechanical team quickly built a rolling cart for tripod
- lack of complete set of spares was hindrance (finder video camera)
- issues getting CCDs to work
- Dec 2019
- CCD issue identified: mis-understanding about polarity of power supply
- Late Dec, CCD working and preparing equipment to roll outside
- Jan 2020
- Early in morning of Jan 6th, altitude drive gear failed during setup, required to be sent back to Meade.
- Started using older LX200 with severe backlash but work-able
- Early in morning of Jan 19th, ran 2nd DIMM on sky for a few hours from parking lot
- Effort to finalize network access, finder camera, etc
- Feb 2020
- Evening of Feb 12th, found DIMM enclosure roll-up roof open
- roof likely had been open for 3-4 days during snow and rain
- primary DIMM (LX200GPS) fully saturated with water and non-functional
- Ongoing efforts to clean/revive LX200GPS; "2nd DIMM" LX200 classic mounted in enclosure to serve as primary DIMM
- Early in morning of Feb 22nd, old LX200 operating as primary DIMM (horrific backlash)
- Evening of Feb 12th, found DIMM enclosure roll-up roof open
- Mar 2020
- March 4th: webcam mounted in DIMM enclosure for monitoring: http://dimm-cam.as.utexas.edu/
- Efforts to repair water-logged LX200GPS unsuccessful, spare parts unavailable to order
- March 11th: repaired LX200GPS (altitude drive issue) arrives back at the HET
- In use as primary DIMM again on March 14th
- March 19th: ordered two 11" Celestron telescopes for 2nd DIMM project and for future DIMM upgrade
- March 24th: two Celestron 11" telescopes arrive at HET, pandemic slows down everything
- Apr 2020
- April 3rd: One new Celestron telescope delivered to Justen's garage for testing
- Efforts to build weight/balancing system, attach guider scope, mount finder video camera, etc
- Early in morning of April 29th, DIMM2 (Celestron) runs on the cart and gets seeing measurements on sky!
- May 2020
- Waiting on all-weather cover before mounting on the primary DIMM tower
- May 17th: reliably producing seeing data on rolling cart, but auto-guider not working yet
- June/July 2020
- June 11th: DIMM2 moved to exterior pier on DIMM tower, after protective covers arrive
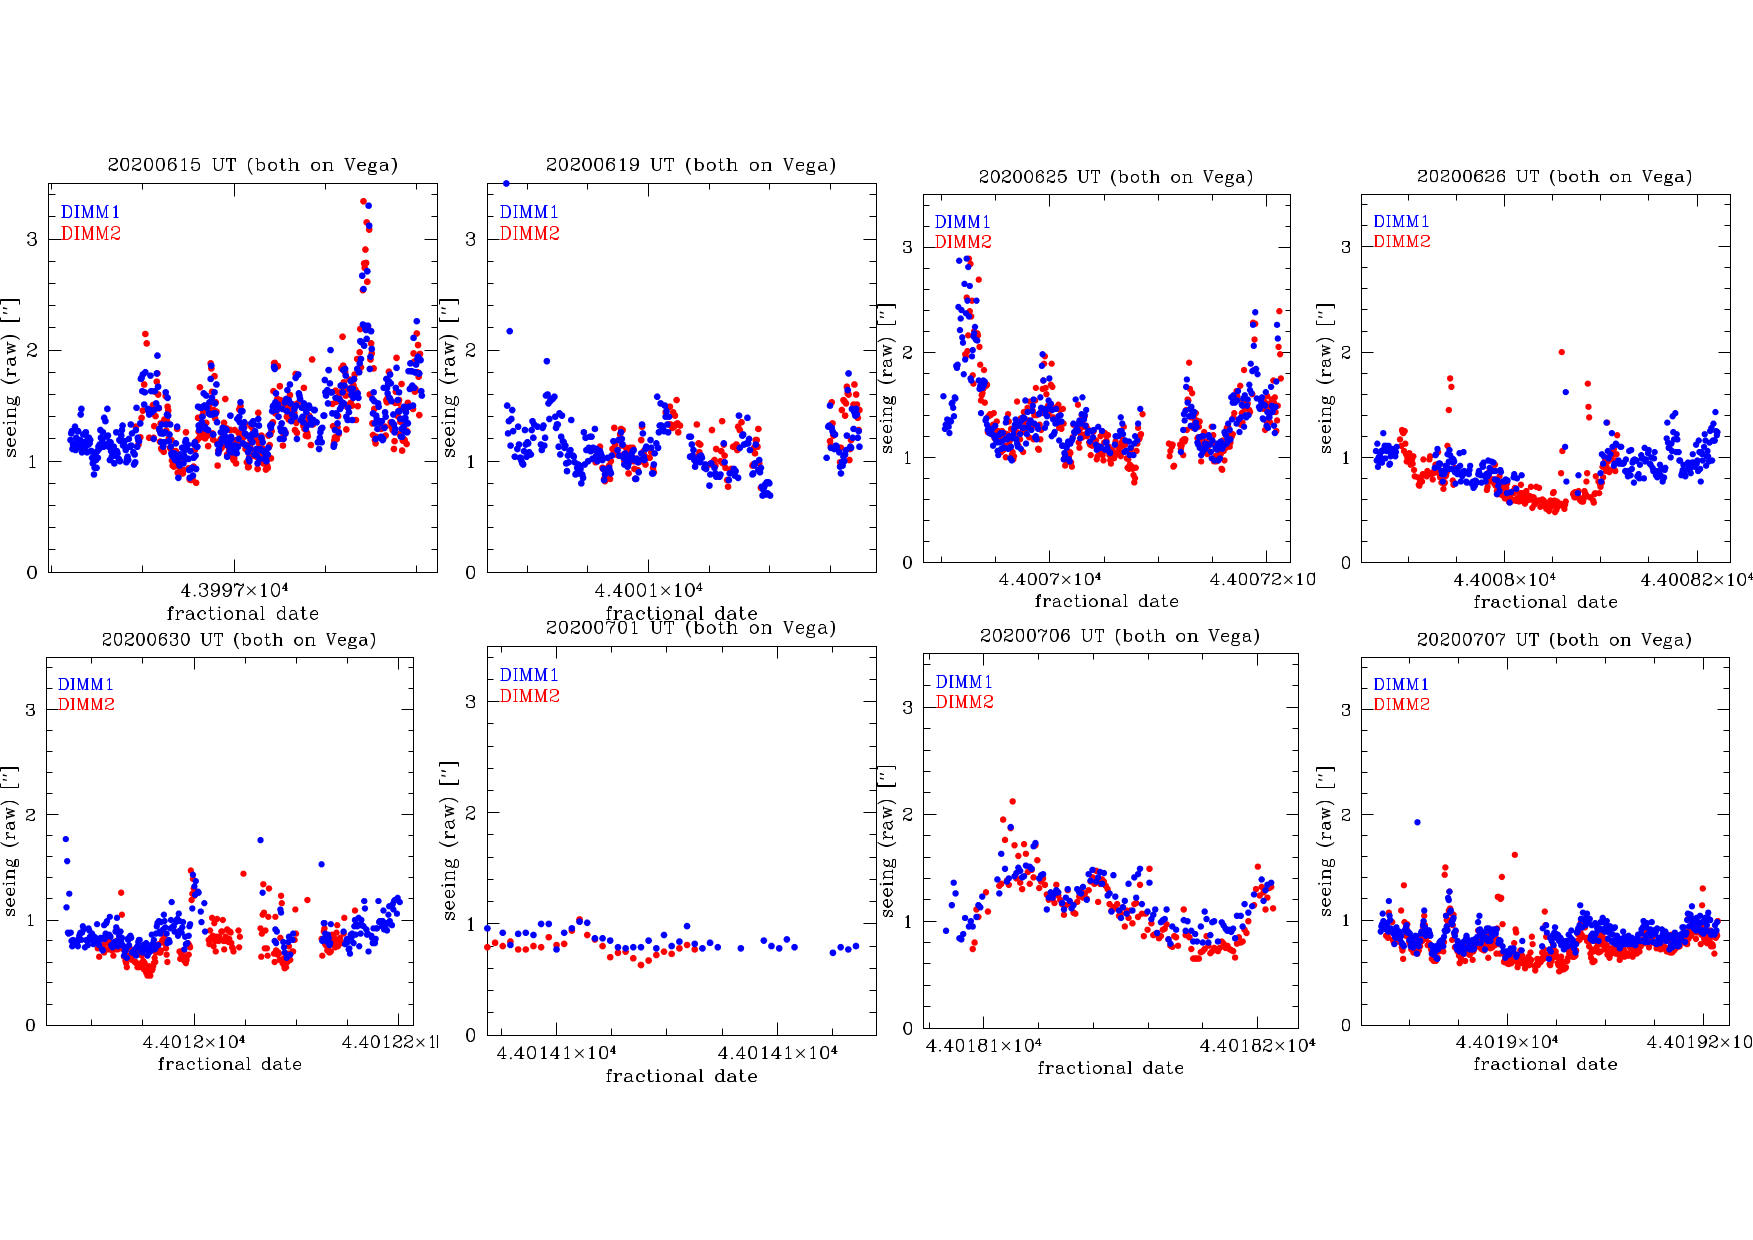
- 20200615 UT: DIMM2 run on Vega all night, as was DIMM1
- 20200619 UT: DIMM2 run on Vega most of the night, setup by JP shutdown by SR.
- 20200622 UT: DIMM2 run on Vega all night, winds gusting to 20mph, measurements very inconsistent.
- 20200625 UT: DIMM2 run on Vega all night, as was DIMM1. Not windy, good data set.
- 20200626 UT: DIMM2 run on Vega, as was DIMM1. Trained SCO on how to use it, he ran it the rest of the night and shut it down.
- 20200630 UT: DIMM1 and DIMM2 on Vega.
- 20200701 UT: DIMM1 and DIMM2 on Vega. SR: attempted to use Arcturus but got into cable wrap issue. JP fixed this.
- 20200705 UT: DIMM1 and DIMM2 on Vega for about 1/2 the night. Spotty data collection with clouds.
- 20200706 UT: Both DIMMs on Vega for about ~3h. Generally good data collection during this time.
- 20200707 UT: Both DIMMs on Vega all night. Very good conditions all evening.
- Results of running both DIMMs on Vega:
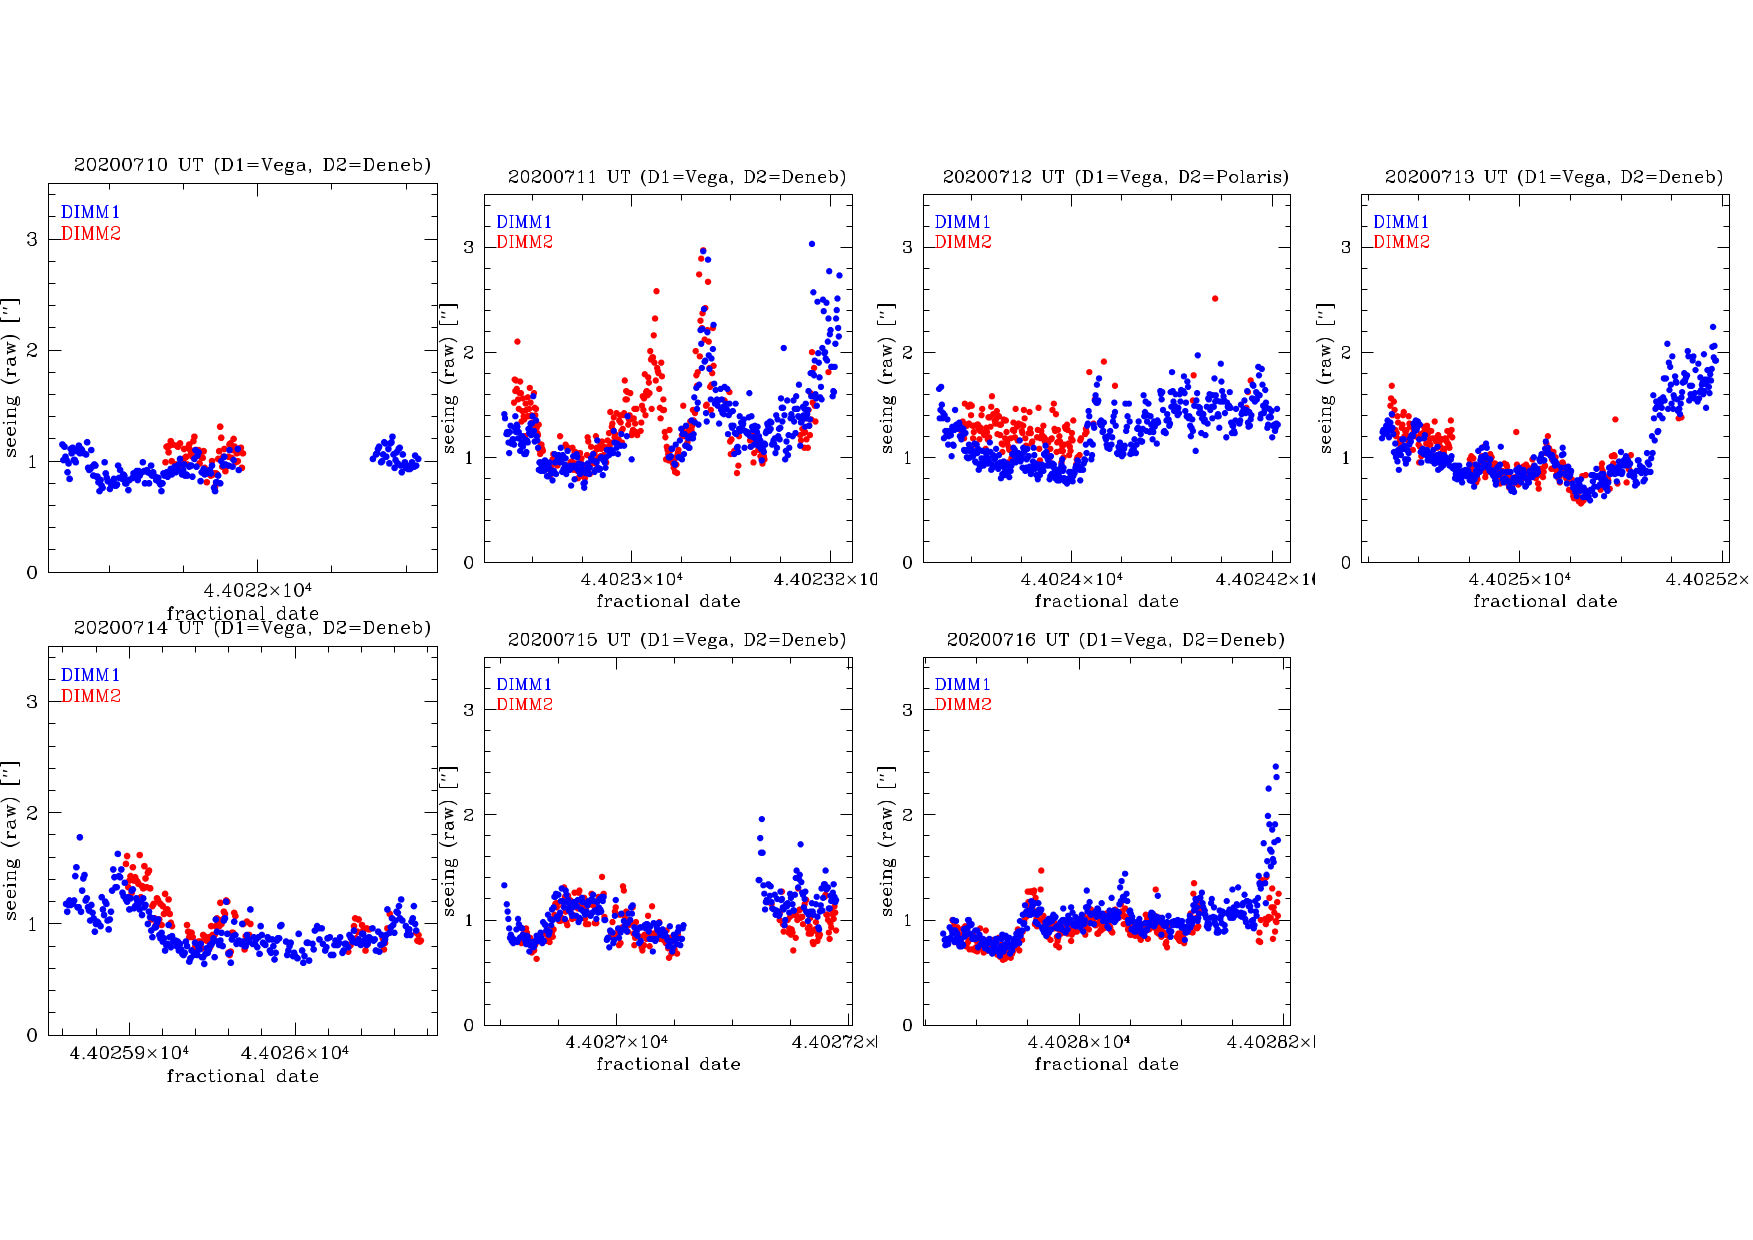
- 20200710 UT: DIMM1 on Vega, DIMM2 on Deneb for part of the night (4:32-5:45 UT at least)
- 20200711 UT: DIMM1 Vega, DIMM2 Deneb for most of the night
- 20200712 UT: DIMM1 Vega, DIMM2 Polaris first half, then wind shake made measurements poor
- 20200713 UT: DIMM1 Vega, DIMM2 Deneb with poor data from wind shake in 2nd half of night
- 20200714 UT: DIMM1 Vega, DIMM2 Deneb for first 1/3rd of night before wind then clouds.
- 20200715 UT: DIMM1 Vega, DIMM2 Deneb.
- 20200716 UT: DIMM1 Vega, DIMM2 Deneb.
- Results of running DIMMs on Vega+Deneb/Polaris:
- 20200723 UT: DIMM1 Vega, DIMM2 Schedar from about 08:20 UT till end of the night(periods of clouds and south wind, data mediocre).
- 20200724 UT: DIMM1 Vega, DIMM2 Schedar on sky for only ~1 hour. Very unpredictable weather.
- 20200725 UT: DIMM1 Vega, DIMM2 Schedar, Deneb. Very inconsistent data collection due to clouds.
- 20200726 UT: DIMM1 Vega, DIMM2 Schedar. Inconsistent data collection for approx. 1.75 hours.
- 20200727 UT: DIMM1 Vega, DIMM2 Deneb.
- 20200728 UT: DIMM1 Vega, Deneb around 6ut but it too faint. Made 2 stars alignment and back to Vega, DIMM2 @Alkaid @3UT, Shedir 5UT
- 20200729 UT: DIMM1 Vega, DIMM2 @Alkaid @3UT, Shedir 5UT
- 20200730 UT: DIMM1 Vega, DIMM2 can not be use due to lost of its alignment
- 20200731 UT: DIMM1 Vega, DIMM2 on Alkaid from 2:50 to 5:50 UT, then on Shedir at 5:50 on, Shedir gave only a few points in east, but many points when at meridian.
- August
- 20200802? UT: DIMM1 Vega, DIMM2 on Alkaid at 2:54 UT, Shedir at 4:50 UT but difficult to get points in east.
- 20200804 UT: DIMM1 Vega, DIMM2 on Shedir, but a fair bit of wind shake.
- 20200806 UT: DIMM1 Vega, DIMM2 on Shedir. No real data for DIMM2 due to wind shake.
- 20200814 UT: DIMM1 Vega until lost in west, then Deneb till EON. DIMM2 starting on Kochab, switched to Shedir at 06:08, then Capella from 08:22 to EON.
- 20200815 UT: DIMM1 Vega, DIMM2 Kochab. Lost to clouds and closed. Not much data collected after ~04:20 UT.
- 20200816 UT: DIMM1 Vega, No DIMM2 due to weather.
- 20200817 UT: DIMM1 Vega, No DIMM2 due to weather.
- 20200818 UT: DIMM1 Vega and Capella, DIMM2 Capella.
- 20200819 UT: DIMM1 Vega at 03:00 and on Capella at 09:18, DIMM2 on 02:35 Kocheb and 06:40 Shedir.
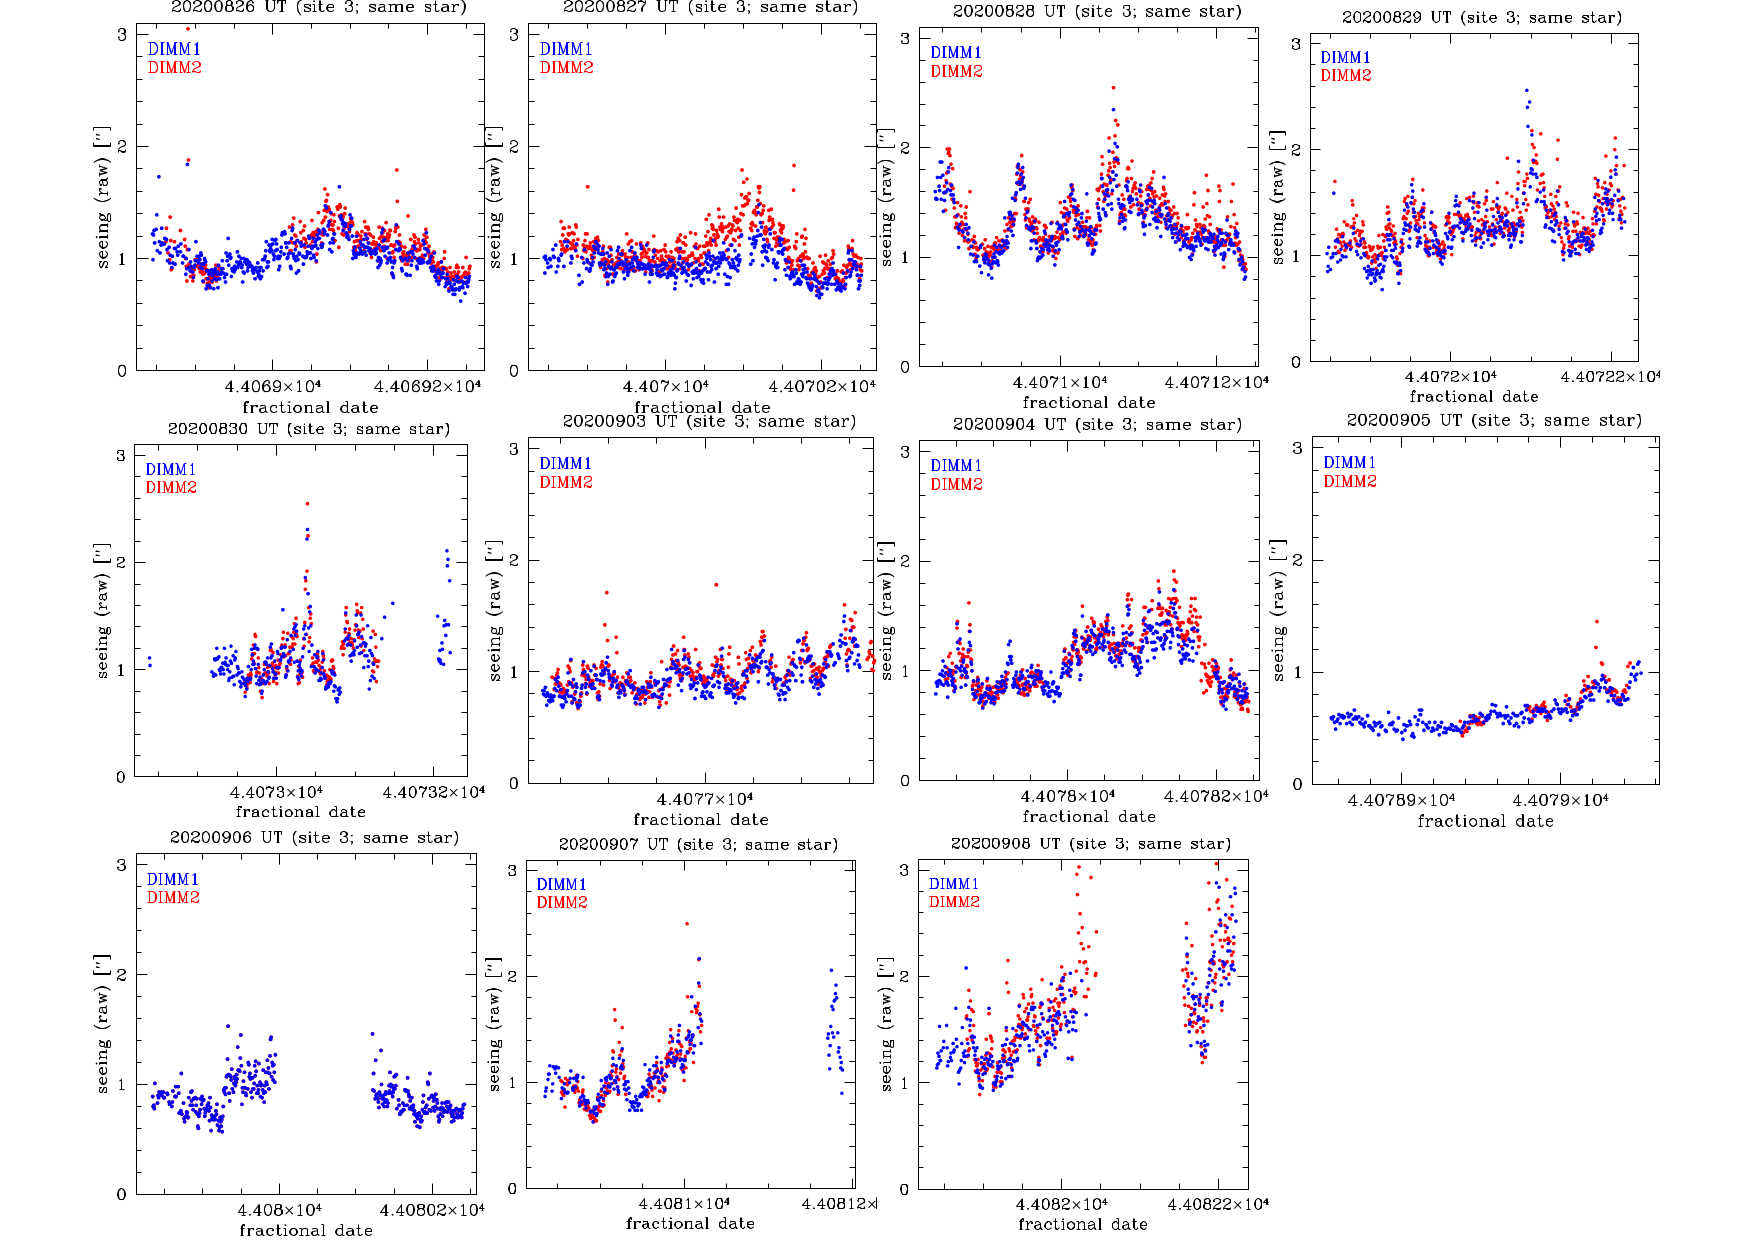
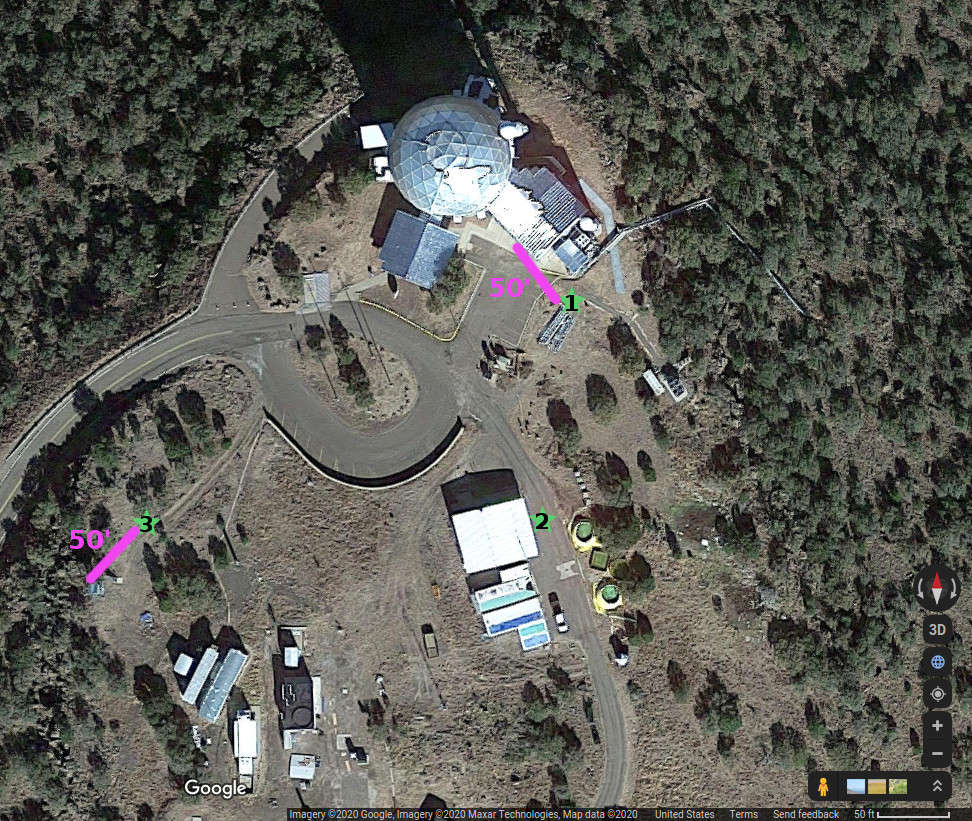
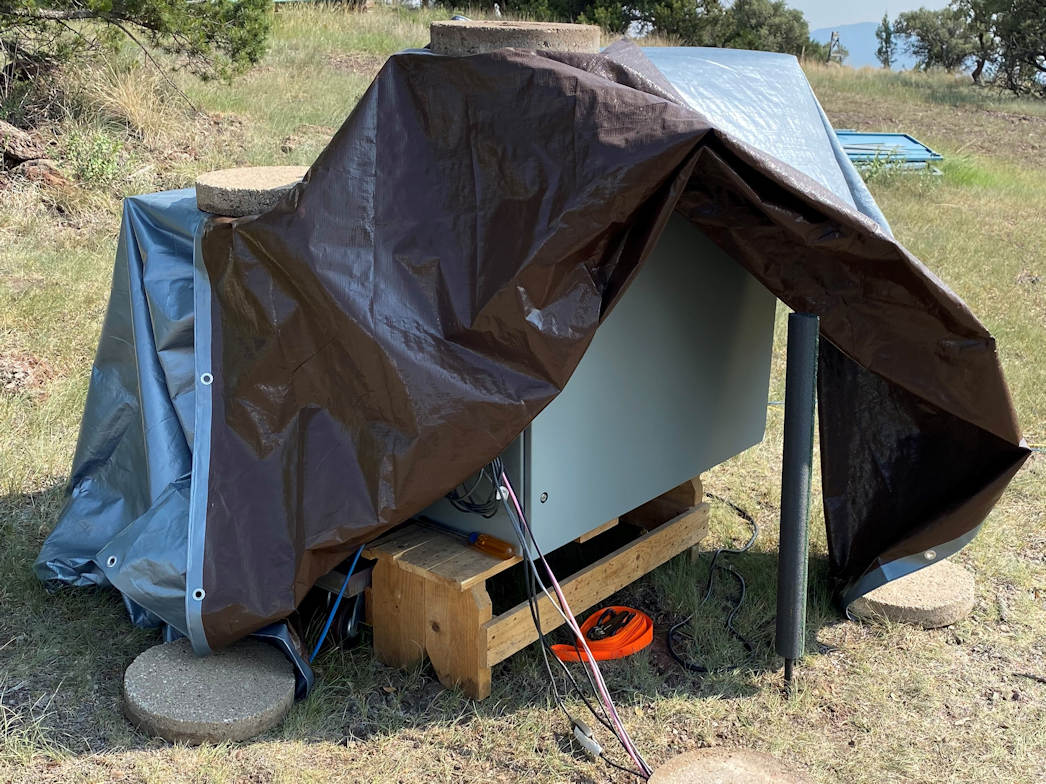
- Late August and early September - DIMM2 moved to ground near DIMM tower (Site 3 on map below)
- 20200826 UT: DIMM1 and DIMM2 both on Vega from 6:29UT to 08:02UT. Then both on Capella from 08:02UT.
- 20200827 UT: DIMM1 and DIMM2 both on Vega from 02:30UT to 08:30UT. Then both on Capella until 12UT.
- 20200828 UT: Both DIMM telescopes on Vega from 02:20UT to 08:20UT. Then both on Capella until 11:40UT.
- 20200829 UT: Both DIMM telescopes on Vega from 02:20UT to 08:20UT. Then both on Capella until 11:40UT.
- 20200830 UT" DIMM1,DIMM2 on Vega at 5:00 UT, DIMM1,DIMM2 on Capella at 8:00 UT (DIMM1 slightly blocked by wall at start of this)
- 20200831 UT: DIMM1 on Vega at 6:30UT. DIMM1 on Capella at 9:05 UT (variable clouds).
- 20200902 UT: data lost from date errors? (DIMM1 and DIMM2 on Vega at 2:20 UT)
- 20200903 UT: both DIMMs were on Deneb until 10:00UT.
- 20200904 UT: both DIMMs were in Deneb in the beginning. Both changed to Capella from 10:42 (DIMM1)and 10:14 (DIMM2)
- 20200905 UT: Both DIMMs were on Deneb. DIMM1 from 2:30 and DIMM2 from 4:30. Both were closed at 07:14 due to high humidity.
- 20200906 UT: Both DIMMs on Vega. DIMM1 around 2:20 and DIMM2 from 2:50.
- 20200907 UT: Both DIMMs on Vega
- 20200908 UT: Both DIMMs on Vega
- Results of running DIMMs on same star with DIMM2 at Site 3 on ground near DIMM tower:
- Mid September - DIMM2 moved to ground near receiving bay on Sep 14th (Site 1 on map below)
- 20200917 UT: Both DIMMs to Vega at the start of the night and then moved to Capella around 6:20 UT
- 20200918 UT: Both DIMMs to Vega around 1:50UT; moved to Capella around 7 UT
- 20200919 UT: Only DIMM2 to Vega around 1:50UT; moved to Capella around 7 UT. Could not start new dimm - computer could not connect to the telescope
- 20200920 UT: Both DIMMs on Vega around 2UT; moved to Capella around 6:50UT. Closed both DIMMs around 9UT due to high humidity and condensation
- 20200922 UT: DIMM2 used for some of the night, but on variety of stars for guiding tests; after 10:38 UT both DIMMs on Capella with good data
- 20200923 UT: Both on Vega with crappy data, then at 07:15 both on Capella with excellent data until 11:30 UT when shut down.
- 20200924 UT: Both are in Vega first and then switched to Capella at 0700 UT. Some data were lost due to cloud.
- 20200925 UT: Both were on Vega at the beginning and moved to Capella at 06:40 UT.
- 20200926 UT: Both were on Vega at the beginning and moved to Capella at 07:40 UT (DIMM1) and 07:00 UT (DIMM2) .
- 20200927 UT: DIMM1,2 on Vega from start to 6:00UT, both DIMM on Capela for remainder of night
- 20200928 UT: Both DIMMs on Vega first half of night before dust closure
- 20200929 UT: Both DIMMs on Vega until about 6hUT when we swithed to Capella
- 20200930 UT: Both DIMMs on Vega at 1:30UT, both DIMM to Capella at 6UT
- 20201002 UT: Both DIMMs on Vega at 1:40UT, both DIMM to Capella at 6UT
- 20201003 UT: Both DIMMs on Vega at 1:40UT, both DIMM to Capella at 6UT
- 20201004 UT: Both DIMMs on Vega at 00:50 UT (DIMM1)and at 1:40UT (DIMM2). Both DIMMs to Capella at 6:04 UT (DIMM2) and 6:44 UT (DIMM1). Both closed at 8:00 UT for dust.
- 20201005 UT: Both DIMMs on Vega at 01 UT, both DIMMs on Capella at 06UT.
- 20201006 UT: Both DIMMs on Vega at 01 UT, both DIMMs on Capella at 06UT.
- 20201007 UT: DIMM2 is on Vega at 01 UT, then on to Capella at 07UT.
- 20201008 UT: DIMM1 on Capella at 6:00, DIMM2 on Capella at 8:00 UT
- 20201009 UT: DIMM1,2 on Vega at 1:20UT; DIMM1,2 on Capella at 6:15 UT
- 20201024 UT: DIMM1 on Capella at 5:45 UT, DIMM2 on Capella at 8:30 UT.
- 20201025 UT: DIMM1 on Vega at 1:00UT, DIMM2 on Deneb (mistake) at 1:10 UT, DIMM1,2 on Capella at 6:00UT


- Results of running DIMMs on same star with DIMM2 at Site 1 outside HET receiving bay parking lot:


- Mid October - DIMM2 moved to ground near summit building on Oct 19th (Site 3 on map below)
- 20201020 UT: DIMM1 on Vega at 01:40 UT and then to Capella at 05:18 UT. DIMM2 on Capella at 07:10.
- 20201021 UT: Both DIMMs on Vega at 01:00 UT. Both DIMMs on Capella at 05:50 UT
- 20201023 UT: DIMM1 on Vega 1:30UT, DIMM2 on Vega 2:15 UT, DIMM1 on Capella 5:30 UT, DIMM2 on Capella 6:00UT
- 20201024 UT: DIMM1 on Capella 5:45UT, DIMM2 on Capella 8:30 UT
- November
- 20201104 UT: Both DIMMS on Vega at 01:12 UT, Switched to capella at 04:50 UT
- DIMM2 mounted on upper hex
- 20201129 UT: DIMM2 successfully taking seeing measurements from the upper hex
- December
- continued commissioning DIMM2 operations on upper hex
- January 2021
- 20210119 UT: first successful high-speed CWFS dataset with both DIMMs running on Capella
DIMM2 instructions for operations while mounted on the exterior of the DIMM tower
Setup Procedure:
*NOTE:* while mounted on the DIMM enclosure, avoid going to stars in the south.
- Carefully uncover the second DIMM telescope located on the DIMM tower (place inside DIMM enclosure).
- Take off guider scope cover and place inside DIMM enclosure (somewhere to be found at the end of the night).
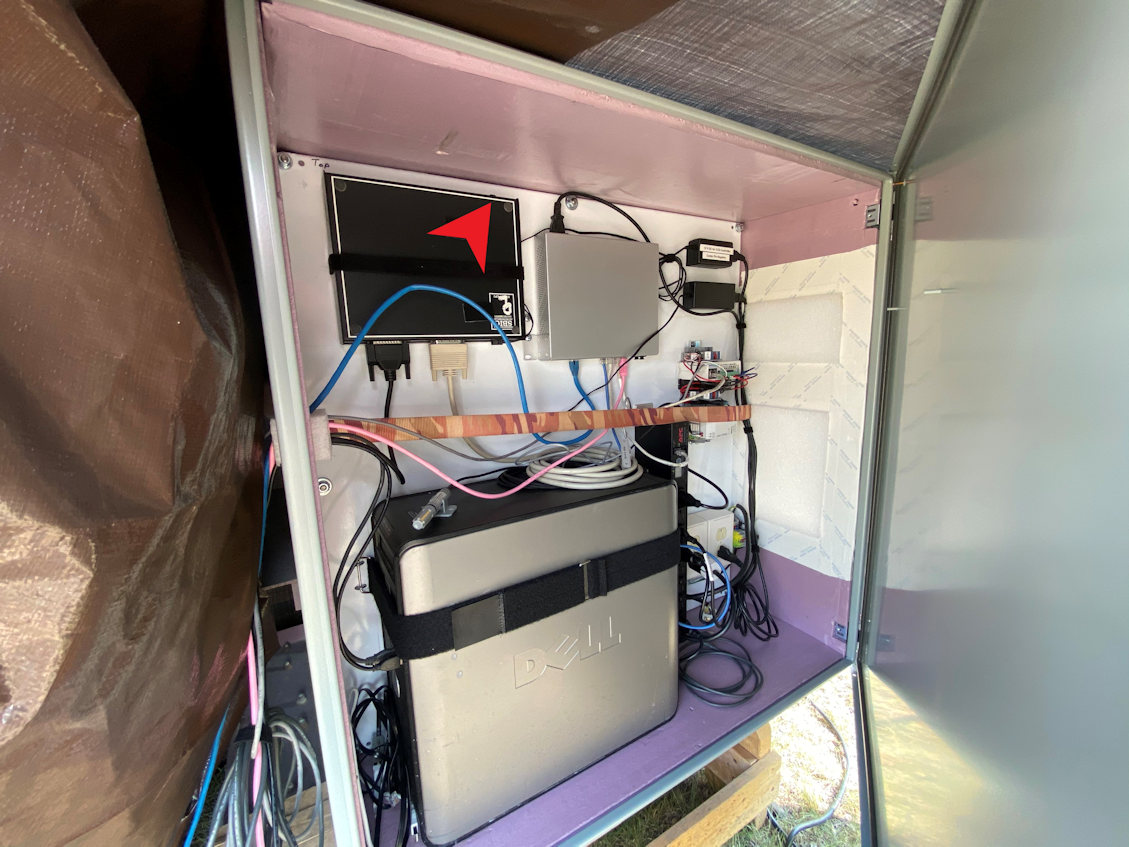
- Turn power strip located on the left side of the DIMM pedestal on. It is on the left just past the edge of the CCD CPU box toward the railing (away from the user while looking at the auxiliary DIMM).
- Enter the DIMM enclosure, turn 2nd DIMM computer monitor on, log in to the 2nd DIMM computer (this part will eventually be done remotely once we have a system down that routinely works). The username is dimm and the password is the same as the other DIMM computer login.
- Once logged in, start the CPWI software, the icon looks like the following:

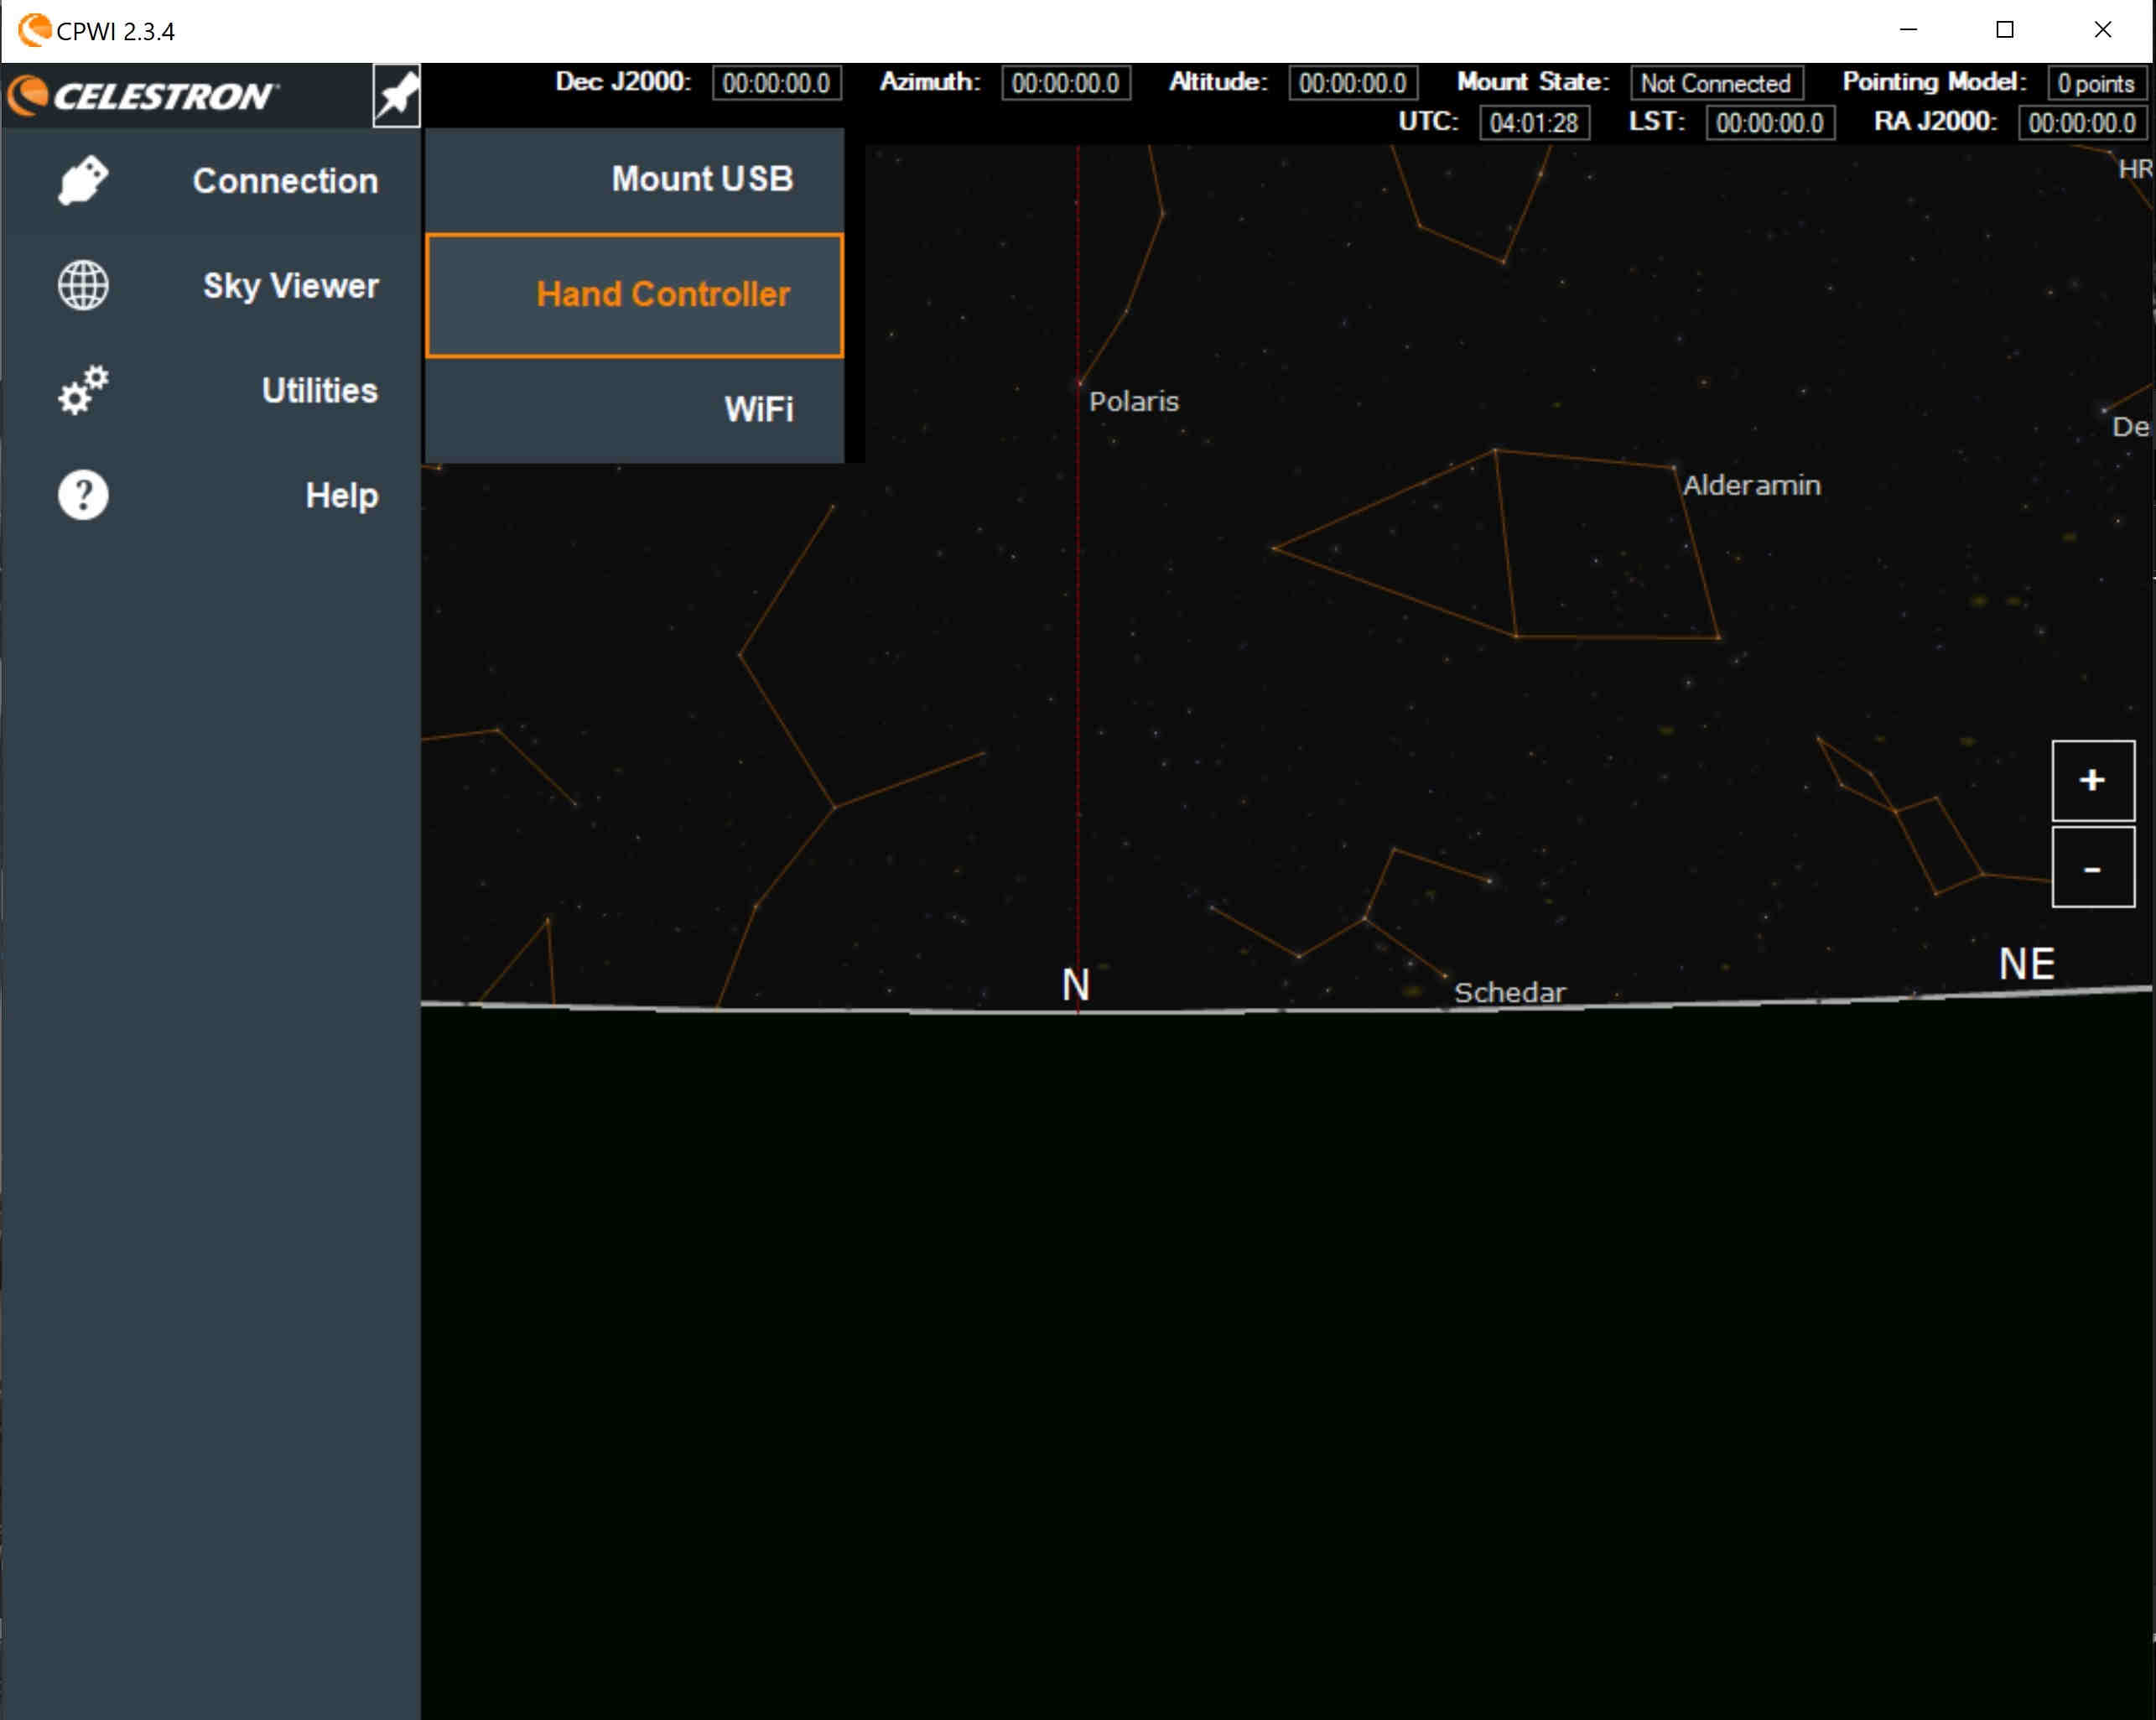
- Once you open the CPWI software connect to the telescope. Mouse over the word "Connection" on the left hand side, in the menu that expands out click "hand controller" (Figure 1). The telescope should be connected shortly after.
Figure 1: Connecting to the Telescope.

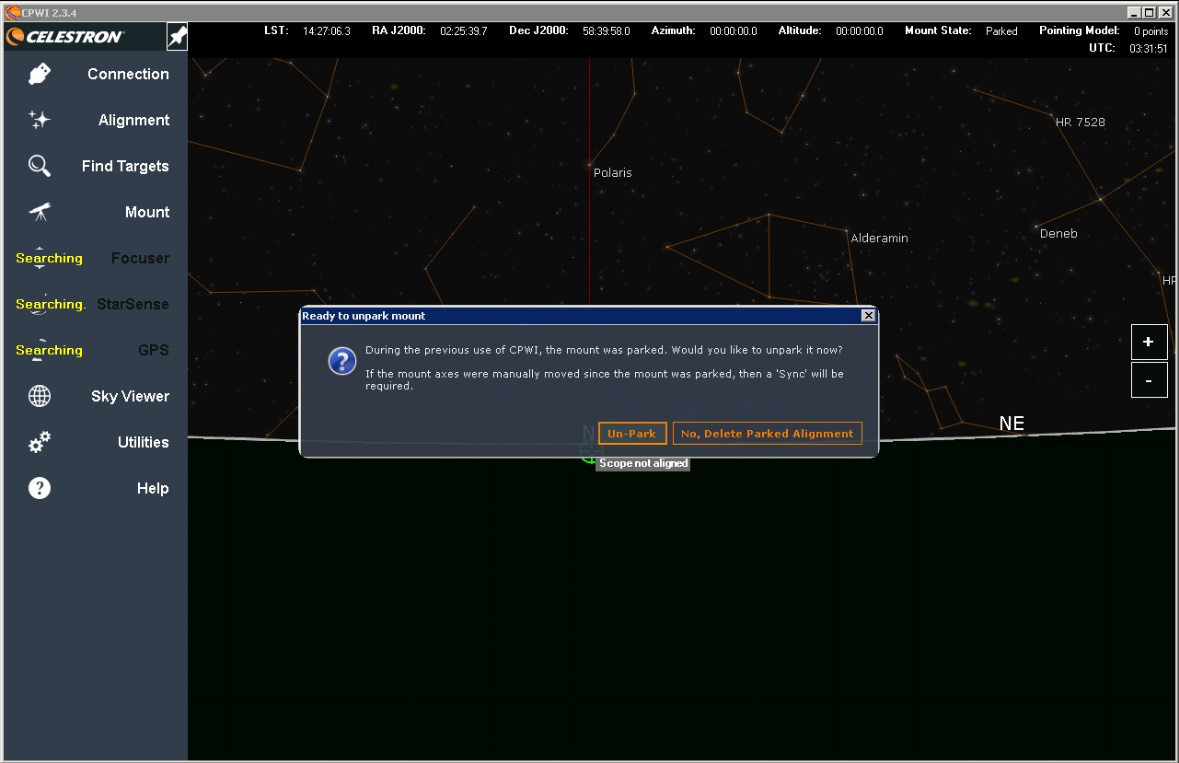
- Under normal condition the telescope has already been aligned and that alignment saved (unless moved by hand or pushed hard enough to slip on the clutches). When you connect to the telescope it will ask you if you would like to un-park the telescope (Figure 2). Choose to un-park the telescope.
Figure 2: After connecting to telescope it will ask if you would like to Un-Park it.

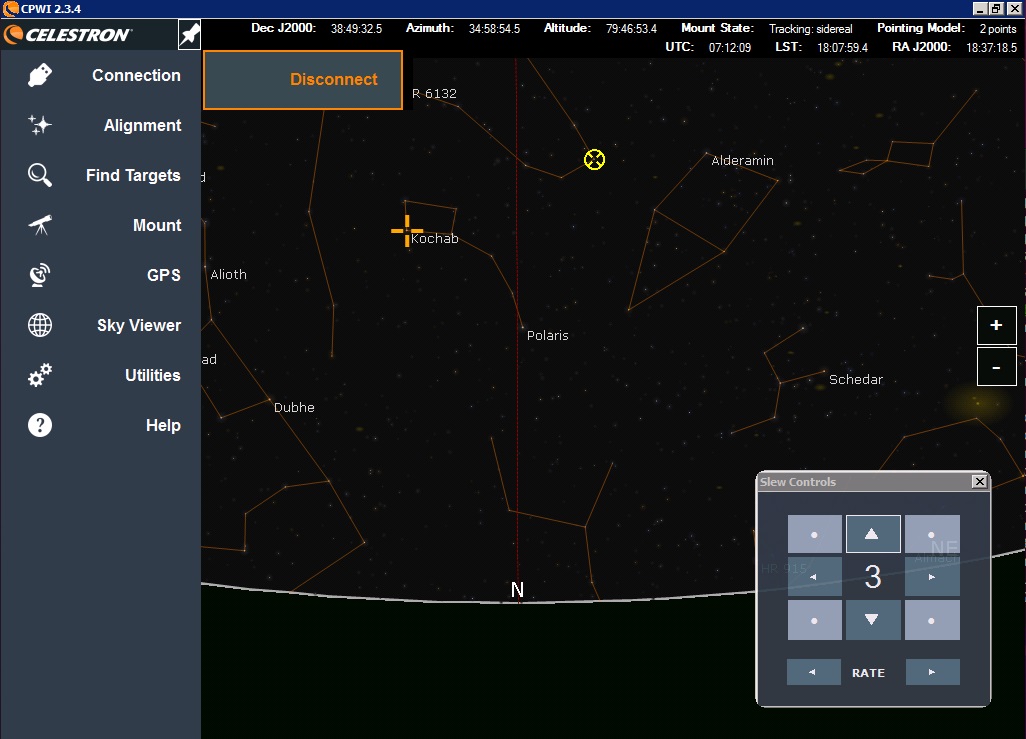
- From here you should be able to click and drag the sky changing the part that is viewed. Find the star you would like to move to and click on it. Note: Please pick stars in the north since the cables seem to easily be caught on things mounted on the pier in this configuration. Then click "Goto" in the box that appears. The telescope should slew to the object you are interested in. The telescope's current pointing is represented by a green circle with the target location represented by a smaller yellow circle.
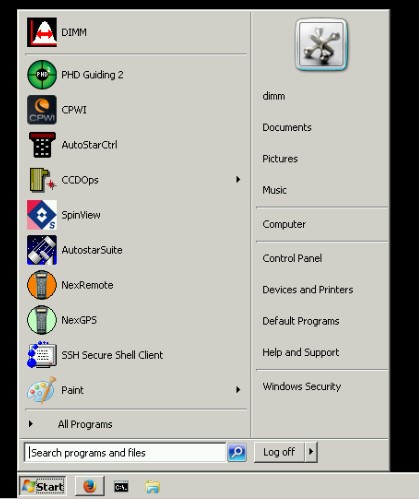
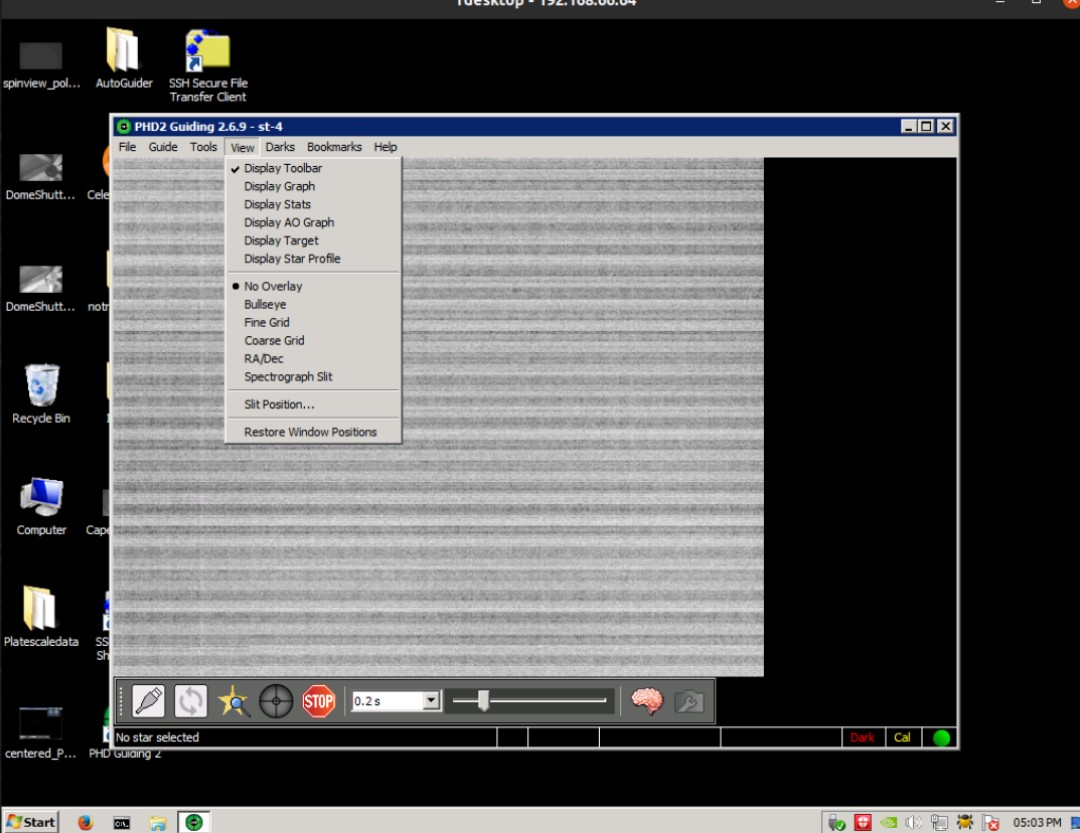
- The telescope should now be roughly pointed at the star of interest. To line it up for taking seeing measurements we will use the guide telescope and Orion Starshoot Autoguider via PHD2 guiding software. To start the PHD2 software click the start button, it should be in the menu that appears (Figure 3).
Figure 3: Start menu showing PHD2 icon.

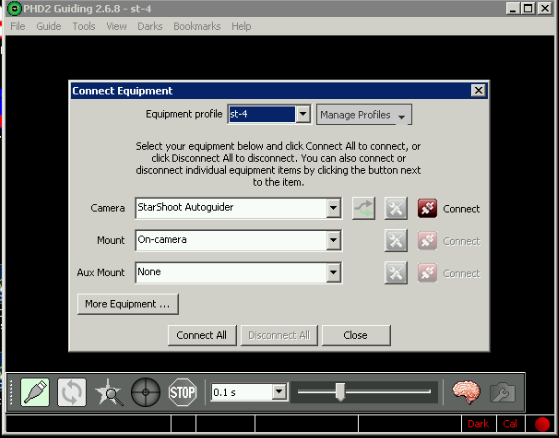
- Once the PHD2 software is loaded you will connect to the camera by clicking the USB icon in the bottom left corner (Figure 4).
Figure 4: USB icon in the bottom left corner of PHD2 software.

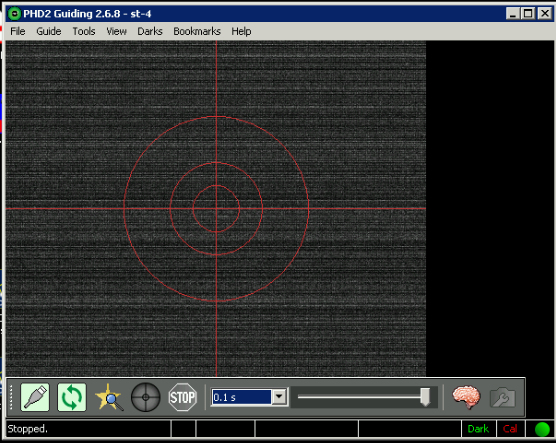
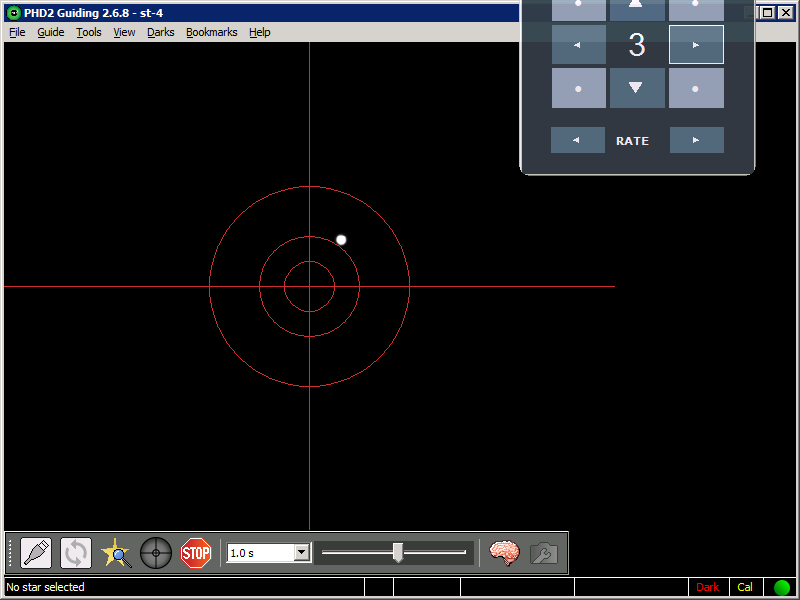
- In the connection menu, select Starshoot Autoguider for camera and On-Camera for mount (Figure 5). This should be the default for the St-4 equipment profile which can be selected in the drop down menu at the top of the window. Click Connect all at the bottom and close the menu. Under view menu select bullseye (Figure 6).
Figure 5: Connecting to camera and mount for autoguiding.

Figure 6: View after bullseye has been chosen. Refresh icon starts looping images, stop icon stops images.

- Hit the button that looks like a refresh button from a browser. This will start the images in the PHD2 software.
- If all is working properly you should now see the star of interest in the autoguider field of view. Center the star on the bullseye using the slew controls in the Celestron software under mount menu (Figure 7).
- Start DIMM software, it will give an error about not being able to connect to the telescope. It will ask if you would like to continue anyways. Select yes to continue to the normal software. Select “take images” to see that the star is in the DIMM field of view. If it is in the field of view center it with the CPWI hand paddle controls by mouse-ing over the word mount in the Celestron software and selecting slew controls (Figure 7). You will want to lower the rate with the arrows at the bottom of the slew controls that pop up. Once spots are positioned where you would like, select “start seeing measurements.” Unfortunately we do not have guiding solved yet so periodically it will need to be centered up by the user until this issue is solved.
Figure 7: How to show the slew controls.

Shutdown Procedure:
- Close DIMM software, wait for the CCD to warm up.
- Close PHD2 camera software.
- In CPWI software under Alignment, select "Park and Save Alignment" as seen in Figure 8.
- It will ask you if you would like to park it here or the previous position. Select the previous position, it should slew to zenith and park itself.
- At this point the Celestron software will ask if you would like to disconnect the telescope, click the Disconnect button in the menu.
- Go up to DIMM tower. If all has worked as intended, the telescope is parked similar to how you found it at the beginning of the night. If it is, turn the power strip off on the left side of the pedestal. If it is not, and the cables are wrapped up, loosen the clutches, unwrap the cables and point the telescope manually at Zenith.
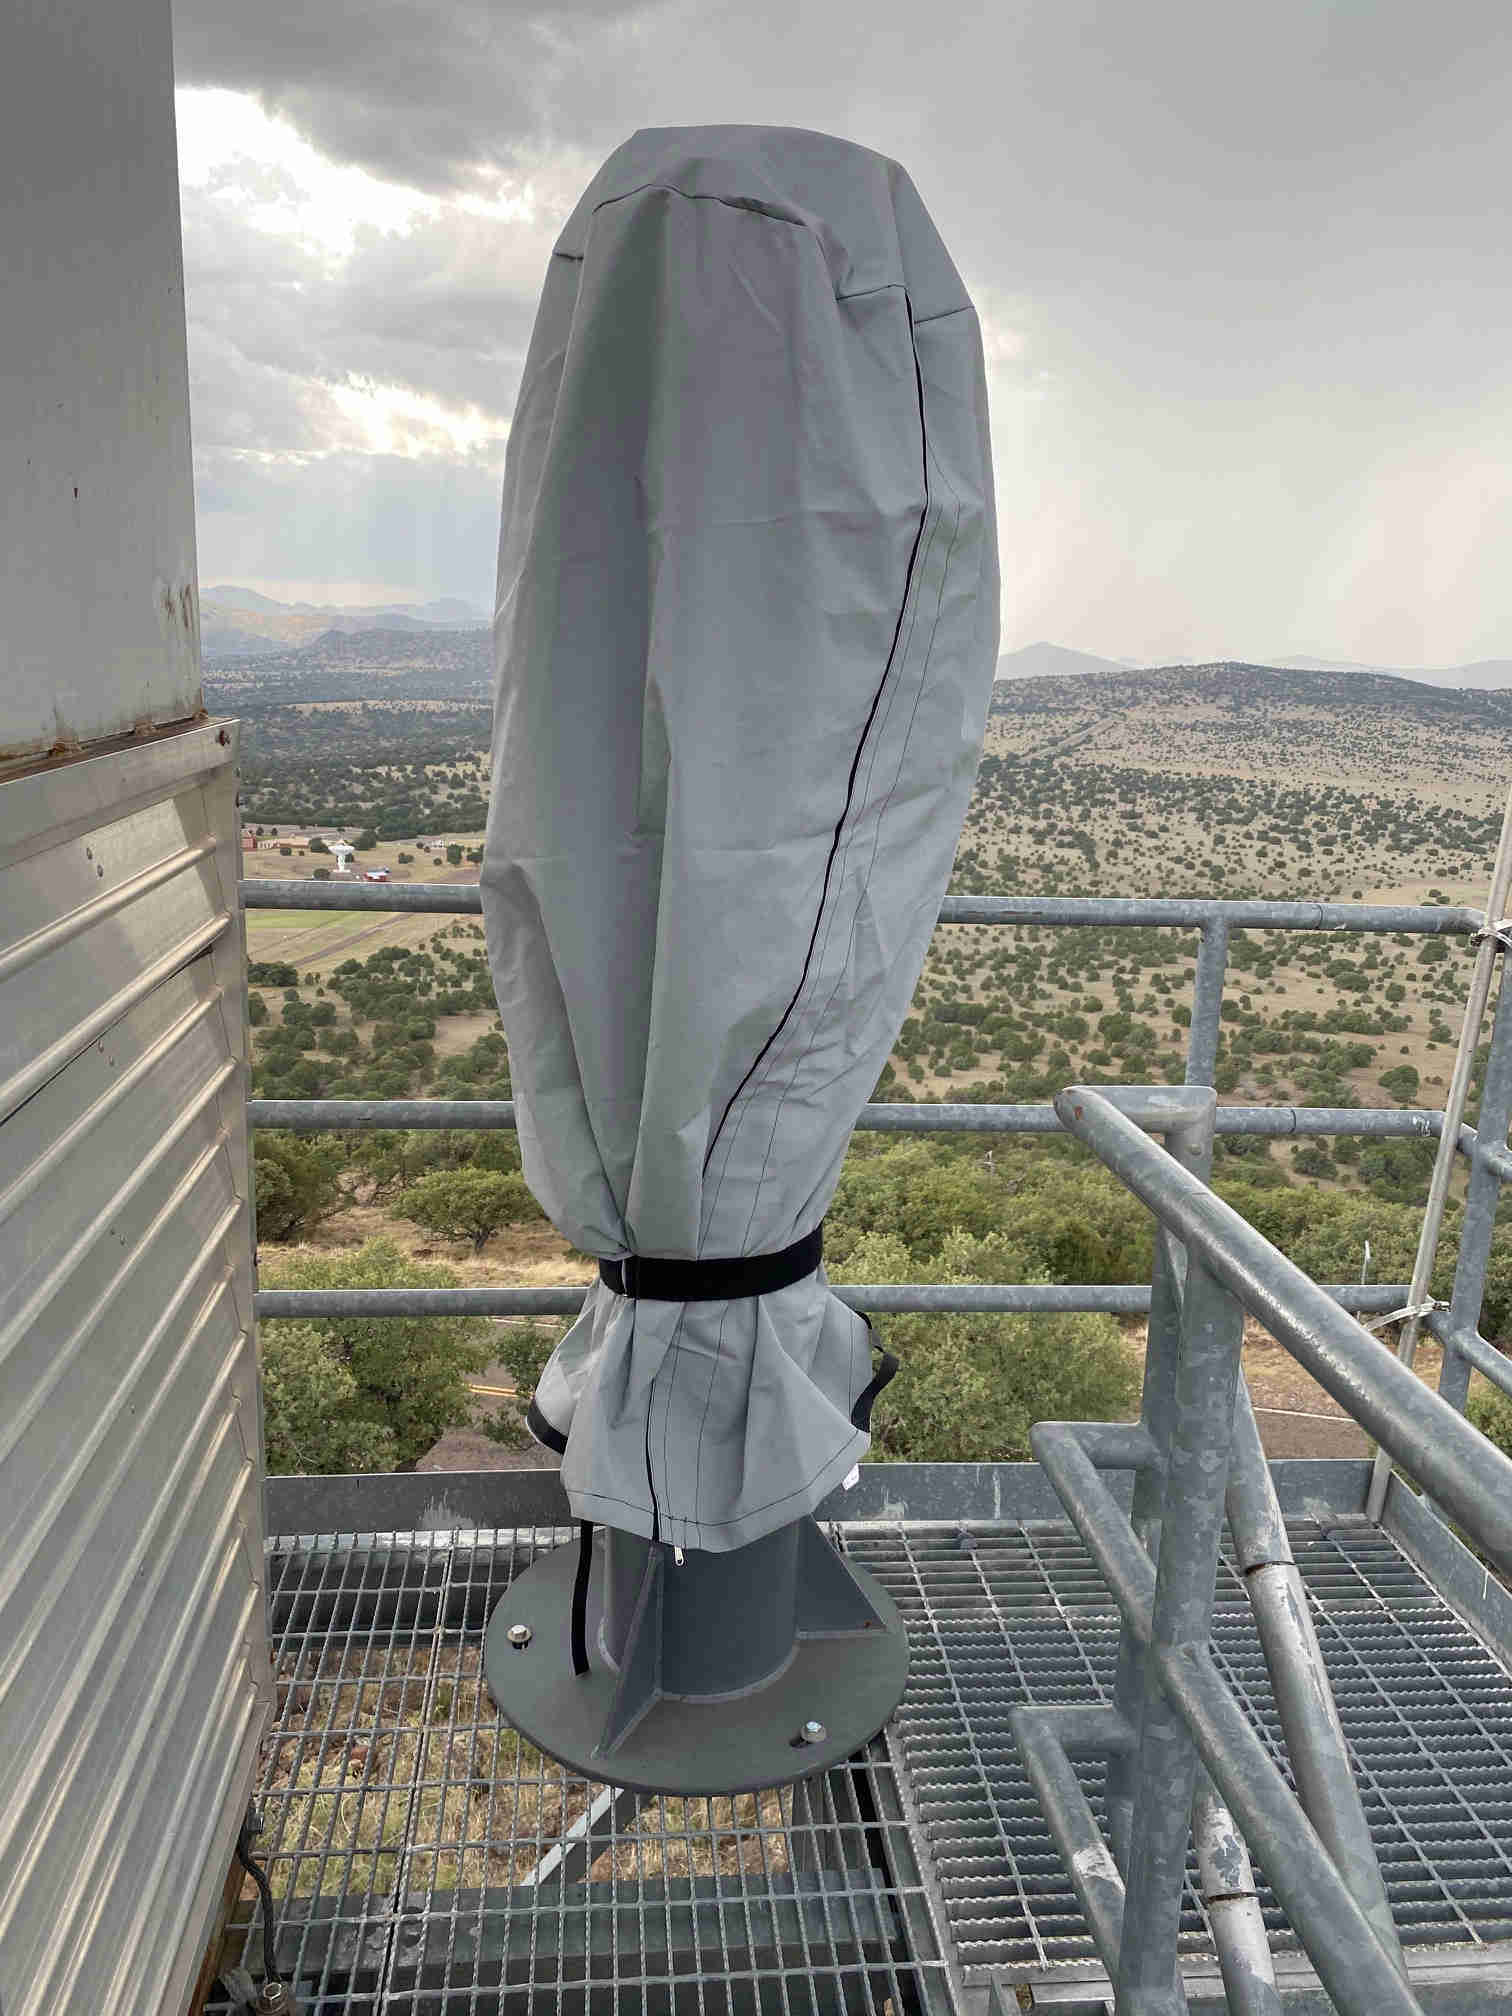
- Put the front cover on the guiding scope and carefully put the telescope cover over the whole assembly. This consists of putting the cover over the telescope, zipping the cover up, and fastening the strap around the base of the cover.
- If the telescope did not park properly or the cables were found wrapped up, contact Justen. The procedure for completing a two star alignment has not been refined yet and may be difficult for others to do.
- Note in the timeline section if the auxiliary DIMM was run and whether the conditions were good or not.
Figure 8: Save alignment and park the telescope.

Manual Alignment:
This process has not been refined yet and may be very difficult for some. I find that the easiest way to accomplish this is to unplug the USB cable from the hand paddle and align the telescope using the hand paddle first. Once the 2 or 1 star alignment has been performed, I tell the telescope to Goto Polaris. From there I slew down until the tube is level. This puts the telescope very close to north and level which makes aligning using the computer software much easier.
Manual Alignment Via Hand Paddle:
- Disconnect USB cable from the bottom of the hand paddle.
- The telescope should prompt you to align it, if it does not flip the rocker switch off then back on.
- Choose easy 2 star alignment and don't hit anything. The GPS fix will be taken and then it will ask you to pick a star to align on.
- Celestron expects that you try to center the star in the finder first and hit enter. Then you will align in the regular eye piece and hit align once centered. It will then ask you to pick a second star. When you pick this star the telescope will slew to the approximate position of the star you chose.
- Center the second star in the finder and hit enter, center in the eyepiece and hit align. If the alignment is successful the hand paddle will inform you.
- If you will be using the CPWI software you will want to tell the telescope to Goto Polaris.
- Once at Polaris, use the down arrow to move the scope till the tube is parallel to the ground (level).
Manual alignment in CPWI:
- If you have the telescope parked pointed north and the tube is level you can begin this procedure.
- Connect the USB cable to the hand paddle if not already connected.
- Start the CPWI software on the DIMM computer and connect to the telescope. Under the connection menu select “hand controller.”
- Once connected you will have to choose to align the telescope under the align menu.
- Wait for the GPS to get the appropriate time and location then choose manual alignment.
- Star in the sky above this menu. It will recommend certain stars using yellow marks. You do not need to use these but they will be nice and bright. Stay in the northern part of the sky for your alignment stars.
- Pick a star and click the Goto button in the menu at the bottom of the screen. It will assume the telescope is currently pointed north and the tube is level. If the telescope is accurately in that position, it will go to the star you have selected. Follow the instructions on centering the star and do this for 2 or more stars.
- Once you have completed the alignment you can exit the menu and select the star you would like to observe.
- The cable wrap may not be correctly configured if the alignment is lost. Until the behavior is well known of this system these steps should be attempted while carefully watching to be sure the cable is not going to get wrapped up. If it looks like it is going to get wrapped up and damage the scope, please turn it off mid slew and let Justen know that the scope needs to be re-aligned.
DIMM2 instructions for operations while mounted at select locations
Locations:

Remote DIMM Assembly:

Setup Procedure:
*NOTE:* while mounted on the tripod, avoid going to stars in the south due to cable wrap.
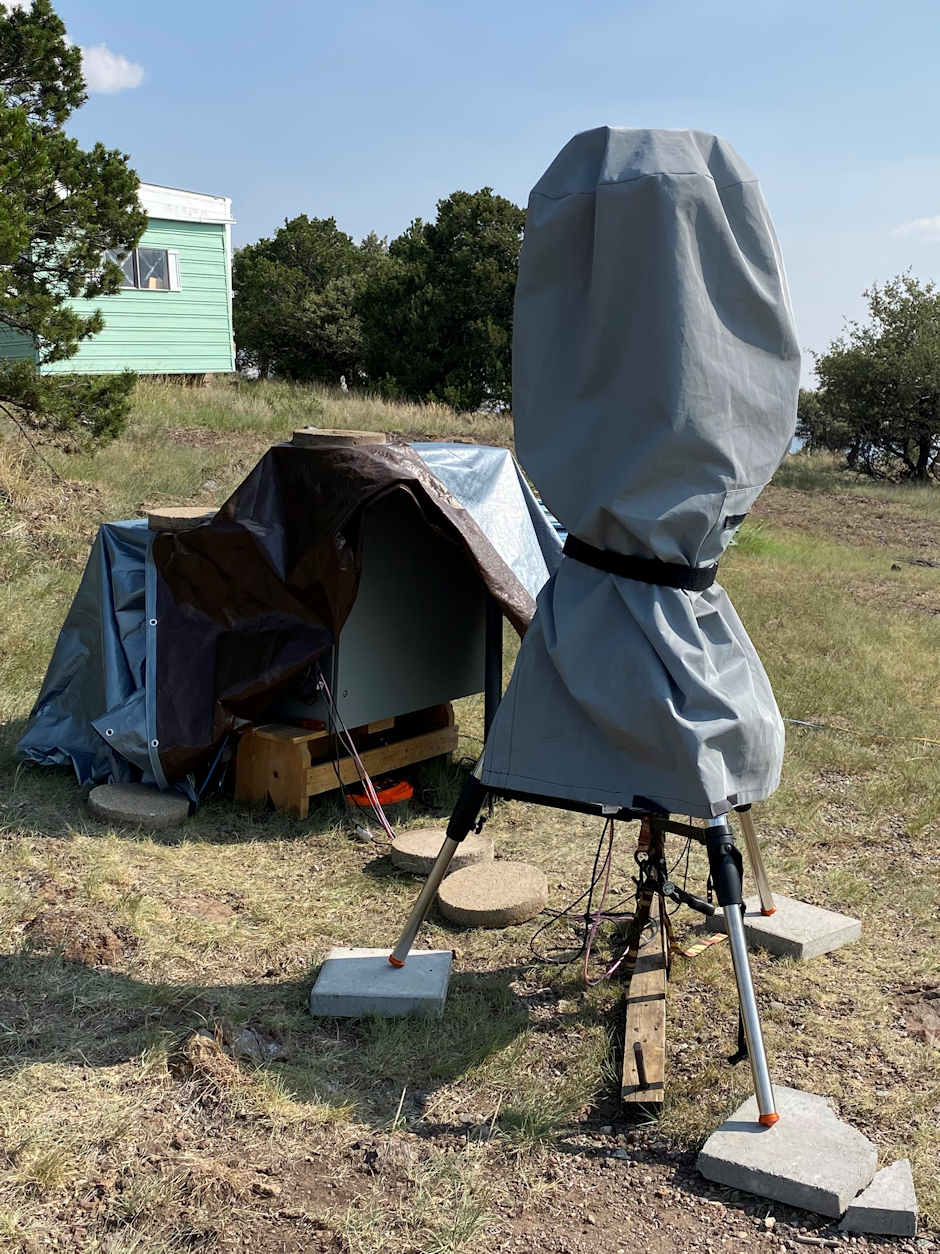
- Carefully uncover the second DIMM telescope located at the remote location we are currently studying. Place cover in a safe place.
- Take off guider scope cover and place in a safe place (somewhere to be found at the end of the night).
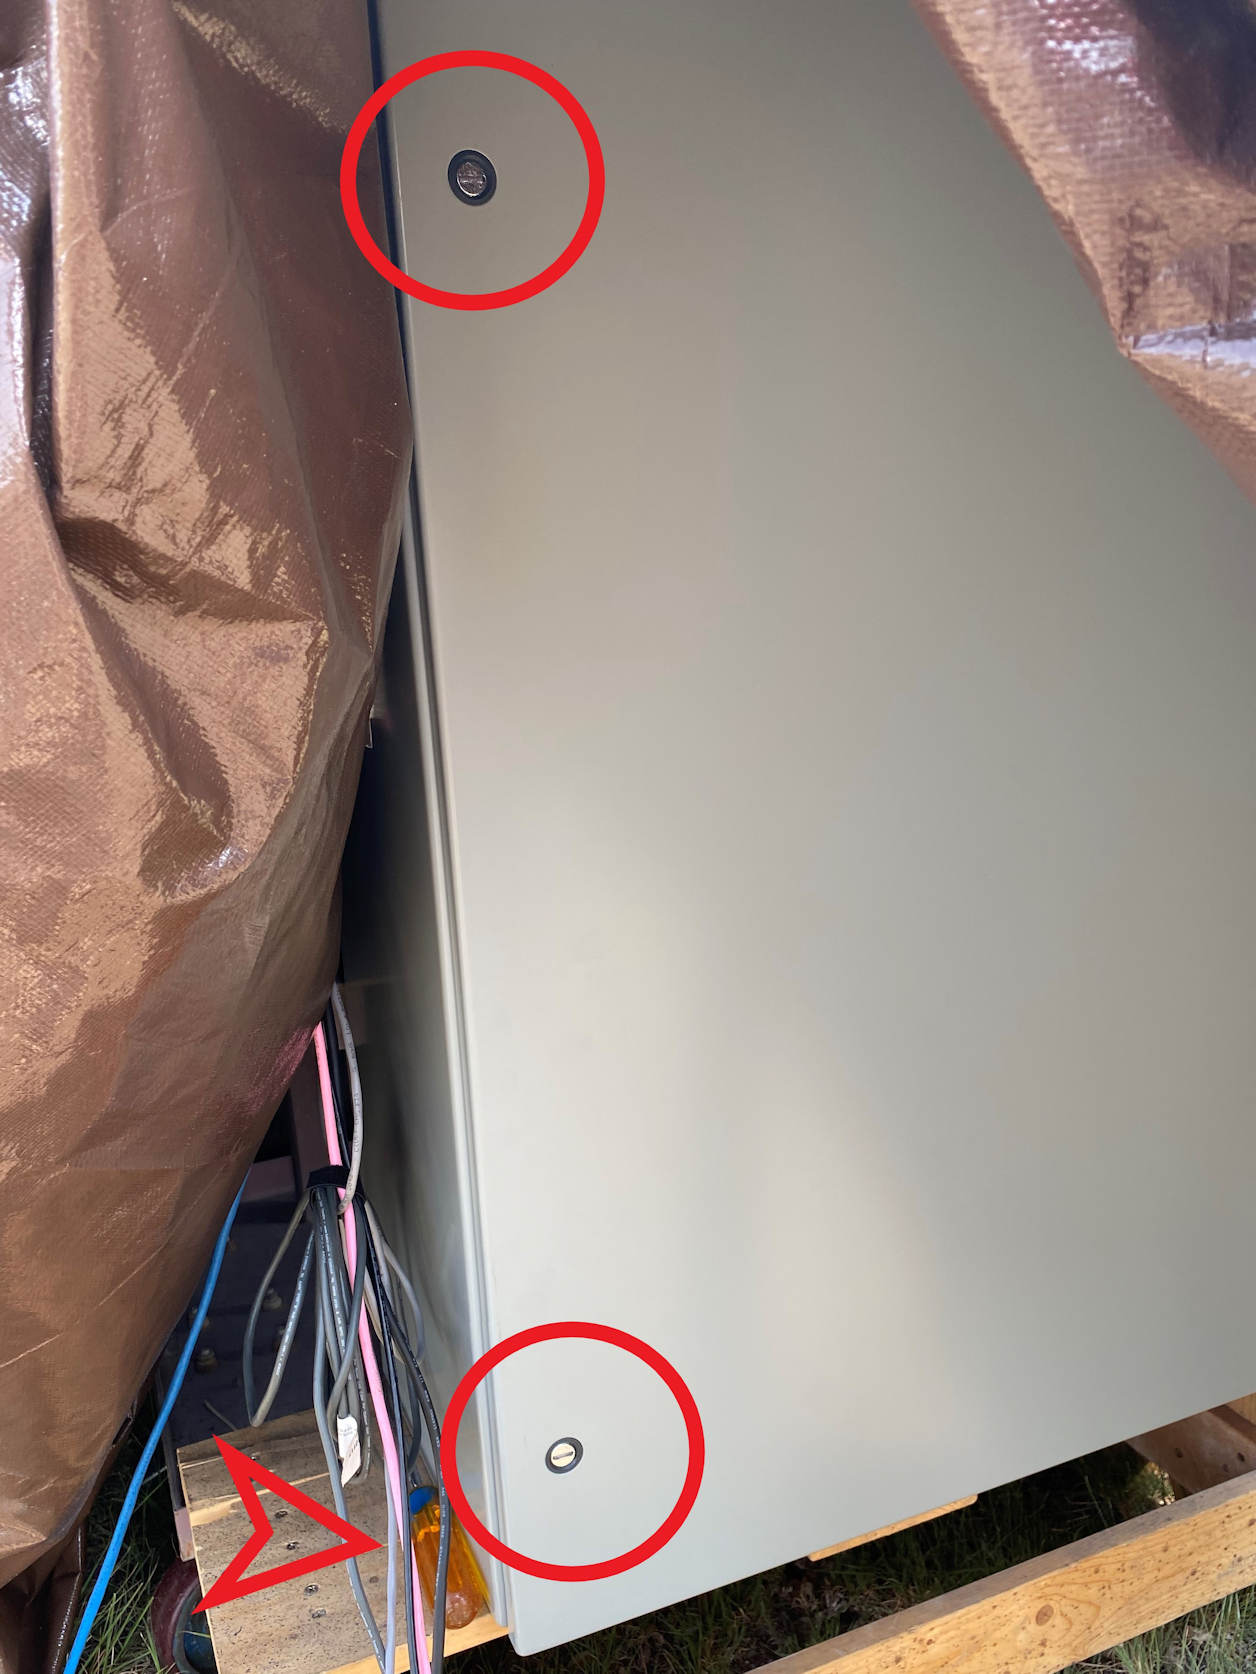
- Using the flat blade screw driver next to the gray enclosure, turn the two screws on the left side of the box 1/4 turn to unlock the enclosure. Leave enclosure open through the night to keep the temperature down.
Figure 1: Quarter turn latches (red circles) and flat blade screwdriver (red arrow). Turn counter clockwise to open, clockwise to close.

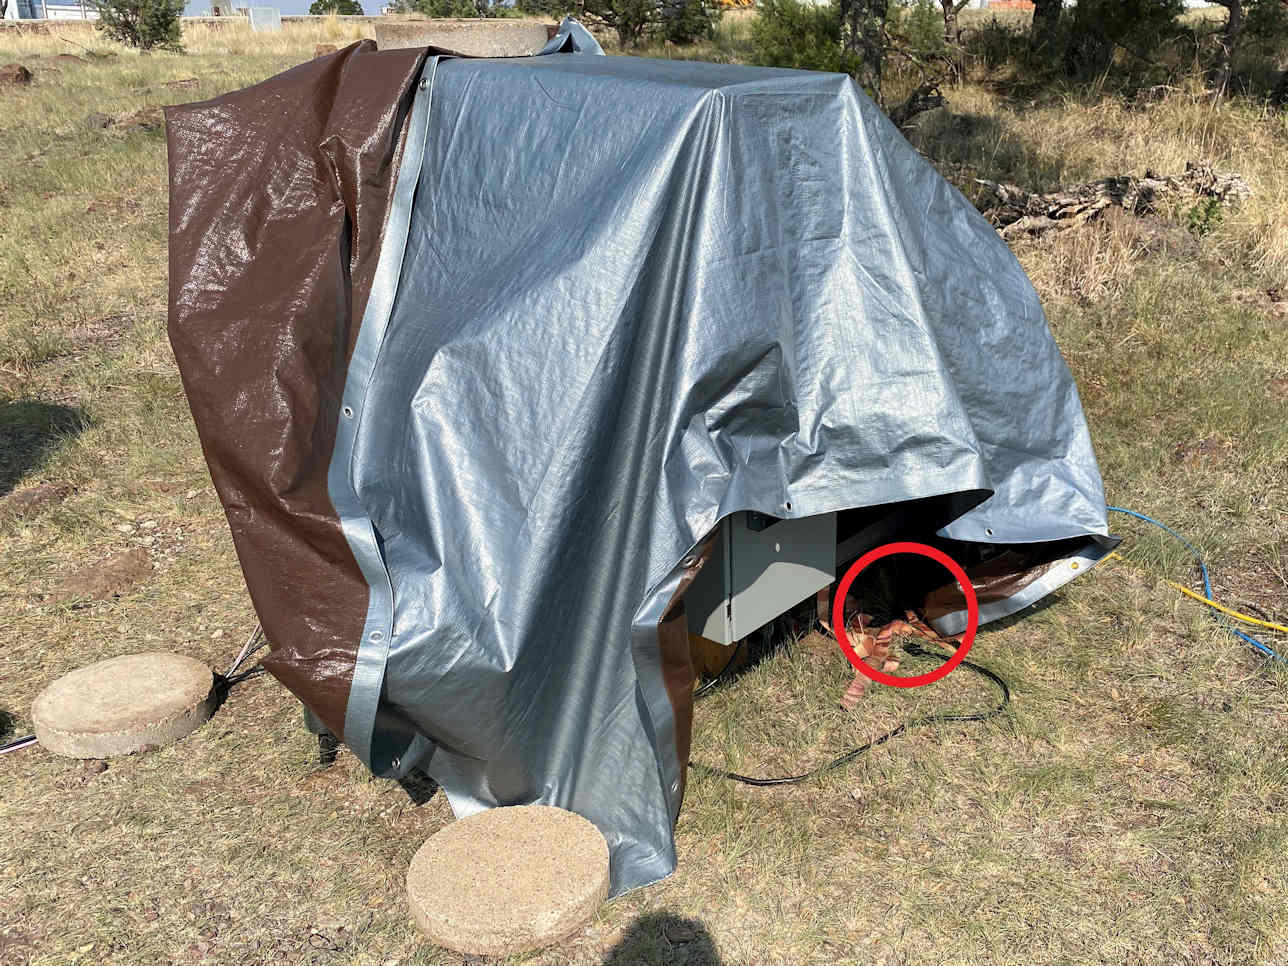
- Plug the enclosure in, the cord is on the ground on the right side of the enclosure. It takes a short period of time for power to come on to the things in the enclosure. This is a good time to setup DIMM1.
Figure 2: Plugging in the enclosure.

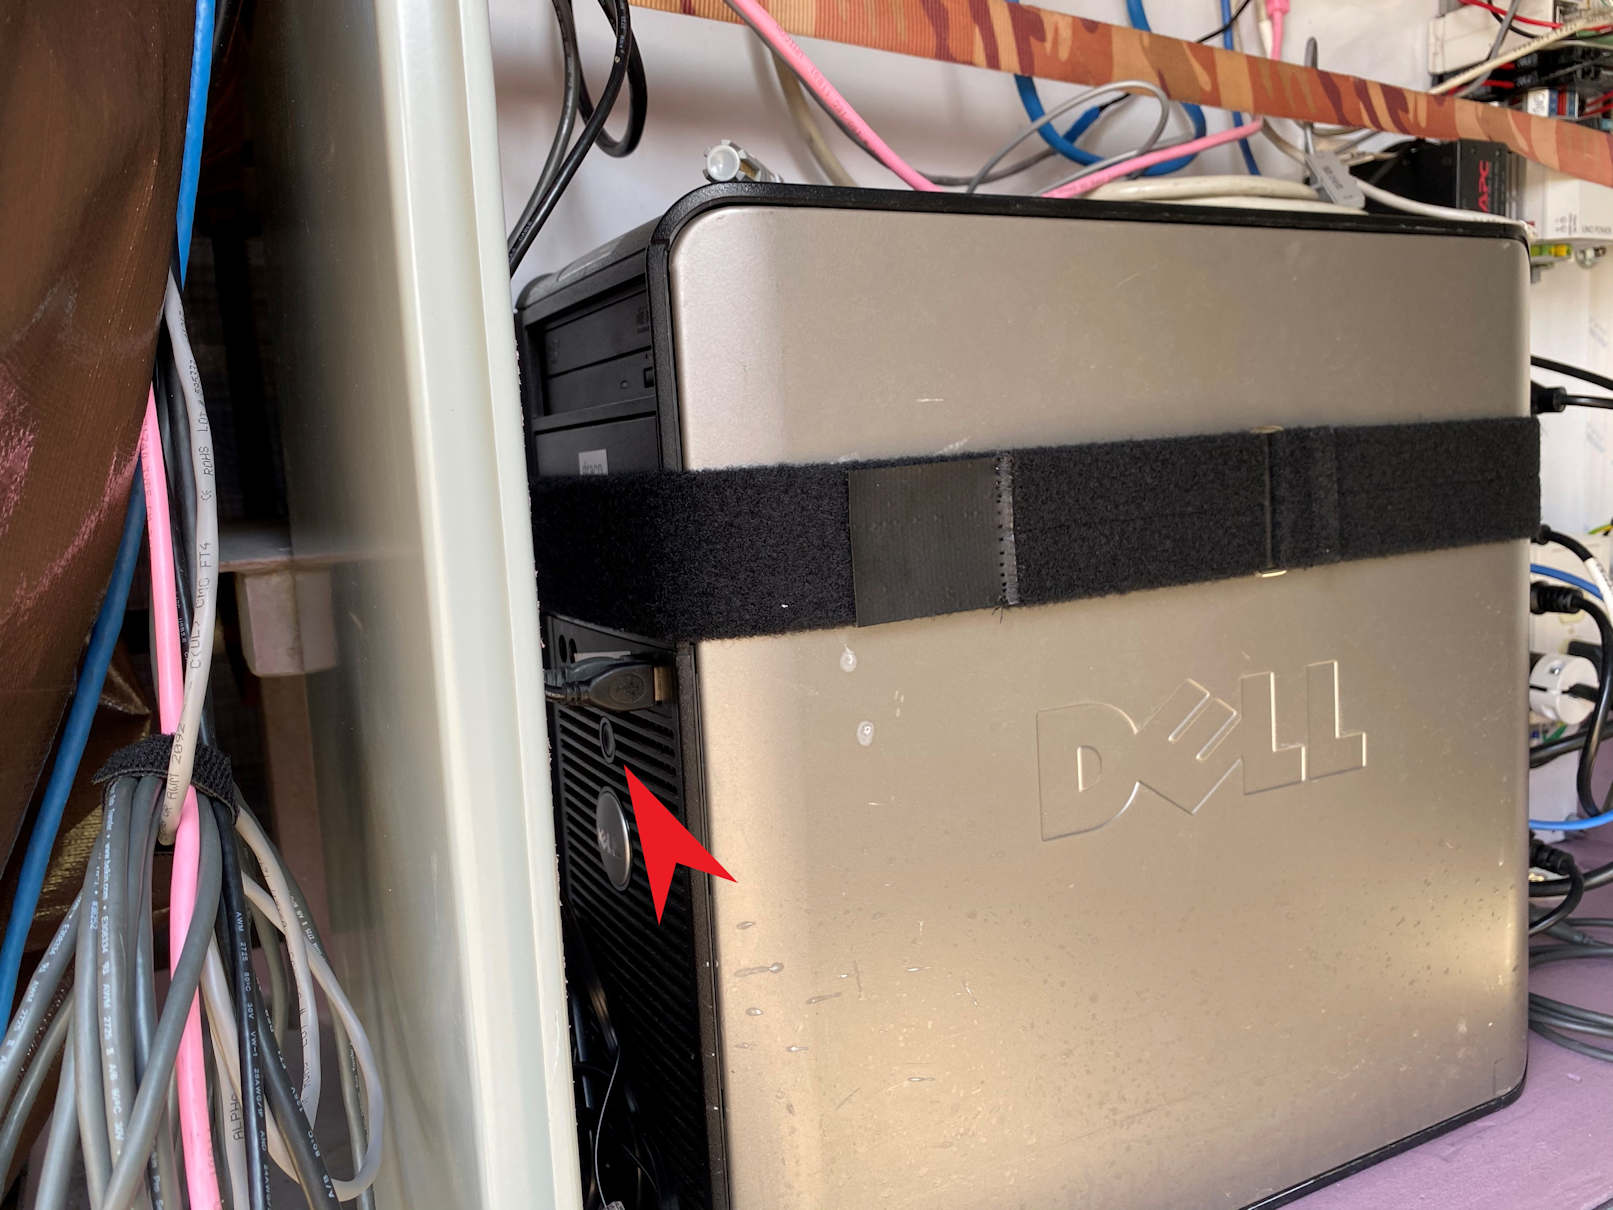
- Turn on the telescope via the rocker switch on its base (If you do this after the computer you will need to restart the computer from home via "shutdown /r"). In the enclosure, turn on the CCD controller box by the switch on top (Figure 3). The CCD fan should be on now. Turn on the desktop computer by the push button on the front (Figure 4).
Figure 3: The CCD controller box is mounted in the enclosure. The position of the switch is marked with a red arrow.

Figure 4: The computer power button is located on the front face marked in this photo by a red arrow.

- The remaining steps should be able to be done remotely on a normal night.
- On MCS start the DIMM2 remote desktop. The login name is DIMM and it has the usual password. Once logged in, start the CPWI software, the icon looks like the following:
- Once you open the CPWI software connect to the telescope. Mouse over the word "Connection" on the left hand side, in the menu that expands out click "hand controller" (Figure 5). The telescope should be connected shortly after.
Figure 5: Connecting to the Telescope.
- Under normal condition the telescope has already been aligned and that alignment saved (unless moved by hand or pushed hard enough to slip on the clutches). When you connect to the telescope it will ask you if you would like to un-park the telescope (Figure 6). Choose to un-park the telescope.
Figure 6: After connecting to telescope it will ask if you would like to Un-Park it.
- From here you should be able to click and drag the sky changing the part that is viewed. Find the star you would like to move to and click on it. Note: Please pick stars in the north since the cables seem to easily be caught on things mounted on the pier in this configuration. Then click "Goto" in the box that appears. The telescope should slew to the object you are interested in. The telescope's current pointing is represented by a green circle with the target location represented by a smaller yellow circle.
- The telescope should now be roughly pointed at the star of interest. To line it up for taking seeing measurements we will use the guide telescope and Orion Starshoot Autoguider via PHD2 guiding software. To start the PHD2 software click the start button, it should be in the menu that appears (Figure 7).
Figure 7: Start menu showing PHD2 icon.
- Once the PHD2 software is loaded you will connect to the camera by clicking the USB icon in the bottom left corner (Figure 8).
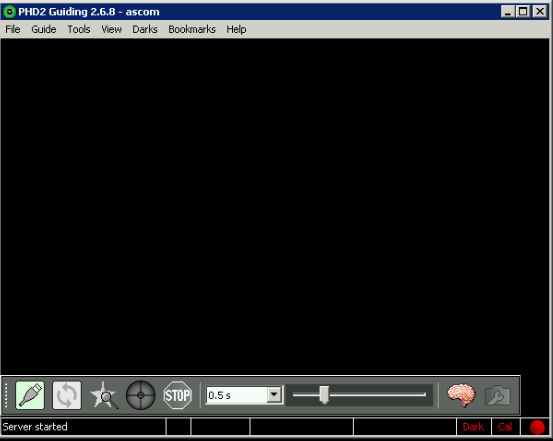
Figure 8: USB icon in the bottom left corner of PHD2 software.
- In the connection menu, select Starshoot Autoguider for camera and On-Camera for mount (Figure 9). This should be the default for the St-4 equipment profile which can be selected in the drop down menu at the top of the window. Click Connect all at the bottom and close the menu. Under view menu select bullseye (Figure 10).
Figure 9: Connecting to camera and mount for autoguiding.
Figure 10: View after bullseye has been chosen. Refresh icon starts looping images, stop icon stops images.
- Hit the button that looks like a refresh button from a browser. This will start the images in the PHD2 software.
- If all is working properly you should now see the star of interest in the autoguider field of view. Center the star on the bullseye using the slew controls in the Celestron software under mount menu (Figure 11).
- Start DIMM software, it will give an error about not being able to connect to the telescope. It will ask if you would like to continue anyways. Select yes to continue to the normal software. Select “take images” to see that the star is in the DIMM field of view. If it is in the field of view center it with the CPWI hand paddle controls by mouse-ing over the word mount in the Celestron software and selecting slew controls (Figure 11). You will want to lower the rate with the arrows at the bottom of the slew controls that pop up. Once spots are positioned where you would like, select “start seeing measurements.” Unfortunately we do not have guiding solved yet so periodically it will need to be centered up by the user until this issue is solved.
Figure 11: How to show the slew controls.
Using the Focus Motor:
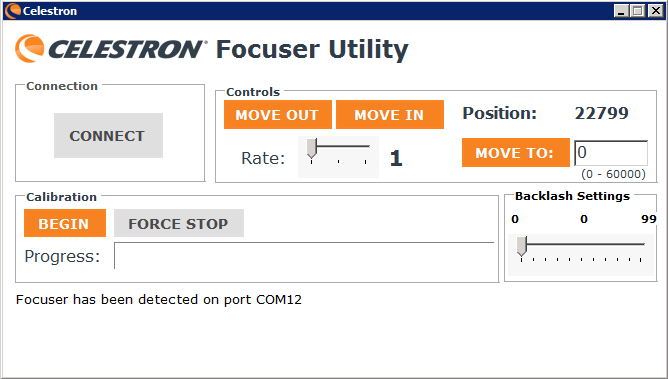
- In the start menu open the Celestron Focuser Utility (Figure 12)
Figure 12: Opening the Focus Utility.

- Hit "Connect" and set the rate to 1. This is plenty fast for the adjustments we are doing (Figure 13).
Figure 13: This is how the focuser utility should look when setting are correct.

- Mouse click on the "Move Out" or "Move In" buttons briefly to adjust the focus. "Move Out" will increase the separation between the points. "Move In" will decrease the separation between the points.
- Close Celestron Focuser Utility when done focusing.
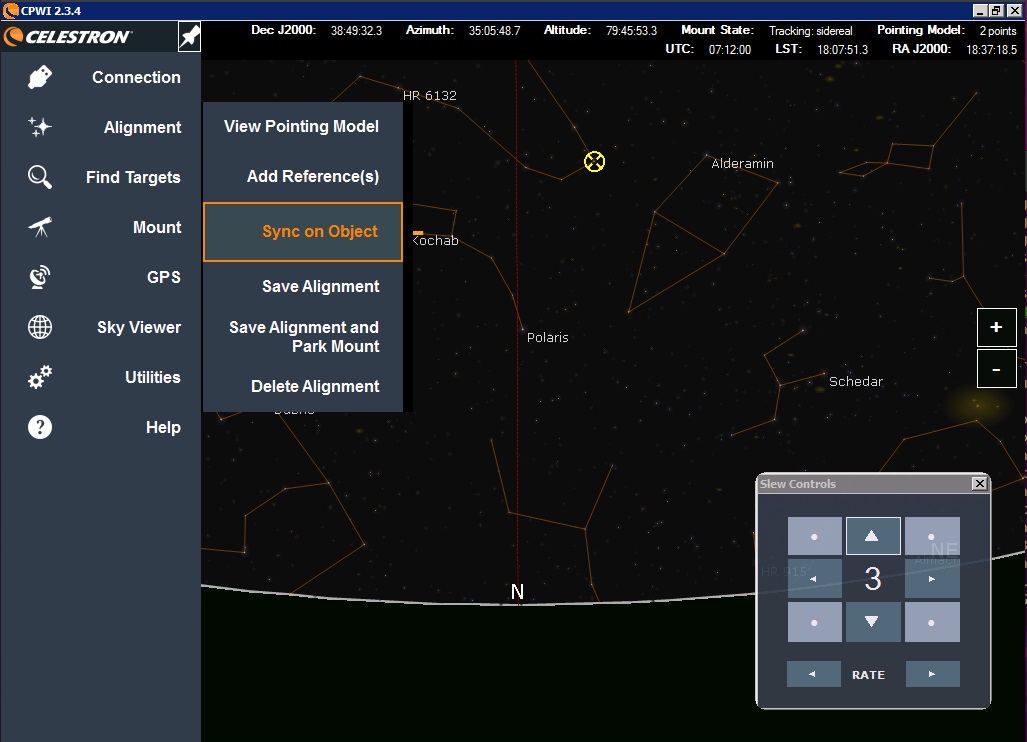
Syncing on Star or Adding References:
Syncing on a star resets the reference of the pointing to match any changes since alignment. This can sometimes help if the telescope is drifting a lot. Adding a reference adds the position of another star to the pointing model of the telescope. The steps are similar between these two procedures.
- In the alignment tab of the Celestron Software(CPWI), you will see the options to either "Sync on Object" or "Add Reference(s)." Select the desired action.Note: When you click on an object as normal their is an "Add to Model" option to the right of "Goto", this will bring you through the same process as the Add Reference(s) button.
- The telescope will then prompt you to select the star that you would either like to sync on or add to the pointing model.
- Once you click on the star the software will prompt you to Goto this object. Click "Goto" in the box at the bottom of the screen.
- Center the star and then hit centered or finish.
- Depending on the action you selected in step 1, the telescope will either be synced on this object or a new star will be added to the pointing model.
Note: The telescope will move a little after you have centered the star and synced on it. You will need to re-center the star to commence taking DIMM data.
Using Wide Feild Finder Camera:
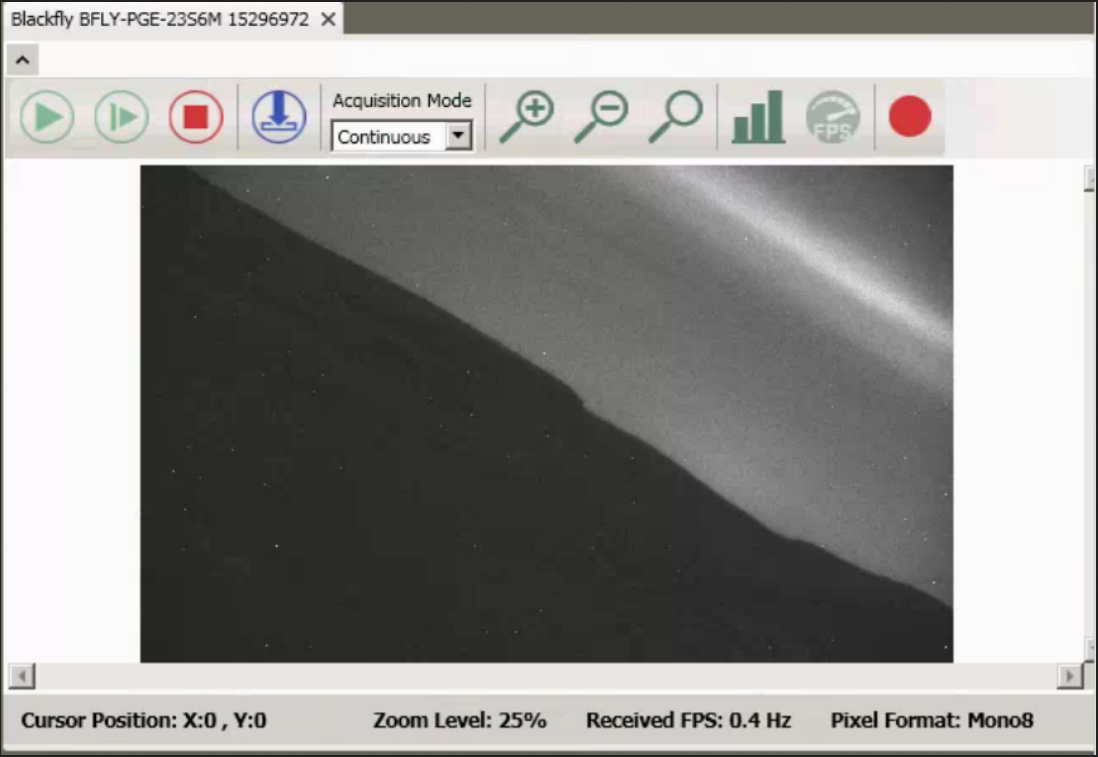
If you cannot find the star in the guide camera and need to use the wide field finder camera below is the basic procedure. Warning! The spinview software is very powerful and as a result is very complex. This software may take some getting used to.
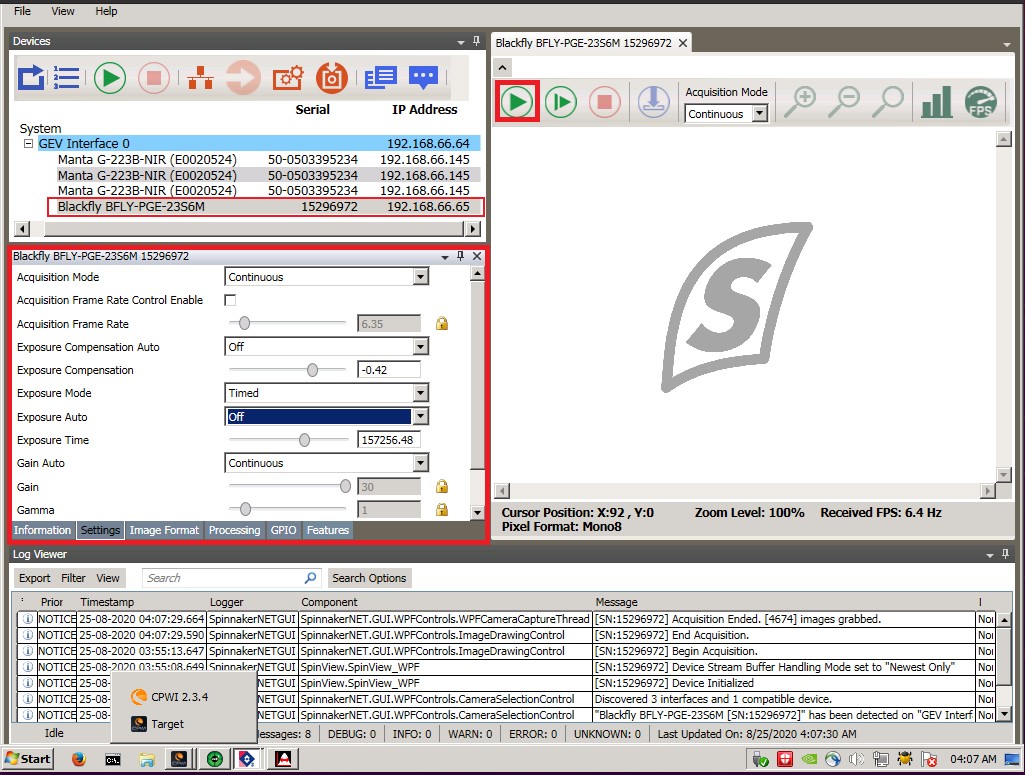
- Open Spinview from the start menu.
- Click on the camera labelled Blackfly BFLY-PGE-2356M
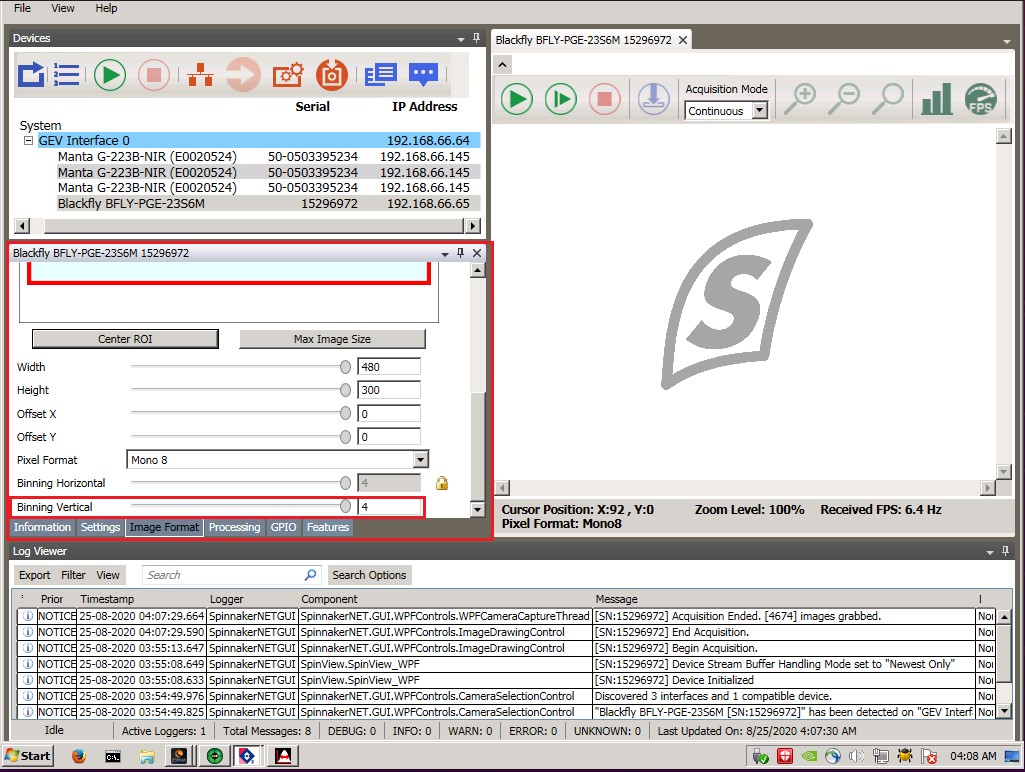
- Set Binning Vertical to 4 in Image Format setting tab below. This will also set Binning Horizontal to 4. This option cannot be changed while images are being taken. (Figure 14)
- In the Settings tab the following should be the settings (Figure 15): Acquisition Mode = Continuous Acquisition Frame Rate Control Enable = not checked Exposure Compensation Auto = Off or Once Exposure Mode = Timed Exposure Auto = Off Gain Auto = Continuous
- In the window to the right hit the play icon. This should star images. The exposure time is adjustable by dragging the slider in the Settings menu.
- Hopefully once everything is adjusted so you can see stars on the right side screen, you will see the star your interested in. If the camera has not been bumped heavily since writing this the position you need to move the object of interest to is X,Y=260,180 (20200829). It would be a good idea to check this position periodically.
- After you have moved the star to the desired coordinates, check that it is now visible on the finder camera via PHD2 software. If it is you can now close spinviewer.
Figure 14: Image Format settings tab.

Figure 15: Spinviewer Settings tab. These settings seem to work best for me.

Shutdown Procedure:
- BEFORE powering off the system, click the shortcut (this is the red apple icon) labeled on the MCS desktop to transfer DIMM data. To confirm that data files have been transferred you can check in /hetdata/data/ImageQuality/YYYYMMDD/DIMM.
- Close DIMM software, wait for the CCD to warm up.
- Hit the stop button in the PHD2 software and close it.
- In CPWI software under Alignment, select "Park and Save Alignment" as seen in Figure 16.
- It will ask you if you would like to park it here or the previous position. Select the previous position, it should slew to zenith and park itself.
- At this point the Celestron software will ask if you would like to disconnect the telescope, click the Disconnect button in the menu, then close the software.
- Open the command or CMD prompt and issue command "shutdown /s". There is a black icon on the task bar with the letters CMD in it. The prompt can also be opened by clicking the start button and typing CMD into the search box.
- Go up to the remotely located DIMM. If all has worked as intended, the telescope is parked similar to how you found it at the beginning of the night. If it is, turn the power off via the rocker switch on the telescope base. If it is not, and the cables are wrapped up, loosen the clutches, unwrap the cables and point the telescope manually at Zenith. The telescope will need to be realigned the next night.
- Turn off the CCD controller in the enclosure on the ground.
- Put the front cover on the guiding scope and carefully put the telescope cover over the whole assembly. This consists of putting the cover over the telescope, zipping the cover up (note it will not zip completely), and fastening the strap around the base of the telescope.
- Unplug the power cable on the ground at the right side of the enclosure. Close the enclosure door and secure the two screw latches using the flat blade screwdriver next to the enclosure.
- If the telescope did not park properly or the cables were found wrapped up the telescope will need to be realigned the next evening. See alignment instructions below.
- Note in the timeline section if the auxiliary DIMM was run and whether the conditions were good or not.
Figure 16: Save alignment and park the telescope.
Manual Alignment:
I find that the easiest way to accomplish this is to unplug the USB cable from the hand paddle and align the telescope using the hand paddle first. Once the 2 or 1 star alignment has been performed, Tell the telescope to Goto Polaris. From there slew down until the tube is level (the arrows on one of the forks will be aligned). This puts the telescope very close to north and level which makes aligning using the computer software much easier.
Manual Alignment Via Hand Paddle:
- Disconnect USB cable from the bottom of the hand paddle.
- The telescope should prompt you to align it, if it does not flip the rocker switch off then back on.
- Choose easy 2 star alignment and don't hit anything. The GPS fix will be taken and then it will ask you to pick a star to align on.
- Celestron expects that you try to center the star in the finder first and hit enter. Then you will align in the regular eye piece and hit align once centered. It will then ask you to pick a second star. When you pick this star the telescope will slew to the approximate position of the star you chose.
- Center the second star in the finder and hit enter, center in the eyepiece and hit align. If the alignment is successful the hand paddle will inform you.
- If you will be using the CPWI software you will want to tell the telescope to Goto Polaris.
- Once at Polaris, use the down arrow to move the scope till the tube is parallel to the ground (level).
Manual alignment in CPWI:
- If you have the telescope parked pointed north and the tube is level you can begin this procedure.
- Connect the USB cable to the hand paddle if not already connected.
- Start the CPWI software on the DIMM computer and connect to the telescope. Under the connection menu select “hand controller.”
- Once connected under the mount menu select slew controls then under the align menu select perform alignment.
- Wait for the GPS to get the appropriate time and location then choose manual alignment.
- Follow the menu instructions. It will recommend certain stars using yellow marks. You do not need to use these, but they will be nice and bright. Stay in the northern part of the sky for your alignment stars.
- Pick a star and click the Goto button in the menu at the bottom of the screen. It will assume the telescope is currently pointed north and the tube is level. If the telescope is accurately in that position, it will go to the star you have selected. You will want to center each star where the DIMM FOV is. For the first star using the guide camera put the star in the center of the guide camera FOV. Check to see the star is visible in the DIMM field of view. If so center it in the DIMM field of view and note the position on the guider camera. For the next few stars you can just center on the position you found on the guide camera. I usually do 3 to 4 stars spanning both east and west of the meridian in the northern part of the sky.
- Once you have completed the alignment you can exit the menu and select the star you would like to observe.
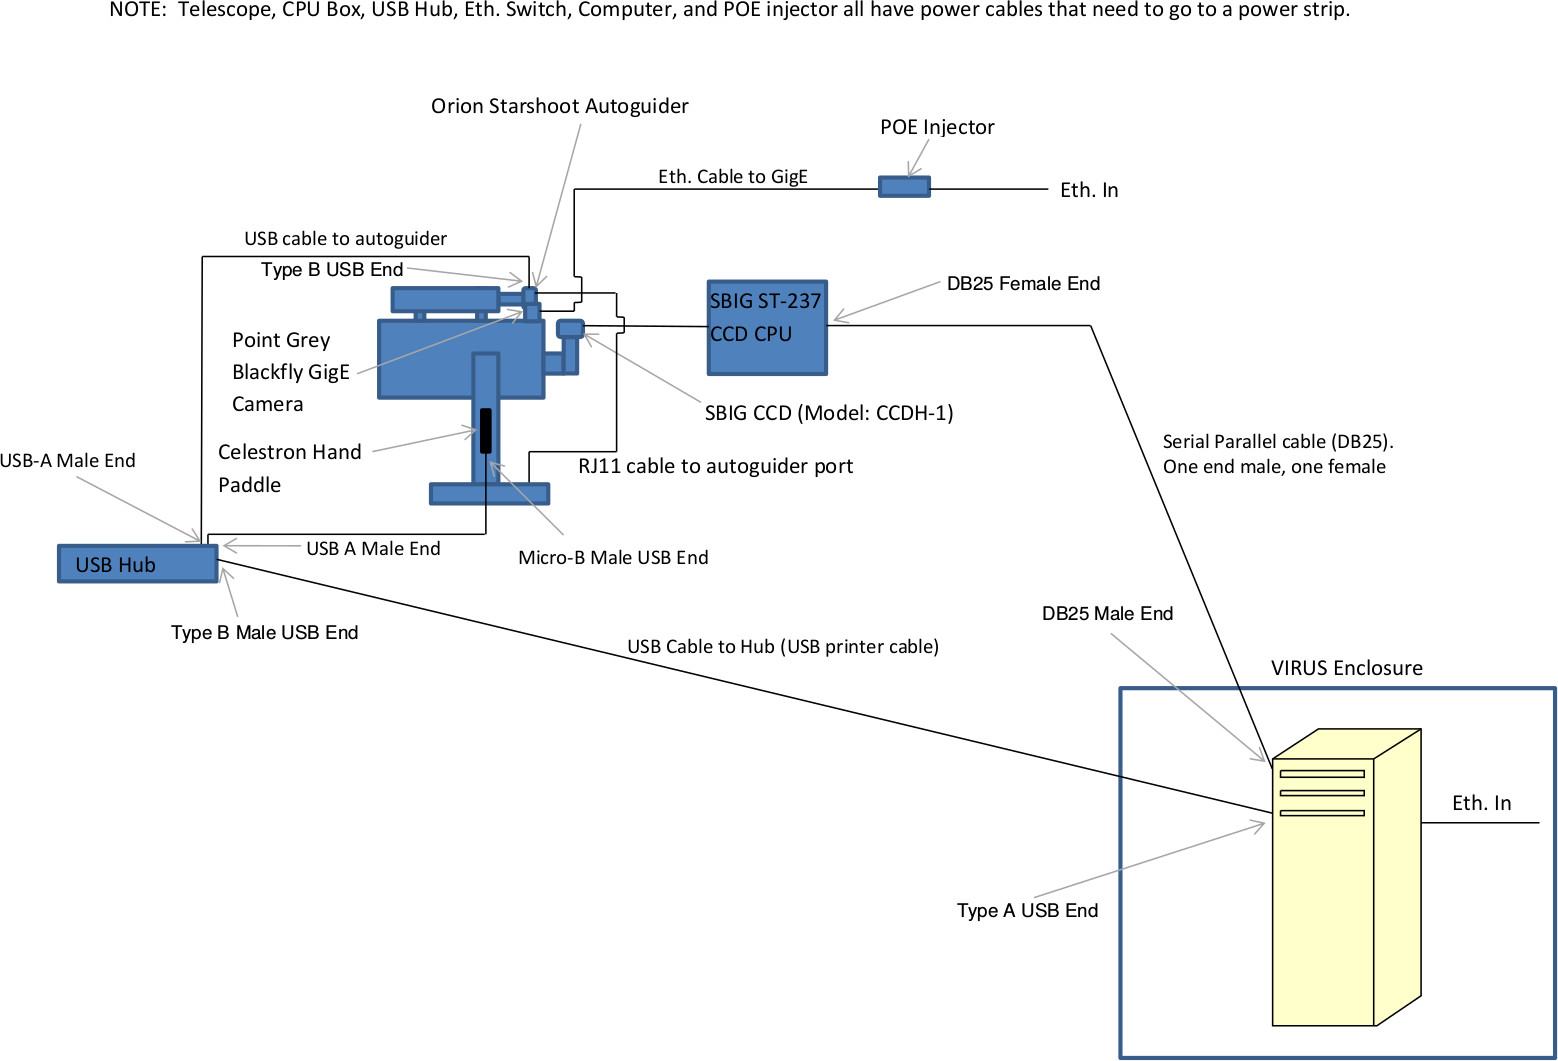
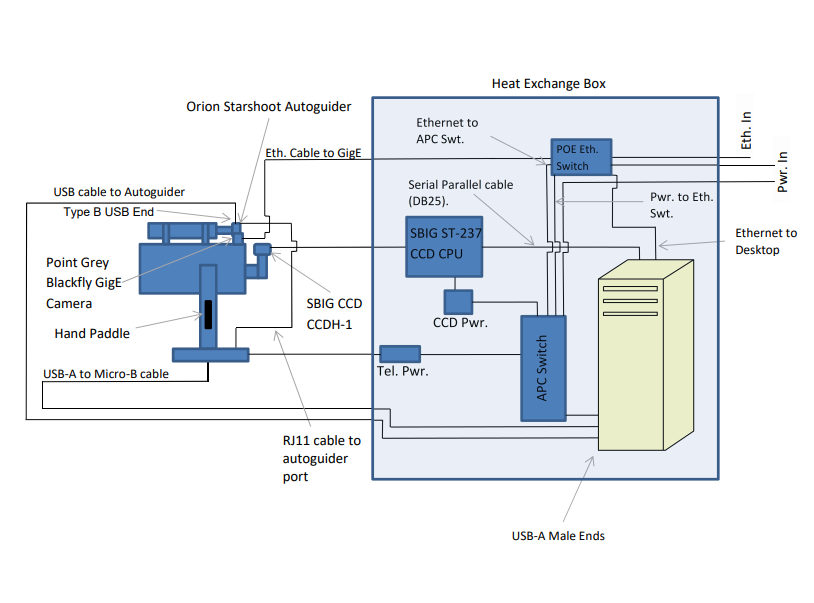
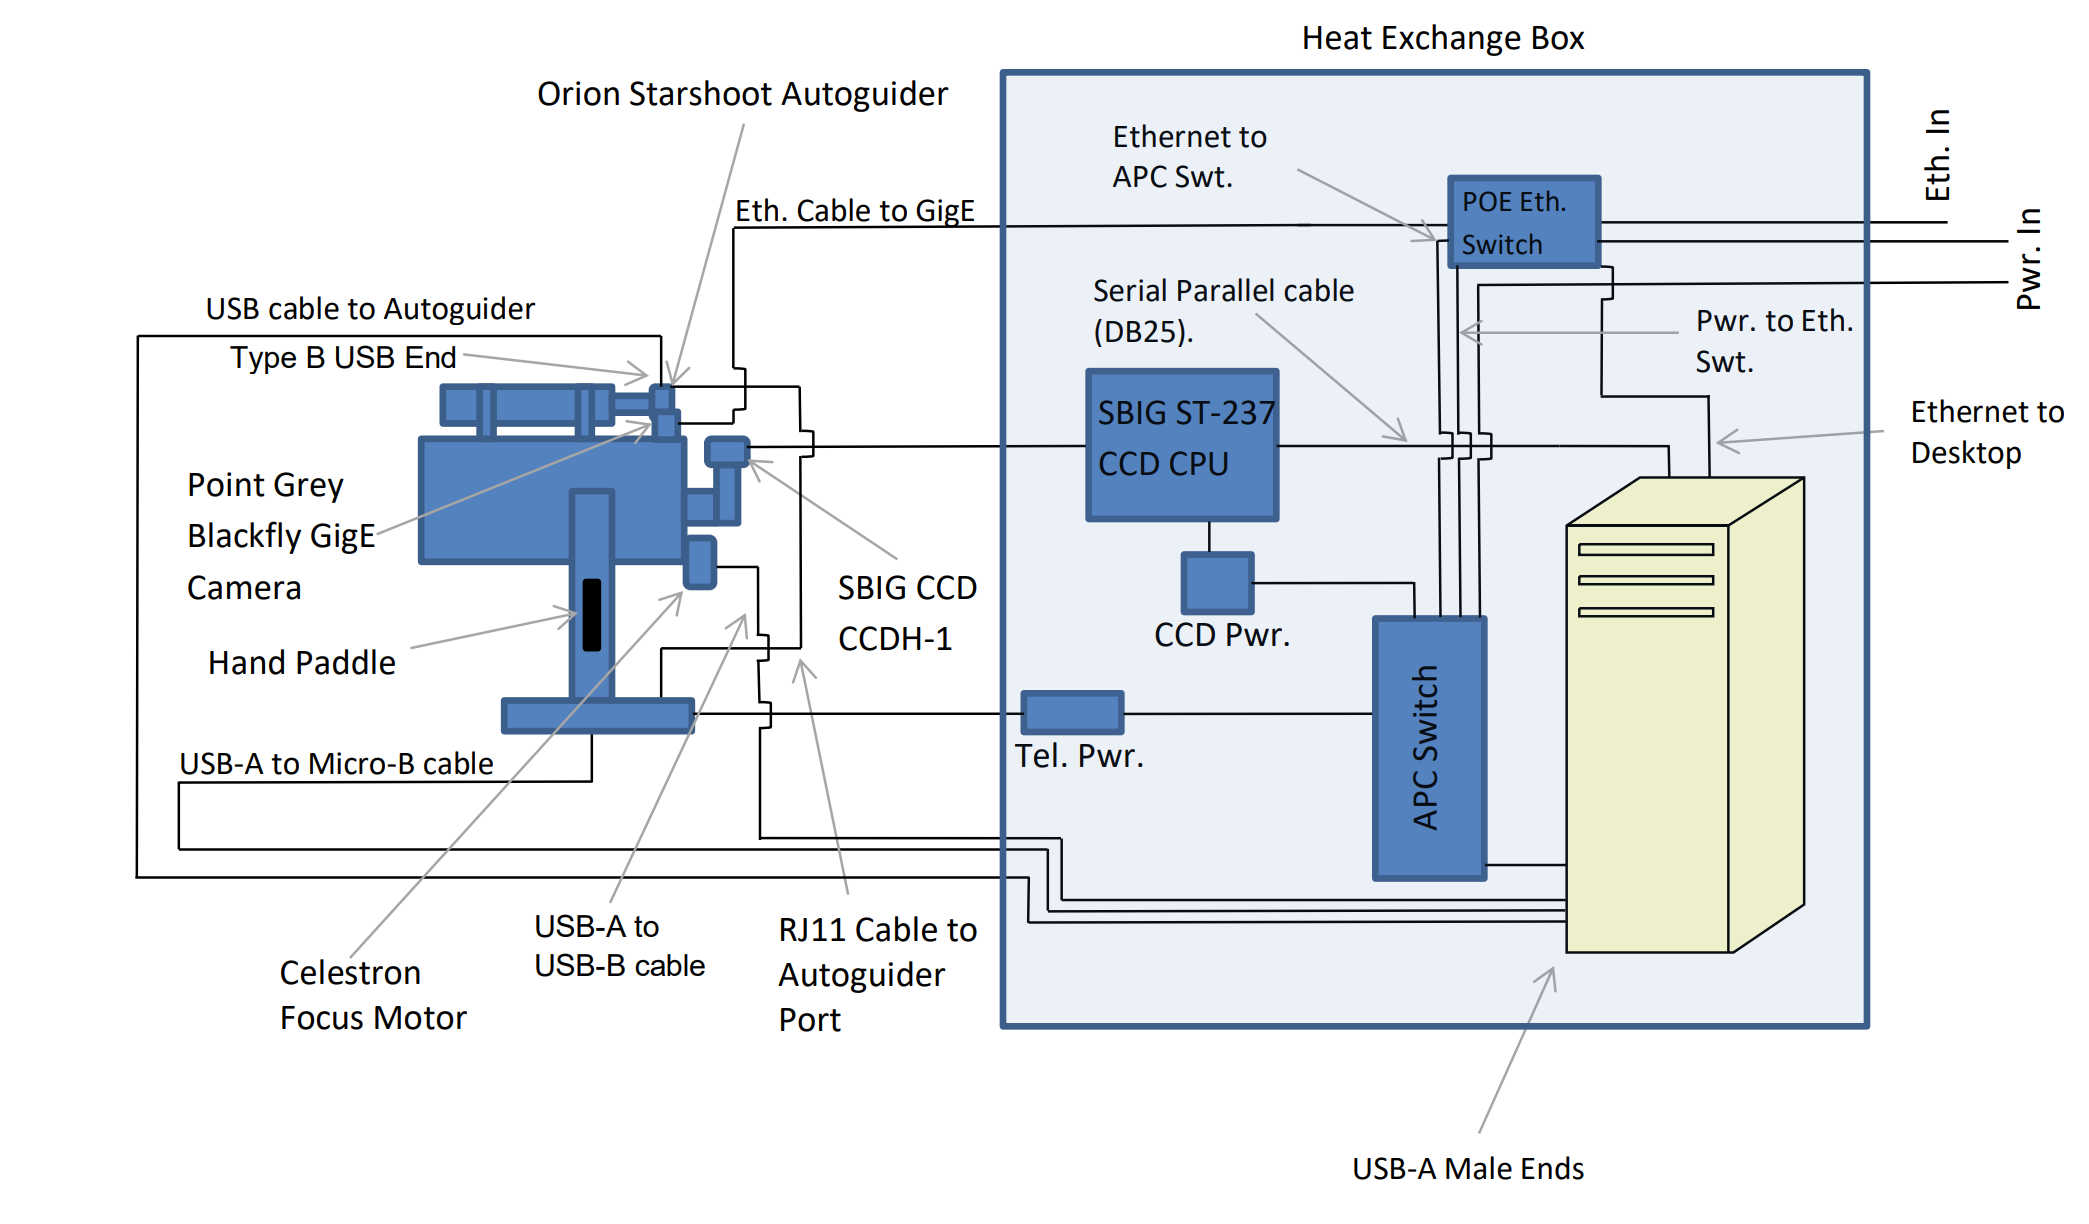
DIMM2 Details About Mounting on the Upper Hex
Below is a diagram of the cables/connections from Justen, as part of the planning process for mounting the 2nd DIMM on the upper hex:

To recover alignment if it is lost, consider two options:
- point at N horizon, use this screenshot of the N horizon on spinview/FLIR camera:

- close dome, struct=304.764, dome=324.40, point level and find this joint along the right-hand edge of the dome shutter opening
DIMM2 Instructions While Mounted on the Upper Hex
As of 17 Jul 2021, using Vega in DIMM2 at Az=280 If needed, can run a BSC like:
target_setup 999 W -cat bsc -ifu 000 -to -sharg "--az 280"
then modify the load trajectory command from target_setup to include az=280, like:
syscmd -T 'load_trajectory(ra=99, dec=99 equinox=2000.0, dir="WEST", object="cwfs", az=280)' >/dev/null
Set up on this like a normal high-speed CWFS test. Set up the DIMM2 during the target preceding this one, and tweak its position while the TO sets up on the target. When finished, save alignment and park mount (can be done during following science target).
DIMM2 Setup Procedure:
*NOTE:* While mounted on the upper hex the telescope should only be pointed within 90 degrees of the current HET azimuth. This is similar to not pointing to southern targets as the telescope will wrap up the cables.
During target prior to Highspeed CWFS target:
- During target prior to the one we wish to do the high speed CWFS test, log into the DIMM telescope control machine (machine with CPWI software): xfreerdp -u guider -p password 192.168.66.164 Where you replace password with the appropriate password. Since we have an absurd number of passwords, it is useful to remember that the "appropriate" password is the one involving that favorite cop pastry that the TO's use for almost everything.
- Then in a second terminal window access the remote desktop for using the PHD2 and DIMM GUIs for dimm2: rdesktop -u dimm -p mars**** dimm3 Here the password is that used for dimm1 (outside).
- If the power to the telescope is not on already, turn on the Telescope in the APC tab of the TCS GUI. Then turn on the CCD_Power via the APC tab of the TCS GUI.
- Start the CPWI software on the new machine opened with xfreerdp and connect to the telescope via the Hand Controller option if not already open, running and connected.
- Select Un-Park the telescope if the software was not already running (NOTE: If mount is already connected (no GPS), then all you will do is "Enable Tracking" in the Mount menu).
- Slew to the designated DIMM star for the current CWFS test azimuth by clicking on it and hitting "Go To". Example: Vega for Az=280
Once structure has set down at proper azimuth for Highspeed CWFS test:
- Open the PHD2 Guiding software on the older DIMM2 machine (the machine you connected to with rdesktop), connect to the Orion Starshoot Autoguider by hitting the usb icon on the bottom left of the window then hitting "Connect All". To start seeing images click the green circular arrows that look like a refresh button.
- Move star to position shown below in the autoguider field of view using the slew controls at a speed of 3 or 4 found under mount menu in CPWI software (see figures below). Using slit view option in Phd2, center the star inside the box that appears in the frame as seen in Figures 2 and 3.
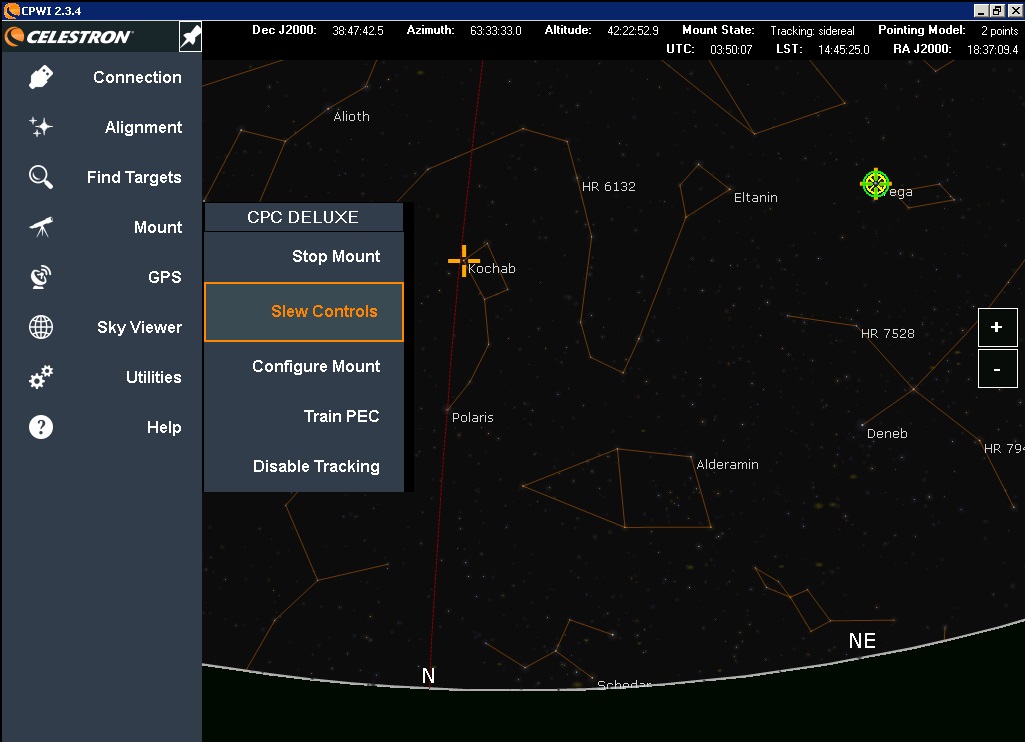
Figure 1: Open up slew controls to center the telescope on star of interest.
Figure 2: Selecting spectrograph slit view in the menu.
Figure 3: View after spectrograph slit has been enabled. Note the red box, center star in this box.


- Start DIMM software and start seeing measurements.
- Maintain star centering during CWFS test manually using slew controls in CPWI software.
Shutdown Procedure
- Exit DIMM software choosing to warm up the CCD.
- Exit PHD2 software.
- In CPWI software under Alignment, select "Park and Save Alignment" (as seen in Figure 8 above). Choose the previous park position if the telescope has acquired GPS lock. This will park the telescope so that it is pointed in line with the HET structure.
NOTE: If the telescope has not connected to GPS, it will not be able to park. Instead:- Choose "Mount, Disable Tracking"
- Click stars near the horizon to find one with azimuth as close as possible to 280 and altitude as close as possible to 0. Once you find one hit "Go To", this will get the telescope mostly to where we wish to leave it for the night.
- Use the hand paddle controls to slew the remainder of the way to Az=280.0, Alt=0 then Leave CPWI software on.
- Hopefully later in the night it will get GPS connection and you can park it. If not, leave the CPWI running, turn off power to the CCD in the TCS GUI and email Justen and Steven J. Do not continue to steps 4-6 unless it has been parked.
- Exit CPWI software once parked and disconnected.
- Turn off the CCD controller and Telescope in the APC tab of the TCS GUI.
- End High speed CWFS as usual.
DIMM2 specifications/details
- Telescope: Celestron CPC Deluxe 1100 HD 11" f/10 Edge HD Aplanatic Cassegrain with a 2800mm focal length.
- When pointed at zenith, it stands 91cm tall from the bottom of the base to the top of the aperture cover.
- CCD: ST-237A SBIG imaging camera system, and there is no focal reducer or filter in use.
- A remote-control focuser will be added to this setup at a later date.
- Also attached to the DIMM2 are:
- Orion CT80 refractor with StarShoot AutoGuider
- FLIR GigE camera (FLIR Blackfly S2.3Mpix, 5.86um pixel over 1920x1200) attached to a 200mm efl achromat
- Power analysis by George and Justen (from July 1, 2020):
- Celestron telescope power draw. Voltage is 12 VDC
- Slewing Az and El, 750 mA, 9 watts
- Slewing El only, 450 mA, 5.4 watts
- Tracking, 300 mA, 3.6 watts
- SBIG Camera Controller, Voltage is 12 VDC
- Current draw is 1.2 A for a total of 14.4 watts.
- Jim measured USB hub power at 12 VDC, 1 amp, so 12 watts
- Celestron telescope power draw. Voltage is 12 VDC
- Temperature/humidity sensor available at: http://192.168.66.102/
- web-cam on telescope available at http://dimm3-cam.as.utexas.edu
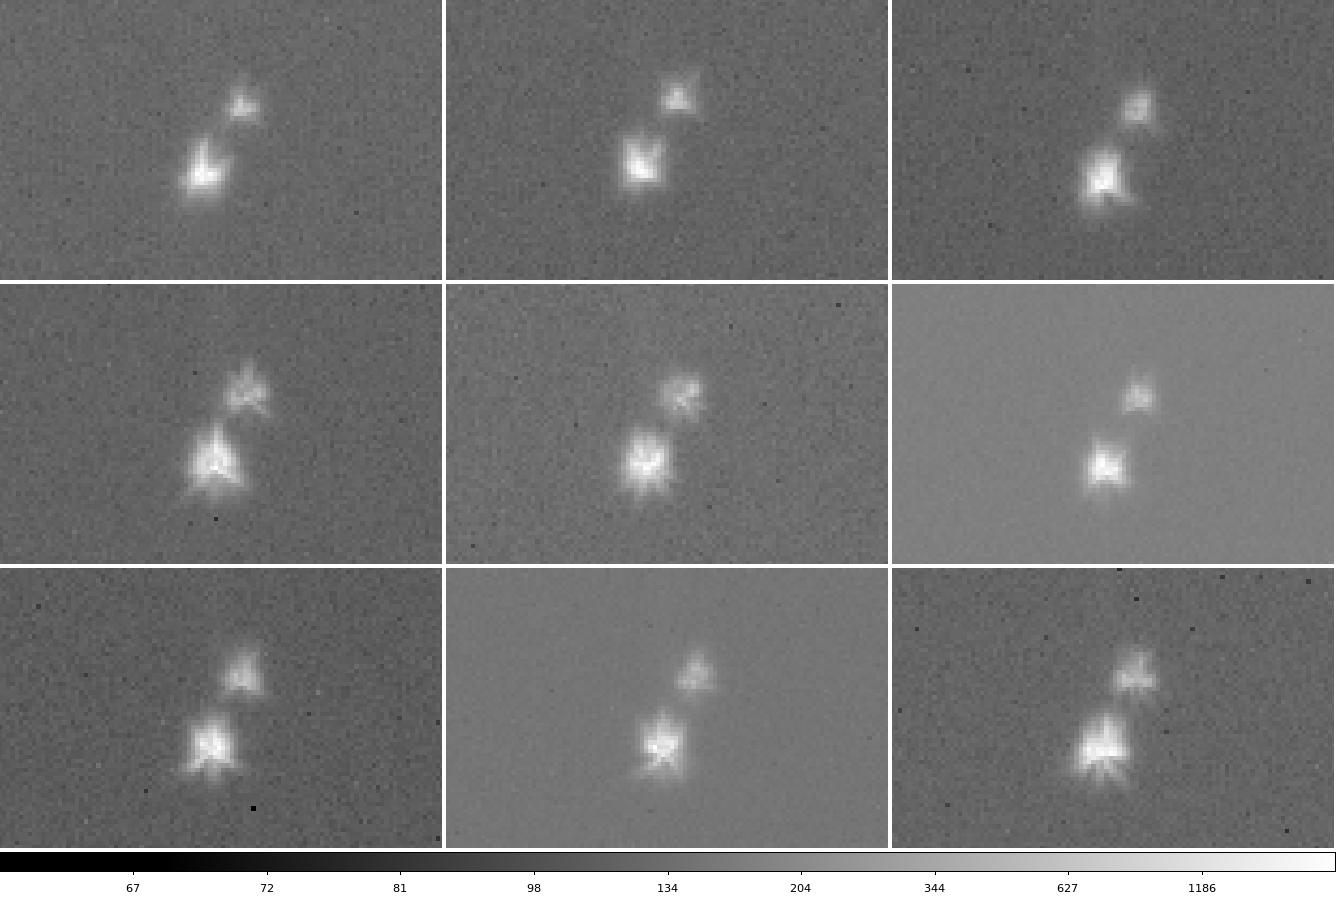
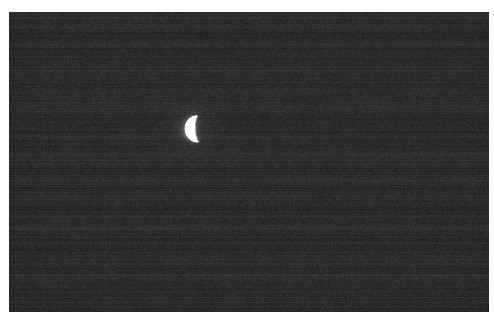
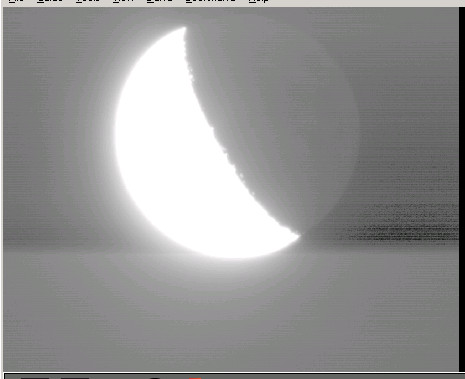
Below are photos of the crescent moon in both cameras (left: FLIR GigE; right: CT80 AutoGuider):


Currently (June 2020) we are using the custom DIMM software to run the CCD, Celestron's CPWI to run the telescope, and experimenting with various auto-guiding software solutions.
The DIMM2 is mounted on the external pier on the deck of the primary DIMM enclosure:

The plate scale on DIMM2 has been measured using Mizar as 0.47 arcsec/pixel (measured on YYYYMMDD ?? UT).
DIMM data is being stored nightly (copied at 13:00 UT) in /hetdata/data/ImageQuality/YYYYMMDD/DIMM/ in folders called DIMM (primary DIMM on tower) and DIMM2 (secondary DIMM, currently mounted on exterior of tower).
Note that the dimm3 computer (2nd dimm) is available at: 192.168.66.64
rdesktop -u dimm -p mars2719 -g 1024x768 192.168.66.64
Note that the dimm2 computer (primary dimm) is available at: 192.168.66.20
Attachments (40)
- CCDPowerCompressed.jpg (199.4 KB) - added by stevenj 4 years ago.
- ComputerPowerCompressed.jpg (203.9 KB) - added by stevenj 4 years ago.
- CPWIicon.png (23.0 KB) - added by stevenj 4 years ago.
- dimm1_mizar.jpeg (102.6 KB) - added by stevenj 4 years ago.
- dimm2_site1_same.jpg (239.6 KB) - added by stevenj 4 years ago.
- dimm2_site3_same_20200909.jpg (224.1 KB) - added by stevenj 4 years ago.
- DIMM2CableDiagram2.jpg (136.9 KB) - added by stevenj 4 years ago.
- DIMM2_map.jpg (205.1 KB) - added by stevenj 4 years ago.
- DIMM2_map_2020_08_05_lo.jpg (190.2 KB) - added by stevenj 4 years ago.
- DIMM2_map_2020_10_14_lo.jpg (205.1 KB) - added by stevenj 4 years ago.
- dimm_bothvega.jpg (238.8 KB) - added by stevenj 4 years ago.
- dimm_on_enclosure.jpg (170.0 KB) - added by stevenj 4 years ago.
- dimm_vega_other.jpg (232.7 KB) - added by stevenj 4 years ago.
- Disconnect.jpg (162.7 KB) - added by stevenj 4 years ago.
- Fig1ConnectingHandPaddle.jpg (202.6 KB) - added by stevenj 4 years ago.
- FocuserSettings.jpg (153.3 KB) - added by stevenj 4 years ago.
- FocuserSettings.2.jpg (153.3 KB) - added by stevenj 4 years ago.
- LatchesCompressed.jpg (202.7 KB) - added by stevenj 4 years ago.
- MasterPowerCompressed.jpg (205.0 KB) - added by stevenj 4 years ago.
- moon_flir_crop.jpg (29.3 KB) - added by stevenj 4 years ago.
- moon_starshot_crop.jpg (24.9 KB) - added by stevenj 4 years ago.
- OpenFocusUtility.jpg (198.2 KB) - added by stevenj 4 years ago.
- OutsideEnclCompressed.jpg (203.0 KB) - added by stevenj 4 years ago.
- PHD2_bullseye.jpg (229.3 KB) - added by stevenj 4 years ago.
- PHD2_Connect.jpg (129.8 KB) - added by stevenj 4 years ago.
- PHD2Main.png (20.6 KB) - added by stevenj 4 years ago.
- RemoteSetup.jpg (203.1 KB) - added by stevenj 4 years ago.
- SaveAlignmentandPark.jpg (164.6 KB) - added by stevenj 4 years ago.
- Screenshot from 2020-06-18 04-14-05.jpg (37.5 KB) - added by stevenj 4 years ago.
- SlewControls.jpg (170.6 KB) - added by stevenj 4 years ago.
- SpinImageFormat.jpg (230.6 KB) - added by stevenj 4 years ago.
- SpinSettings.jpg (229.5 KB) - added by stevenj 4 years ago.
- SyncOnObject.jpg (173.7 KB) - added by stevenj 4 years ago.
- unpark.jpg (121.2 KB) - added by stevenj 4 years ago.
- DIMM2Diagram20201103.png (91.5 KB) - added by justenp 4 years ago.
- DIMM2Diagram20201122.jpg (201.2 KB) - added by justenp 3 years ago.
- dimm_N.png (246.8 KB) - added by stevenj 3 years ago.
- centered_PH2_20201128.png (18.9 KB) - added by justenp 3 years ago.
- slitview20211012.jpg (152.9 KB) - added by justenp 3 years ago.
- slitviewbox20211012.jpg (195.2 KB) - added by justenp 3 years ago.