| Version 65 (modified by stevenj, 7 months ago) (diff) |
|---|
Post FPA taken down science procedures
see also the HET Box folder containing more information:
https://utexas.box.com/s/05ox0s5skp84ydg1sa7hl75o50oee1iv
- Closed dome tests after FPA is reassembled and PFIP/FCU are available:
- Tests during first twilight on sky:
- First night tests on-sky:
- Further refinement on-sky:
- external link to Steve's documentation about his alignment/analysis codes
Closed dome tests
These tests should be carried out as soon as OPS is finished on the afternoon when the FPA is re-mounted and available for use. The first step is to archive the older Marker values and update this page.
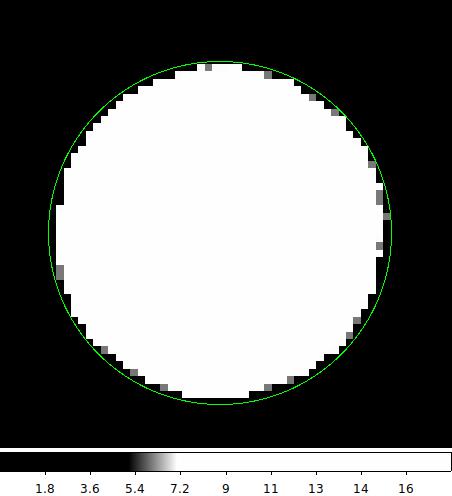
Measuring BIB CFB center
- Open the PFIP shutter
- Deploy the FCU head
- Select an FCU lamp and fiber combination to get good flux on the BIB. Be sure to open the FCU shutter with a decent exposure time.
- Mar2022: used QTH lamp, red light guide; 0.01s exposure on BIB.
- Save some BIB images.
- Use ds9 to measure the center of the CFB (can use circular region by eye).
- be sure the last results are saved under "old results on the wiki"
- update the wiki value for the BIB center.
- This should be the CRPIX value for the BIB as well so these numbers should be given to the software team for updating in TCS (note these are in units of binned pixels).

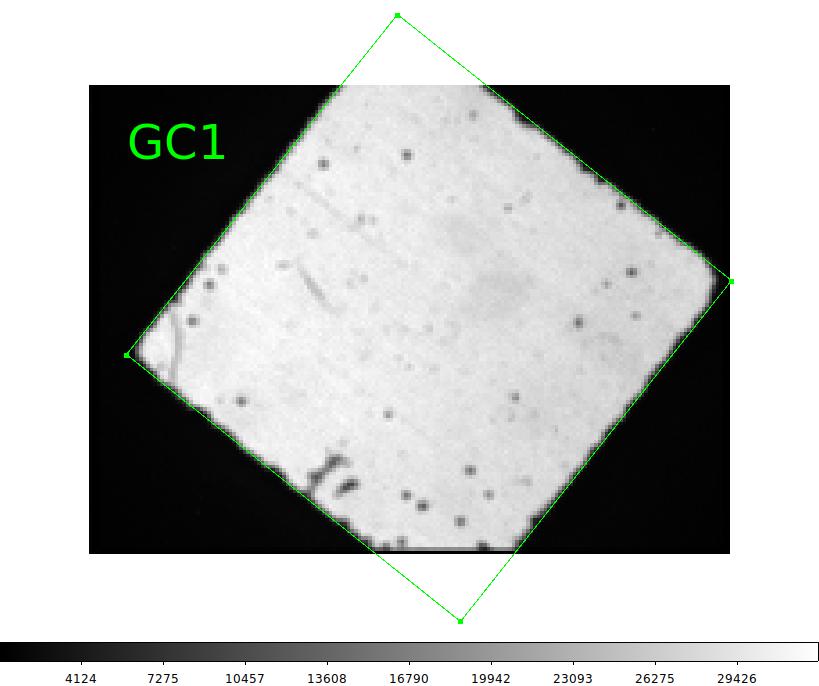
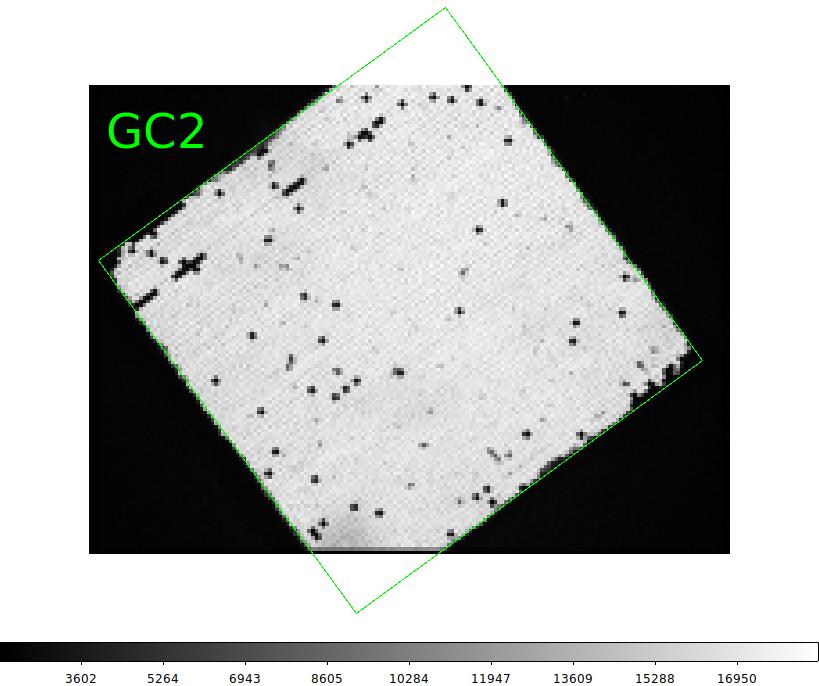
Measuring GC1 and GC2 CFB centers
- Deploy the FCU head (PFIP shutter can stay closed)
- Set filters on GC1 and GC2 to g` (not that important for this)
- Select an FCU lamp and fiber combination to get good flux on GC1 and GC2.
- Mar2022: used QTH lamp, red light guide; 5s exposures on GC1/GC2; probes at home5
- Save some GC1 and GC2 images.
- Use ds9 to measure the center of the CFB diamond (can use rectangular region by eye).
- be sure the last results are saved under "old results on the wiki"
- update the wiki value for the GC1 and GC2 center.
- update the TO setup scripts (ask Amy and Nathan).
- This should be the CRPIX value for the Guiders as well so these numbers should be given to the software team for updating in TCS (note these are in units of binned pixels).


Check WFS1/2 aperture spots with FCU lamp too, to check for any changes
- Qth, red guide, 15s exposures on WFS1/WFS2; probes at home5
- Save some images, use ds9 to get the center of the selected spot by eye (compare before and after). If there is a big change, contact Hanshin to update the apertures on the WFS processing pipeline (required before WFS are useable!)


Measuring center CFB and side CFB centers on HPF ACQ
- Open the PFIP shutter
- Deploy the FCU head
- Select a lamp and fiber combination to get good flux in the HPFACAM. Be sure to open the FCU shutter with a decent exposure time.
- Mar2022: used QTH lamp, red light guide; 1s exposure on HPFACAM.
- Store some images on the HPFACAM, where both CFBs are visible.
- Notify Joe Ninan that the images have been saved and what the image name is.
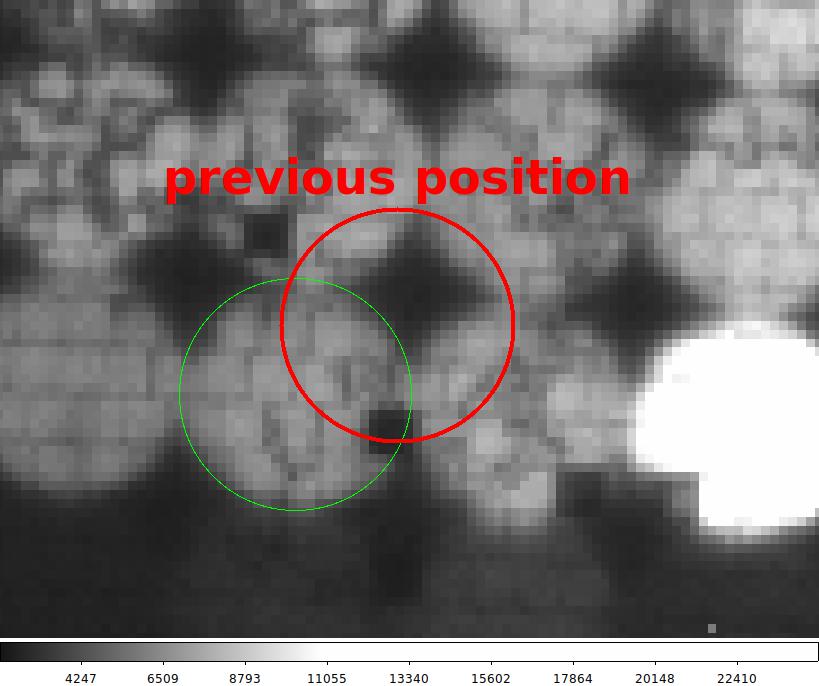
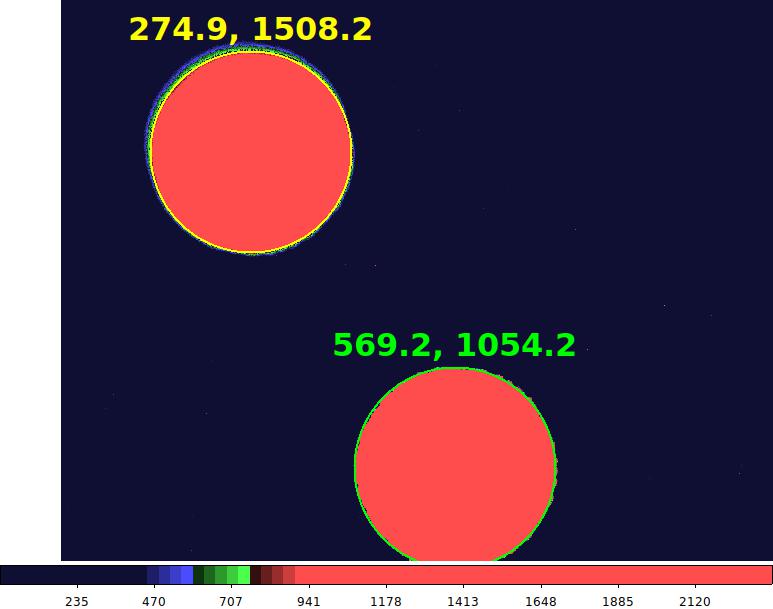
- Measure the position for the center of the HPFACAM direct field:
- Use ds9 measure the center of both CFB: this can be done with circle markers (145 pixel radius is good for both) and then looking at the marker info. You will need to play with the scale to get the off axis one to look like a circle due to the coma at that position.
- be sure the last results are saved under ”old results on the wiki”
- update the wiki values for both CFB centers.
- Note how much rotation is required from the central one to the new off-axis position and this is the delta angle to report to the TCS team.
- Ask Amy and Nathan to update the TO setup scripts.
- This should be the CRPIX value for the HPFACAM as well so these numbers should be given to the software team for updating in TCS (note these are in units of binned pixels).

Twilight tests
These twilight tests are in additional to the regular evening twilights for all science instruments.
Acquire twilights for both guiders in all filters
- Start this about 5-7min before sunset
- Try exposure times like 0.01s with very short cycle times
- Cycle through all filters: B, g‘, r‘, i‘, (Clear - optional)
- Adjust exposure times of both GCs to obtain two sets of twilights:
- 20 "bright" images at 40-50k counts
- 20 "faint" images at 5-10k counts
- Full instructions are here: HetProcedures/RA/probecals and include how to take the images, how to process them into flats, and how to install them (either temporarily or permanently) into TCS.
Acquire WFS twilights (high flux and low flux)
- Start this about 3-5min before sunset.
- Be sure that "Store images" is selected.
- Adjust exposure times of both WFS to obtain two sets of twilights:
- ~20 flats with one with peak flux values around ~3-5k counts
- ~20 flats with peak flux values at 40-50k counts (saturation is 65k).
- Try exposure times like *0.01s* with very short cycle times.
- Verify again that the spot positions are unchanged from flats taken previously (i.e., daily during OPS with dome lights on). If the spots have moved, contact Hanshin to get help updating the PAS pipeline that processes the wavefront sensor images.
Acquire HPFACQ camera twilights (high flux and low flux)
- Start this about 3-5min before sunset
- Be sure that "Store images" is selected.
- Adjust exposure times of the HPF ACQ camera to obtain two sets of twilights:
- ~20 flats with one with peak flux values around ~200 counts
- ~20 flats with peak flux values at ~3k counts (saturation is 4095).
- Try exposure times like *0.01s* with very short cycle times.
- These are not being used yet but will be invaluable for future comparisons
On-sky tests
Note that these tests rely on good image quality and reasonable transparency. You will want a high-quality stack and good (<2") seeing before attempting them. If the stack quality degrades during these efforts, a re-stack may be necessary to acquire useful data.
Measure BIB position on ACQ camera and on IHMP with VIRUS
- Select a 14th magnitude star with low proper motion in a rich field from the ENGYY-T-000 program (m14_bib_*) which has at least 30 minutes left in its track
- Note that the BIB is IFU=555
- Use g` filters for ACQ camera and guiders
- OPEN the PFIP shutter in order to use the BIB camera
- Setup on this target and ask TO to center star in BIB (on new coordinates!), handshake to a guider, activate a wavefront sensor and allow it to stabilize
- Deploy ACQ camera mirror and store 3x shallow and 3x deep images in g` and i` filters.
- Measure the position of the star in the 3x shallow images and update the value on the wiki
- Retract ACQ camera mirror (will be done automatically with iexp shortly)
- If not running, start BIB camera pipeline and store images (unsaturated), verify that the star is still well-centered at the center of the BIB camera
- Run a dithered VIRUS exposure with iexp then modify command to something like this changing the target name appropriately:
vlexp -B -i virus -pobj m14_bib_1_555_E -texp 360.0 -dither
- Run Remedy on TACC for this VIRUS observation.
- Use the WCS solution from Remedy (IHMP coordinates and angle) and the known coordinate of this star to determine the fplane coordinates of the BIB.
- If necessary, update the fplane file with this new value
- Send this value to the software team to update CRPIX on the ACQ camera in TCS (note these are in units of binned pixels).
Measure LRS2-B & LRS2-R positions on ACQ camera and on IHMP with VIRUS
- Will do each spectrograph (B and R) separately, unless there is enough time on a single trajectory
- Select a 14th magnitude star with low proper motion in a rich field from the ENGYY-T-000 program (m14_B_* or m14_R_*) which has at least 30 minutes left in its track
- Note that LRS2-B is IFU=056
- Note that LRS2-R is IFU=066
- Setup on this target (ask the TO to set up at the old position on ACQ camera), handshake to a guider, activate a wavefront sensor and allow it to stabilize
- Take a 60s exposure with LRS2-B (or LRS2-R), using iexp modified to something like this changing the target name appropriately:
vlexp -B -i lrs2 -pobj m14_B_1_056_E -texp 60.0
or
vlexp -B -i lrs2 -pobj m14_R_1_066_E -texp 60.0
- Run lmap on this exposure to calculate the offset
- Re-center using small trajectory offset ONLY (like mgp -t xxxxx) provided by lmap's output
- Make sure the ACQ pipeline is running and storing images
- Take another 60s LRS2 exposure, as described above
- Run lmap again and verify centering
- Deploy ACQ camera mirror and store 3x shallow and 3x deep images in g` filter for LRS2-B (r` filter for LRS2-R)
- Measure the position of the star in the 3x shallow images and update the value on the wiki
- Retract the ACQ camera mirror
- Run a dithered VIRUS exposure with parallel LRS2 with iexp then modify command to something like this changing the target name appropriately:
vlexp -B -i virus -pobj m14_B_1_056_E -texp 360.0 -dither -par
or
vlexp -B -i virus -pobj m14_R_1_066_E -texp 360.0 -dither -par
- Run Remedy on TACC for this VIRUS observation.
- Use the WCS solution from Remedy (IHMP coordinates and angle) and the known coordinate of this star to determine the fplane coordinates of LRS2-B (or LRS2-R).
- If necessary, update the fplane file with this new value
- Later, VERIFY that the reduced data from Panacea show the star well-centered on the IFU; if not, make corrections and re-determine.
Measure the mapping between the ACQ camera and the IHMP
- In this unusual test, we take a dithered VIRUS observation with the ACQ camera mirror deployed and storing images
- Select on of the VIRUS targets on a rich open/globular cluster field from the ENGYY-T-000 program (VCl_* which has at least 30 minutes left in its track
- Note that these use IFU=068
- Note the guiders and ACQ camera should be using the g` filter as usual for VIRUS setups
- Setup on this target with a blind setup, handshake to a guider, activate a wavefront sensor and allow it to stabilize for about 60 seconds
- Run iexp for this target and verify that the command looks like:
vlexp -B -i virus -pobj VCl_NGC999_1_068_E -texp 360.0 -dither
- Ask the TO to click "setup complete"
- Immediately re-insert the ACQ camera mirror and start the ACQ camera pipeline running and storing images. Use at least a 10s exposure, and possibly up to 60s if appropriate to get good observations for later WCS-solving. Allow the ACQ camera to run throughout the 3x360s VIRUS dither pattern.
- Run Remedy on TACC for this VIRUS observation.
- After logging in to wrangler, commands will be something like:
idev -N 1 -m 60 -p hadoop
python3 /work/03730/gregz/maverick/Remedy/quick_reduction.py 20201024 10 57 /work/03730/gregz/maverick/output/20200801_20200901.h5 -nd 8 -fp /work/03730/gregz/maverick/fplaneall.txt -nD -qs > log_20201024_10_57.txt 2>&1
- will produce a line like the following, with WCS coordinates/rotation of IHMP
log_20201024_10_57.txt:[INFO - 2020-10-27 12:38:32,264] 20201024_0000010 Astrometry: 24.247720 1.10992 58.17
- After logging in to wrangler, commands will be something like:
- Plate-solve the ACQ camera images (use http://astrometry.net or your own method)
- Using the WCS on the ACQ images, look at which pixel the IHMP (from Remedy) lands on, and what the angle is.
- If necessary, update acm origin and angles in fplane file
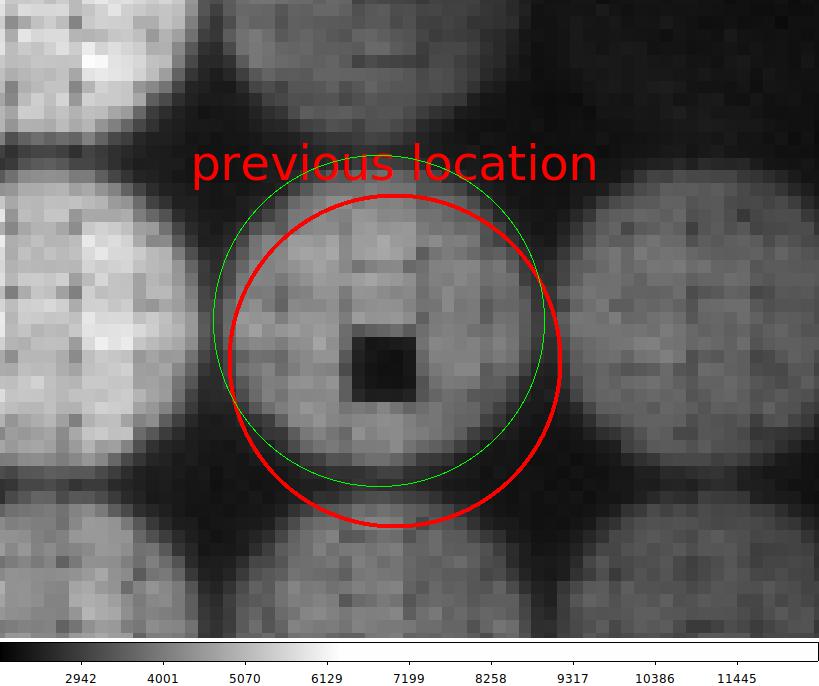
Measure HPF ACAM center/side CFBs positions on the ACQ camera
- Select one of the red stars from the ENGYY-T-000 program (r* targets)
- For the side CFB, run target_setup with -ifu 610
- For the center CFB, use -ifu 600 as usual
- Ask the TO to center and guide on the star on the HPFACAM (side CFB) using the coordinates of the center determined earlier. Note: guiding may not be possible at this position and may require activating a guider and making small offsets to manually center the star on the side CFB.
- For the center CFB this is like a normal HPFACAM setup
- Store images on the HPFACAM and all cameras throughout this test.
- Activate a WFS and allow focus/guiding to stabilize for ∼1 minute, BEFORE asking the TO to handshake to a guider.
- Ask the TO to handshake to a guider and to monitor the star on the side-CFB of the HPFACAM to verify that it stays precisely at the correct location.
- Verify that all probes are storing images.
- Repeat the following procedure four times in total:
- Deploy the ACQ camera mirror (i` filter), wait 10 seconds to stabilize
- Store five ACQ images with short exposures so the target star is not saturated, noting the time stamps (please set ACQ cycle time to ≤1s to speed this up!)
- Retract the ACQ camera mirror
- Do this for both the side CFB and center CFB, noting timestamps
- calculate the fplane values for IFU=600 and IFU=610
- Joe will use the measurements of these two positions on the ACQ camera to update the guider fiducial offset to be used in the HPFACAM setup script
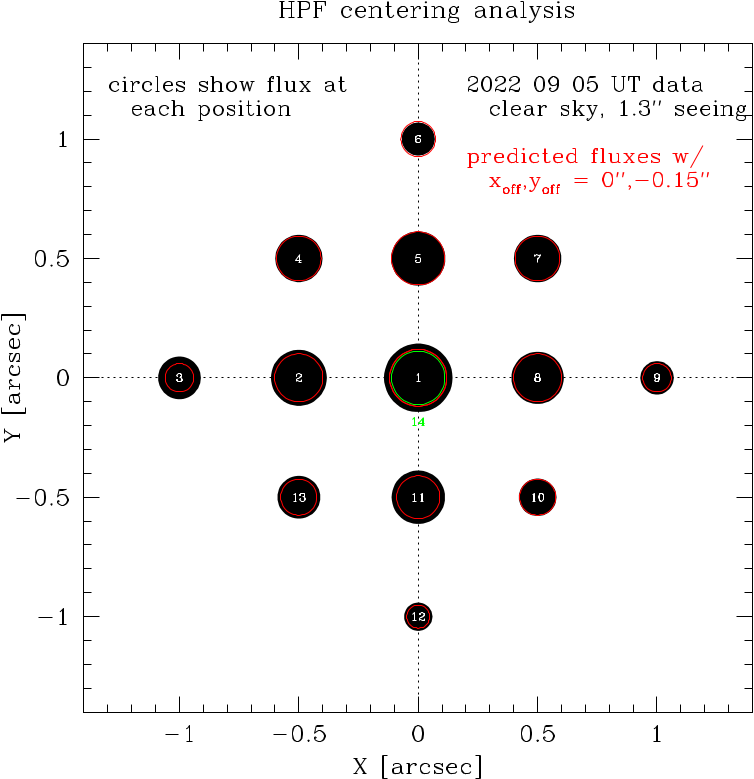
Determine the position of the HPF science fiber on the ACQ camera
- After the previous test is complete and we have updated the HPF ACQ fiducial and the guider fiducial offset in the HPFACAM setup script:
- Choose an M dwarf from the ENGYY-T-000 program with a name like Gl*
- Ask the TO to do an HPFACAM ("regular") setup on one of these targets; pay extra attention to how stable the star is on the HPFACAM after handshaking to a guider - that is critical!
- Activate a WFS, allow to stabilize for ∼1 minute
- Be sure that images are being stored on all probes
- Ask the TO to turn off the integral terms in guider PID loops
- Deploy ACQ mirror and take two exposures (noting time stamps):
- one short exposure where target is unsaturated (if possible)
- one long exposure with N>6 stars visible
- retract ACQ mirror
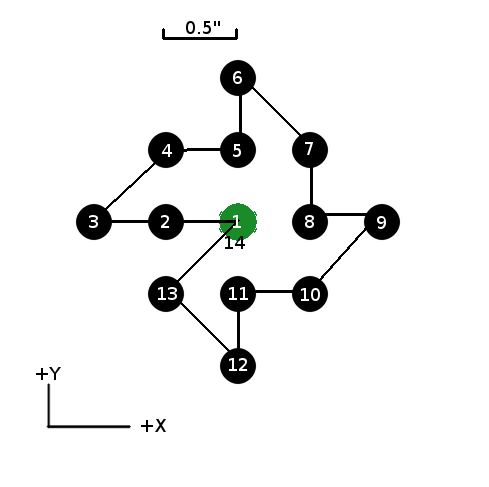
- run test script located in /home/mcs/astronomer/stevenj/hpfcent/
- ./gc1 hpf centering.sh if you are guiding on GC1
- ./gc2 hpf centering.sh if you are guiding on GC2
This will take 14 exposures at different positions, with appropriate pauses between each move.
- When finished the ACQ mirror should automatically deploy; take two exposures (noting time stamps):
- one short exposure where target is unsaturated (if possible)
- one long exposure with N>6 stars visible
- That concludes this test - resume science operations. Email Steven J with details.
- Analysis of these measurements will help verify and refine the guider offset we use to move from the HPFACAM central CFB to the science fiber. These will also be used to update the fplane value of the science fiber. The HPF science fiber is at IFU=603.
- The pre-test ACQ camera images can also be used to verify the position of the HPF science fiber on the HET ACQ camera, used in the "directACAM" HPF setups
Further refinements
These are necessary tests, but probably cannot be done on the first night's re-commissioning and require the previous tasks to be completed successfully first.
Measure HPF ACAM center CFB position on the IHMP with VIRUS
- details in PDF file, to be added
Measure HPF ACAM side CFB position on the IHMP with VIRUS
- details in PDF file, to be added
Refine the HPF science fiber position with small dithers
- details in PDF file, to be added
OLD notes, but with valuable information!
Overview
These tests are intended for moving us from the FPA taken down to full science operations.
Closed dome engineering tests
Getting ready
- Archive the old best current values for the markers and be ready to create new marker position see HetProcedures/RA/markers
Measure the position of the BIB IFU center
Purpose: We want to know the center of the BIB IFU for the tests that are needed involving the BIB
Procedure:
- Open the PFIP shutter
- insert the FCU
- select a lamp and fiber combination to get good flux in the BIB. Be sure to open the FCU shutter with a decent exposure time.
- Save some BIB images.
- Using ds9 measure the center of the IFU. This can be done with circle markers and then looking at the marker info.
- be sure the last results are saved under "old results on the wiki"
- update the wiki value for the BIB center.
- This should be the CRPIX value for the BIB as well so these numbers should be given to the software team for updating in TCS.
Measure the position of the GC1 and GC2 center
Purpose: We want to know the center of the Guider Coherent Bundles for the TO setup scripts.
Procedure:
- insert the FCU
- select a lamp and fiber combination to get good flux in GC1 and GC2.
- Save some GC1 and GC2 images.
- Using ds9 measure the center of the Coherent Bundle Diamond. This can be done with square markers rotating them using the marker info in DS9; the center of the marker is what we want.
- be sure the last results are saved under "old results on the wiki"
- update the wiki value for the GC1 and GC2 center.
- update the TO setup scripts (to be added by Nathan and Amy).
- This should be the CRPIX value for the Guiders as well so these numbers should be given to the software team for updating in TCS.
Testing of the HPF-ACAM IFU positions
Purpose: We want to know if the angle for guiding has changed on the HPF ACQ and the centers for setting up when doing HPFACQ regular setups.
Procedure:
- Open the PFIP shutter
- insert the FCU
- select a lamp and fiber combination to get good flux in the HPFACQ. Be sure to open the FCU shutter with a decent exposure time.
- Save some HPFACQ images.
- Notify Joe Ninan that the images have been saved and what the image name is.
- Measure the position for the center of the HPFACQ direct field
- Update the wiki and the code regularhpfsetup and inform Randy of the new position for the marker file.
- This should be the CRPIX value for the HPF ACAM as well so these numbers should be given to the software team for updating in TCS.
To measure yourself:
- Using ds9 measure the center of both IFUs. This can be done with circle markers and then looking at the marker info. You will need to play with the scale to get the off axis one to look like a circle due to the coma of the camera.
- be sure the last results are saved under "old results on the wiki"
- update the wiki value for both IFU centers.
- Note how much rotation is required from the central one to the new off-axis position and this is the delta angle to report to the TCS team.
We need to get from Joe the procedure for updating the HPF-ACQ orientation, ie. what sign is what...
Twilight
Standard science twilights
LRS2 and VIRUS twilights should be taken at the center of track position. Please follow the start of the night procedures on the wiki.
Creating new Guider flats at twilight
Store images on Guider 1 & 2 in all filters (B, g, r, i`, Clear) during twilight, for use in generating new flat fields. These can be taken at the same time as the LRS2 or VIRUS twilight spectra are being taken.
Full instructions are here: HetProcedures/RA/probecals and include how to take the images, how to process them into flats, and how to install them (either temporarily or permanently) into TCS.
Dome Open Tests
Test the WFS focus and theta-phi
Purpose: Make sure that the WFS1 and WFS2 still produce good results.
Procedure:
- Setup on a star with a guide star in GC1 and GC2 and good WFS stars in both WFS.
- Get to best focus and best theta and phi with one of the WFS.
- Make sure that the WFS corrections agree within <0.04 mm in focus and <10" in theta and phi
- Move out of focus (above and below) by ~0.10 mm.
- Look at the images on the guiders and see if there is any significant coma
- Look at the images and make sure they are about the same size, ie. we are at best focus.
Testing of the ACAM position
Purpose: We want to see if the ACAM position changes with respect to the IHMP over time. We want this data every night and when ever we get an unusually high or low temperature. It would be good to vary the Az as well.
Determine the orientation of the ACAM with respect to the sky:
- Select a 14th mag star in a reasonably rich field with shuffle for the IHMP
- Setup as if it were a blind setup LRS target
- Save several images in each filter g,r,i, for the ACAM.
- Save several deeper images as well.
- Run Steve's software to determine the orientation (or ask Steve to run his software).
Determine the Center of the BIB:
- Select a 14th mag star in a reasonably rich field with shuffle for the BIB
- Setup on the very center of the BIB field of view and save an image note any differences from the wiki center position.
- Guide on one of the guide probes
- Put in the ACAM and save an shallow image with the target star not saturated.
Measure the star position on the acam: ds9_imstats 20190401T115437.0_acm_sci.fits Y
- Report on the position of the BIB in the night report and on NightOperations/Commissioning/Results
- Save a deeper image which should show more than a dozen stars.
Determine the Center of LRS2-B
- Select a 14th mag star in a reasonably rich field with shuffle for the LRS2-B
- Setup on LRS2-B and start guiding on one of the guiders
- Take LRS2-B spectrum, probably 60 seconds.
- Adjust the position so that the star is at the center of LRS2-B IFU using lmap until the offsets are less than 0.3"
syscmd -T 'Guider1_offset_fiducial ( dx_asec=-0.01,dy_asec=0.55,compensate="false")'
- Confirm the star is at the center of the IFU by taking a spectrum.
- Once it is as the center of the IFU put in the ACAM and take a shallow image so that the star is not saturated.
- Report on the position of the LRS2-B in the night report and on NightOperations/Commissioning/Results
- Take a deeper image so that there are large number of stars.
Determine the Center of LRS2-R
- Select a 14th mag star in a reasonably rich field with shuffle for the LRS2-R
- Setup on LRS2-R and start guiding on one of the guiders
- Take LRS2-R spectrum, probably 60 seconds.
- Adjust the position so that the star is at the center of LRS2-R IFU using lmap until the offsets are less than 0.3"
- Confirm the star is at the center of the IFU by taking a spectrum.
- Once it is as the center of the IFU put in the ACAM and take a shallow image so that the star is not saturated.
- Report on the position of the LRS2-R in the night report and on NightOperations/Commissioning/Results
- Take a deeper image so that there are large number of stars.
Determine the Center of the HPFACQ IFU on the ACQ:
- Select a 9-10th mag star with shuffle for the regular setup (600)
- Setup on the very center of the HPFACQ field of view and save an image.
- Guide on one of the guide probes and make sure that the star is still at the center of the HPFACQ
- Put in the ACAM and save an shallow image with the target star not saturated.
- Report on the position of the HPFACQ regular setup in the night report, on the markers wiki page and on NightOperations/Commissioning/Results
Determine the Center of the side HPFACQ IFU on the ACQ:
- Select a 9-10th mag star with shuffle for the side setup (610)
- NOTE that you probably will not be able to guide on the side CB because the orientation is different than the center IFU (600).
- Make telescope offsets with the TCS hand paddle to get it close to the center of the side CB.
- Guide on one of the guide probes and make sure that you use the PID loop.
- Adjust the fiducial position on the active guider to get the star centered well on the side CB.
- Put in the ACAM and save an shallow image with the target star not saturated.
- Report on the position of the HPFACQ regular setup in the night report, on the markers wiki page and on NightOperations/Commissioning/Results
These tests need to be done at least 5 times to get a very good average.
Data reduction
The ACAM image orientation on the sky should come directly from Steve's ACAM orientation analysis. His code is rotated by 90 degrees so subtract 90 from the value that comes from Steve's software. This goes into the Shuffle cfg file as "acam". Follow the instructions for updating the shuffle.cfg file: HetProcedures/RA/Shuffle
On any ACAM image set a circular marker at the LRS2-B and LRS2-R positions and make the radius 158.1 arcseconds in size (as set by the fplane file). The intersection of these two cicles is the new value for the IHMP. Update the wiki and the shuffle.cfg file (acam_x_origin and acam_y_origin; Follow the instructions for updating the shuffle.cfg file: HetProcedures/RA/Shuffle). This is also the center of the TCS pointing should be the CRPIX values for the ACAM, ask the software team to update this for the ACAM. Next take one of the ACAM images from the LRS2-B position test and run the shuffle for this object's setup with the new shuffle.cfg file. Adjust the acam angle in shuffle.cfg until the stellar positions in the fake ACAM match the real ACAM. The for the same object run shuffle but for the LRS2-R position. If the object does not fall at the previously determined value of the LRS2-R then adjust the fplane value in the shuffle.cfg file and rerun shuffle until it does. Wtih these positions now locked in ask Greg to submit the new shuffle.cfg file to svn. Once it is updated download the new version and make sure that Sergey downloads the shuffle.cfg file to the correct location and re-run shuffle for shuffle for all active targets, and standards.
We also need to update the position of the HPFACQ on the ACQ. Update the wiki and change the regularhpfsetup script and check into svn.
We also need to update the position of the directHPF on the ACQ. We have need to get the script to do this from Joe.. The value goes on the wiki and in the directhpfsetup script.
In theory the fplane should not need updating but the offset from from HPFACQ to directsetup might. Place this new value in the regularhpfsetup script and check into svn.
check the offset from LRS2-B to LRS2-R
Purpose: See what the offset is to get accurately from LRS2-B to LRS2-R position on the ACAM. This need not involve the LRS2 instrument at all but does require that we have the new updated LRS2-B and LRS2-R ACAM positions.
Procedure:
- Setup on LRS2-B ACAM position
- Take a final ACAM position to confirm we are in the right place.
- offset from B to R using mgp
- Take an image with ACAM and see if we are in the right place.
- Have the TO offset from the current star position to the ideal position and take note of the offset size.
- move back to LRS2 B
- try a modified mgp poff command with the old offset + correction.
- repeat until it works
- try the oposite offset and see that it works from R to B.
Try this with another star to confirm.
Once you have a new value give it to Sergey to be installed in mgp and also update the wiki.
Measure the guider zero points
In order for the guiders to hit the correct stars once shuffle is updated you need to adjust the probe zero points in TCS.
Procedure:
- Setup on LRS2-B on the ACAM for a 14th mag star
- Measure the offset needed to center the guide star at the center of the guider IFU
- Measure the total offsets needed to center the WFS stars (can use the offsets from the guiders as a first best guess)
- For this setup save the offsets for all of the probes
Do this procedure at least 10 times and then median the results for each probe. Enter these values into the spreadsheet on this page. In a new date/worksheet. Confirm that the current values are correct by looking at TCS code. Update these values with the new values.
Testing the Guider orientation
Purpose: We would like to nail down the Guider orientation angles before the FPA. This is not critical but this is a test we will be doing after so having a baseline would be helpful. The goal is to have 2 or more stars (even if faint) in a guider. It is ok if the guider only one guider gets this per track. The goal is to get at least 10 different images on sky with 2+ stars.
Procedure:
- Go to a very rich field
- Setup on stars selected by shuffle or LRSstars
- Saves 10 images with the guider that has 2+ stars in the field of view.
- Report this in the time in the RA report and in an e-mail to Gary and Matthew.
Repeat until you get 10 fields on both GC1 and GC2.
Notes on Software updates
Zero points of various camera can be changed in the configuration files <camera>Camera.conf (eg. Guider1Camera.conf). The wcs-reference-pixel keyword is the X/Y pixel for the zero point of the field in unbinned pixel coordinates. The binned values are what you see as CRPIXx in the image header.
Plate Scale and Rotation of the cameras are both contained in ./het_lib/common/include/tcs_definitions.h under the particular camera name space. Scale is in units of arcseconds per pixel and angles are in radians. Modifying these values requires a recompile of the source code.
Attachments (15)
-
Guideprobezero.xlsx
(8.7 KB) -
added by shetrone 6 years ago.
Spread sheet to be used for getting the probe zero points
- bib.jpeg (15.2 KB) - added by stevenj 7 months ago.
- gc1.jpeg (44.9 KB) - added by stevenj 7 months ago.
- gc2.jpeg (58.6 KB) - added by stevenj 7 months ago.
- wf1.jpeg (57.0 KB) - added by stevenj 7 months ago.
- wf2.jpeg (60.8 KB) - added by stevenj 7 months ago.
- hpfacm.jpeg (30.8 KB) - added by stevenj 7 months ago.
- hpfsn.sm (2.9 KB) - added by stevenj 7 months ago.
- offset.sm (1.9 KB) - added by stevenj 7 months ago.
- sn.txt (1.2 KB) - added by stevenj 7 months ago.
- hpfcentering.png (53.4 KB) - added by stevenj 7 months ago.
- HPF_centering_diagram.png (15.7 KB) - added by stevenj 7 months ago.
- wcs_fplane.py (1.1 KB) - added by stevenj 7 months ago.
-
CalculateHPFfiberpositions.py
(22.6 KB) -
added by stevenj 7 months ago.
updated CalculateHPFfiberpositions.py
- CalculateHPFfiberpositions_new.py (22.6 KB) - added by stevenj 7 months ago.
Download all attachments as: .zip