Miscellaneous Tasks
TCS Check Out
1.) Move the tracker to the center preset position or (0, 0, 0, 0, 0, 0). Both ways of moving the tracker can be found on the TCS GUI under the tracker tab. The present motions are under the present tab and absolute tab in RTF. This will let you move it to a manual desired position of (0, 0, 0, 0, 0, 0).
2.) Save 2-3 exposures on each camera to ensure they are all working properly. To start the images hit "Start Camera Pipeline" and "Start Images" to start the camera. When ready, check the save images box near the top. The current camera's right now are: T/T, CWFS, PV, WFS1, WFS2, GC1, GC2, BIB, HPF ACQ and ACQ
a.) For T/T look for the return spot. If you do not see it, one solution may be that the tracker is not at the center position.
b.) For the BIB camera, make sure the PHIP shutter is 'Open'. You can open the shutter by going to the PHIP/shutter control/status tab and moving the shutter to open in the drop down menu located at the bottom of the GUI. Once the shutter is open, take your images and be sure to close the shutter when you have finished.
Note: If the RA is still performing OPS, check with them first to make sure that opening the PFIP shutter will not interfere with their work.
c.) For ACQ you will need to insert the ACQ mirror before you take your images. Due to the layout inside of the tracker, you will need to make sure the mirror for PV and CWFS is retracted before you deploy the ACQ mirror. Once that mirror is deployed, you can take your ACQ images.
d.) The PV and CWFS cameras both utilize the same pick off mirror. When taking images with these two cameras, you will want to have the mirror deployed, which you can do on the PFIP/FCU controller/status tab. Before you deploy this mirror, make certain that the ACQ mirror is retracted. Only one of these cameras can be on at once, so choose which camera you will use first. Set the exposure time to 5 seconds and save your frames. Once done, go back to the PFIP/FCU controller/status tab and Deploy (either PV or CWFS, depending on which camera is currently activated) and then save your images with that camera. Once done with both PV and CWFS retract the mirror and turn off power to these two cameras. (The green buttons next to them in the PFIP/FCU Status.)
e.) Be mindful that you have tested and saved images from each camera. Sometimes new cameras are added for tests or new equipment and they need to be tested as well. So be mindful that you are getting to each camera on the telescope.
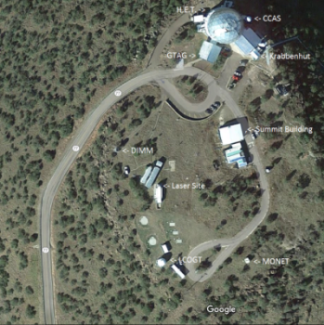
Head out to the Krabbenhut for the next part of OPS and continue the check list from here: Exterior Inspection, Start Air. (See Figure below for location of the Krabben Hut).

Testing Trajectories
It is important to test two types of trajectories during ops to make sure TCS and all the other components are able to deliver them.
1.) The first test is a non-sidereal trajectory, usually in the form of a Geostationary Satellite. There are two options for satellites, DIRECTV10 or GOES14. To send this trajectory to the telescope, you will need to go to the HTCS log monitor and only type in the name of one of the two satellites in all capital letters. This will start a script that moves the telescope to the target. Once the telescope is tracking the target (you will be able to tell this under the Trajectory tab under Status. There should be a set of coordinates in the current section) test the T/T camera to make sure the tracker is on sphere. If you are not getting any feedback from T/T it could be going between mirror gaps. Observe it for a while and if you do not see the return signal back on T/T this could point to several problems with the tracker and at this point it may be a good idea to alert the correct personnel. When you are finished testing T/T cancel this trajectory.
2.) The second trajectory is a standard sidereal trajectory. Under the trajectory tab on the TCS GUI there is a section called "Trajectory", click on the south preset trajectory and click load. Once these coordinates appear in the next column (and you have cancelled the previous trajectory.), click "Go Next" and wait for the trajectory to move in the current section. Once the telescope is on the trajectory, test the T/T camera again and look for the spot feedback.
- During the sidereal trajectory, check the DMI to make sure it is making single peak points. Once you have confirmed this, you can cancel the trajectory.
This concludes the tests you need to do on the telescope. The next step is to prepare it for the night TO.
Attachments (1)
- HETLayout1.png (199.9 KB) - added by stevenj 4 years ago.
Download all attachments as: .zip