Procedure For Clearing a “Soft” Skew Fault
When a soft skew fault occurs the only sensor that faults is the software skew limit (skew less than ~35 mm).
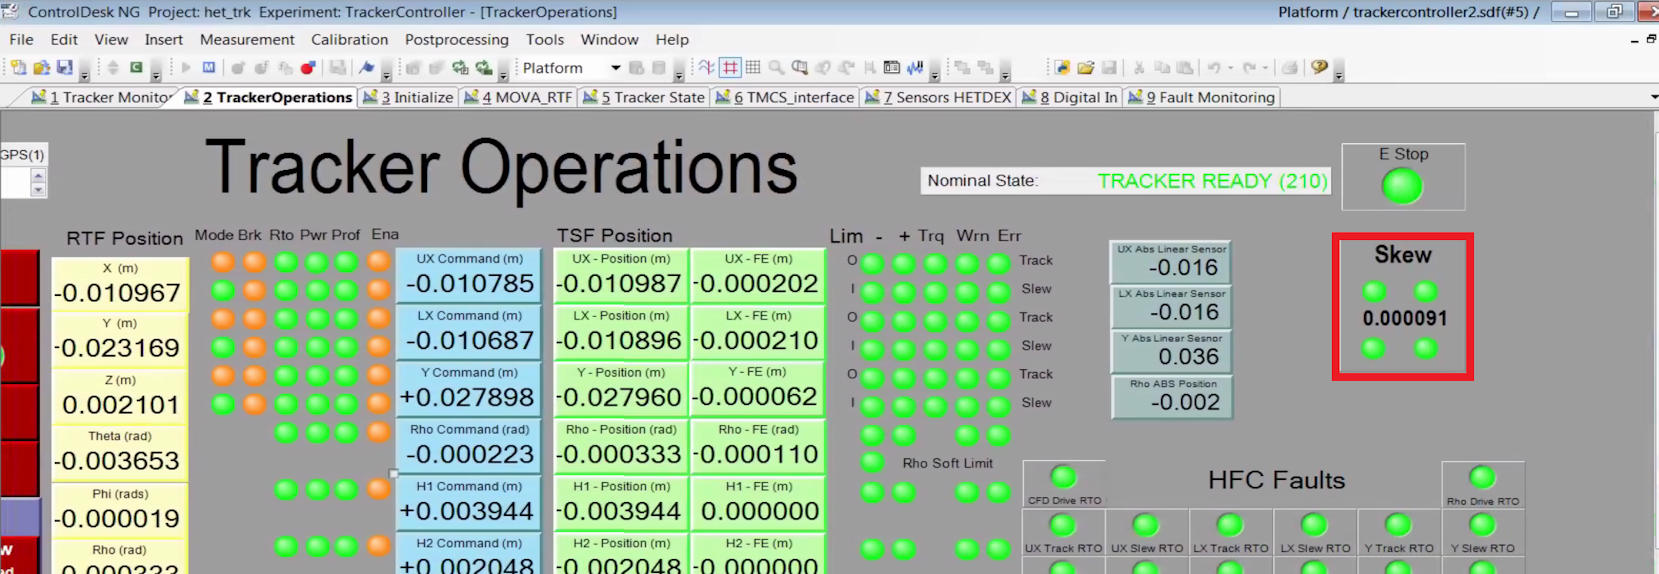
- First try to reset the faults the usual way (this usually results in a HFC fault again right away if the skew condition still exists). The place to see the skew amount in meters as well as any hardware skew sensors that may have been tripped (green LEDs in skew box) is boxed in red in the figure below.

Figure 1: The amount of the skew is indicated in control desk (boxed in red).
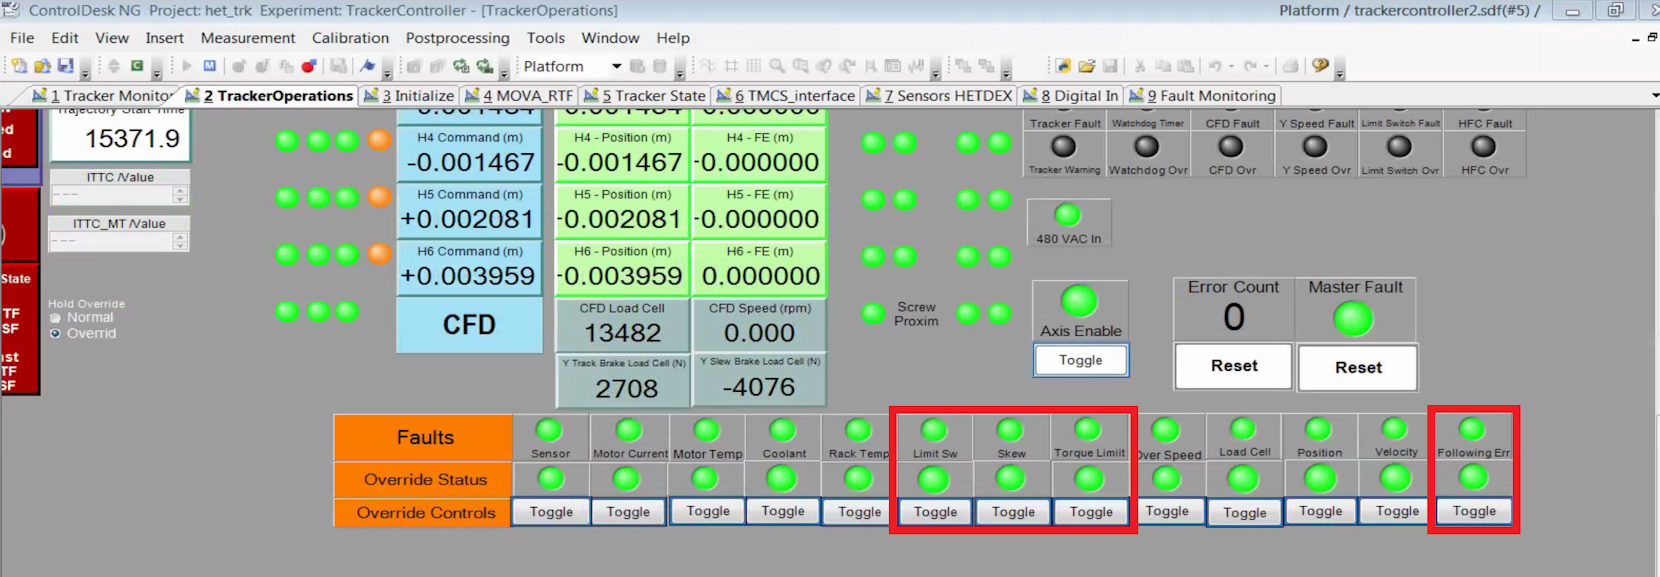
- In control desk, override the software “Skew” limit as well as other limits like the following error limit that are preventing you from clearing the faults. The limits you may need to override are boxed in red in the diagram below.

Figure 2: Things needing to be commonly overridden in control desk are boxed in red.
- Now you should be able to clear the faults (click 2 reset buttons in control desk and then flip the reset switch under HFC LED on the tracker display panel).
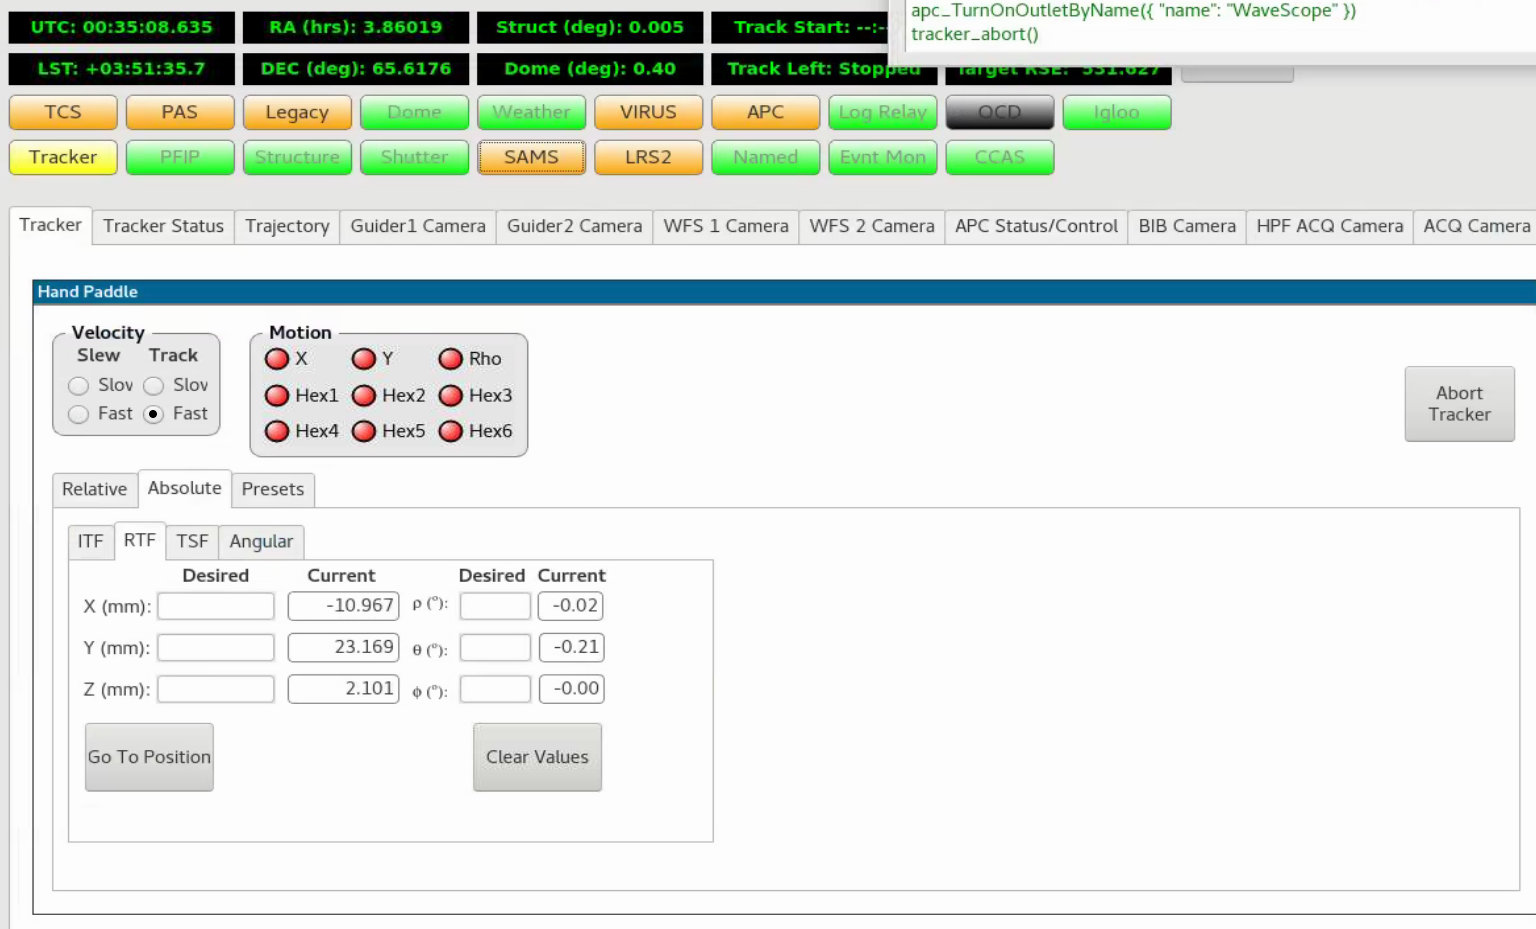
- Remove the skew with the tracker at Fast Track speed (Fig. 3). In the TCS GUI go to the tracker tab, in the tracker tab there is another set of tabs, click on the “Absolute” tab under this set of tabs. Once in the “Absolute” tab you will see yet another set of tabs. The tab to use is the RTF tab (Fig. 3). Check to see that the positions are accurate between the control desk RTF column and the current column in this tab on the TCS Gui (Note: Control Desk units for RTF are meters and TCS Gui units are millimeters). If they are matching, make sure all boxes under desired are blank and you are set to Fast Track velocity up above. If the boxes are empty they will fill in with the current positions when you hit “Go to Position.” The GUI will then ask you if you are sure you want to make this move, choose yes.
RTF_Fast_Track.jpg

Figure 3: This shows the absolute RTF tracker tab, notice how boxes are empty and velocity above is set to fast track.
- As the tracker begins to move watch the skew value closely to make sure that it is going down and not up. Once the skew value is close to zero and the tracker does not appear to be moving per the RTF or TSF position columns in control desk, check to see that the move command has turned green in the command status box of the TCS GUI. If the move has been completed, you should be able to hit “abort tracker” to engage the brakes.
- Once the brakes have engaged and the tracker is no longer trying to move. Check to see that the skew value is still close to zero. If it is you can then turn the software skew override (and any others) off (Fig. 2).
- No errors or faults may be displaying at this time, but it is a good idea to do a routine reset by hitting the reset buttons on control desk and flipping the reset switch under the HFC LED on the tracker display panel found in the rack next to the TO console.
- It is also a good idea to hit abort tracker a couple of times in the TCS GUI and make sure the commands turn green in the command status box.
- Exercise the tracker by moving in absolute RTF by a few hundred millimeters in slow slew. If that works well then in slow slew command the tracker to either of the lower right or lower left presets.
- If no other faults present themselves you are ready to attempt to “go next” to a trajectory.
Procedure For Clearing a “Hard” Skew
A hard skew is one that is significantly larger than the previous type of skew (usually over ~35-40mm). This usually triggers a few more sensors and you cannot clear it unless you override them. The sensors that usually need to be overridden are as follows: software “Skew” limit in control desk, software “Limit Sw” in control desk, and the hardware limit switch on the tracker display panel.
- First try to reset the faults (this usually results in a HFC fault right away if skew condition still exists).
- Override the “Skew” limit, and the “Limit Sw” limit in control desk. You will also need to continuously hold down the “Limits” override on the dspace panel located on the TO desk (black panel with red push buttons). In the control desk software, you should now be able to hit the reset buttons and then reset the HFC fault by flipping the reset switch under the HFC bulb on the tracker display panel. Note: You need to continue holding down the override on the dspace panel to do any of these steps.
Figure 4: Things needing to be commonly overridden in control desk are boxed in red (Fig. 2 repeated).
- The tracker should look ready to move if you have done the previous steps correctly and are still holding down the “Limits” override on the dspace override panel (no faults remaining). From this point one can follow steps 4-10 from above for a soft skew while holding down the override button on the dspace panel.
Clearing a Torque Limit Fault
A torque limit fault usually occurs in conjunction with a skew fault. This is where rotation of a motor is prevented by a torque limit sensor. When this occurs you cannot move the tracker in which ever mode (slew or track) that has tripped a torque limit sensor. This is visible in control desk by looking at the column labelled “trq.” If the lower-X slew trq limiter has been tripped the lower-X slew motor is not able to move the lower-X portion of the tracker. Trying to move the tracker in X will result in only movement of the upper-X portion of the tracker since the lower-X motor is limited. The converse is true if the upper-X motor has been torque limited, only the lower-X portion of the tracker can move. These torque limit sensors can also be tripped in track mode, but this is very uncommon.
Torque Limit with “Soft” Skew Fault
- First try to reset the faults (this usually results in a HFC fault right away since the condition still exists).
- Override the software “Skew” limit in control desk as well as the “Torque Limit” (if they are tripped).
Figure 5: Things needing to be commonly overridden in control desk are boxed in red (Fig. 2 repeated).
- You should then be able to clear the faults.
- At this point you are ready to move the tracker. Clear the skew first by using a system that is not being limited by the torque fault. If it is a slew trq limit sensor that is faulted use fast track. If it is a track torque limit fault use slow slew. This allows the tracker to move and clear any existing skew.
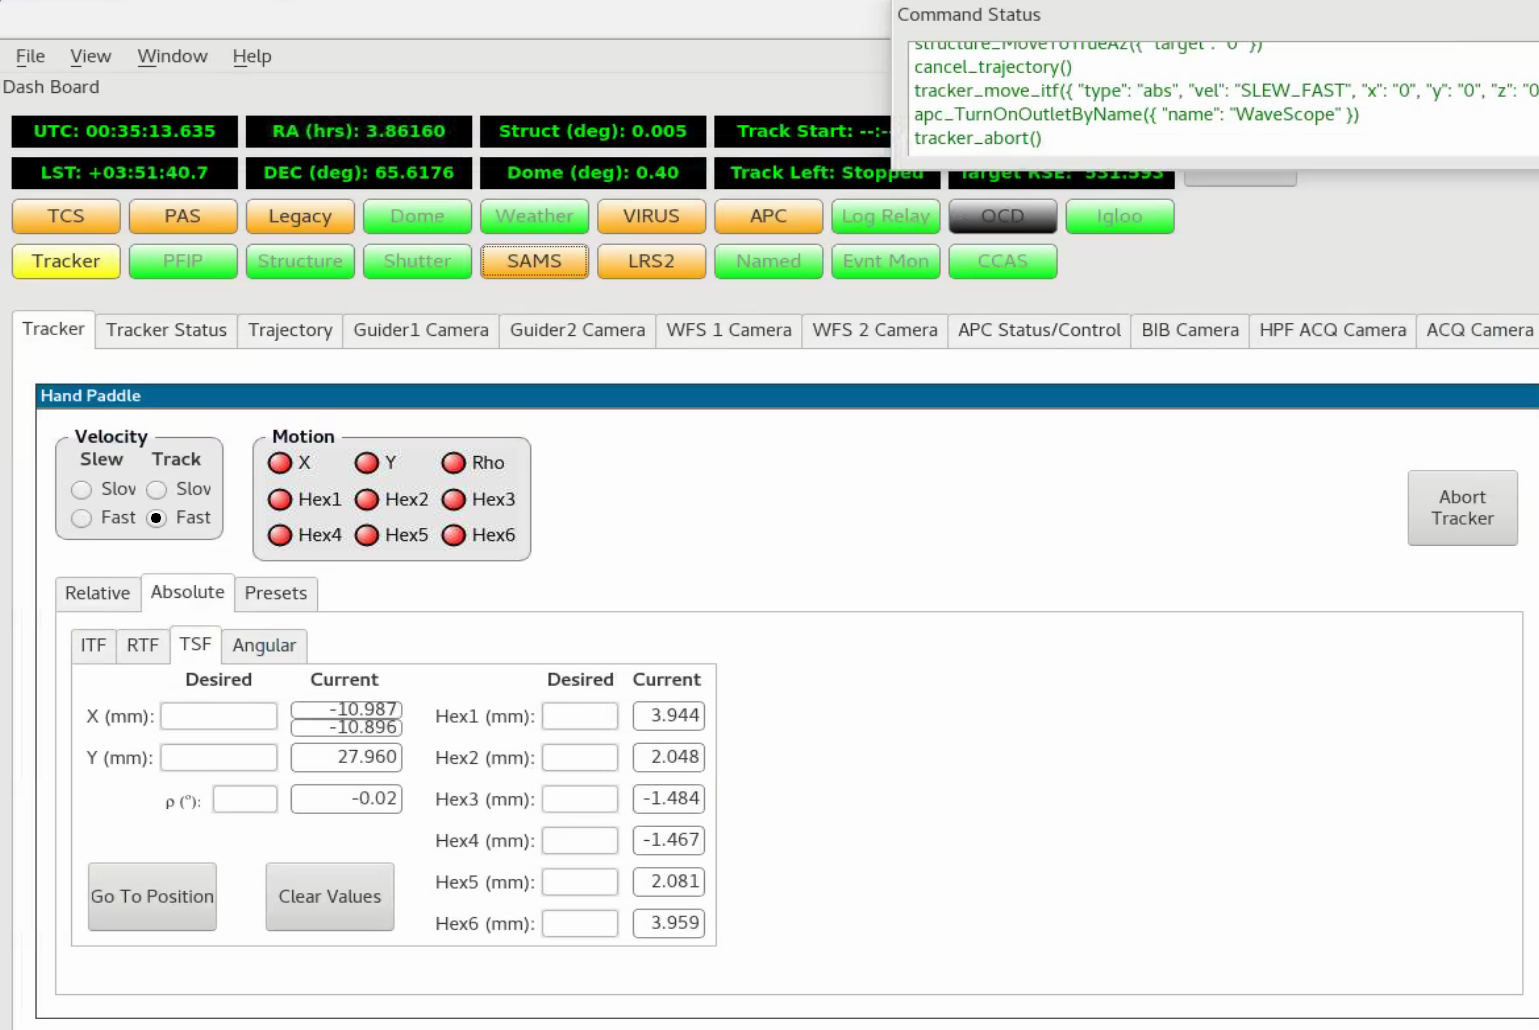
- For a slew torque limit fault, command the tracker in fast track to the current TSF position of whichever upper or lower-X that has the torque limit fault. This will cause the counterpart of the X slew system to then match the side that is not able to move thus minimizing the skew. I choose to use the TSF tab under tracker in the TCS GUI because it displays the positions of the upper and lower X stages separately.
- As with clearing any skew, make sure that when you send the command to move to position the skew value decreases instead of increasing.
- Once the skew is close to zero and has been cleared the next step is to clear the torque limit fault. The red LED in the Torque Limit column of control desk should still be lit. Hit the “abort tracker” button to prepare for clearing the torque limit fault.
- In order to clear the torque limit, you need to “walk” the tracker back and forth in X until the limit clears. If it is a slew torque limit fault you will need to do so in slow slew. If it is a track torque limit you will need to do it in fast track.
- Note the current RTF or TSF positions for use in next step.
- For this step either the absolute RTF or TSF tab can be used. I like to use the TSF tab as it shows both upper and lower x position (Fig. 6). Command in either RTF or TSF absolute tab that the tracker move in slow slew(for a slew torque limit) ~20-30mm in either the positive or negative X direction. Wait a minute for the move to occur and watch the torque limit light. If it starts to blink green, then red and then stay green you have moved the tracker the correct direction and the torque limit has been cleared and you may hit “abort tracker” and continue with step 11. If this is not the case, you should hit “abort tracker” and prepare to send the tracker to ~20-30mm in the opposite direction of where you started using the values in step 9.
Essentially if you moved 20-30mm in the negative x direction and the torque limit does not clear, you then need to move 40-60mm in the positive direction so that you are on the other side of the original position by 20-30mm. If the move in the opposite direction has worked, the torque limit should now be cleared and you may hit “abort tracker” button and proceed.

Figure 6: Absolute TSF tab under the tracker tab of the TCS GUI.
- Now that both the skew and torque limit has been cleared you can put all overrides you implemented back to normal (“Skew” limit and “Torque” limit in control desk). At this point you should also reset any faults that may be left over (hit reset buttons in control desk and flip the reset switch on the tracker display panel under the HFC led).
- Now starting with small movements in slow slew (~100 mm) exercise the tracker to make sure that everything is working properly. If those moves succeed with no fault, then try to go to one of the preset tracker positions in slow slew. If that succeeds, change velocity to slew fast and try another preset position. All of these steps assume that after the command turns green in the command status box of TCS GUI that the “abort tracker” button is hit and the move is completed ending with the brakes engaged.
- If the exercising works well then you are ready to go to a trajectory and continue with normal operation.
Torque Limit With “Hard” Skew
If you have a torque limit and a large (“hard”) skew the procedure is similar to the minimal or “soft” skew case. The only thing done differently is that a couple more sensors will impede your ability to clear the initial skew. The extra sensors that need to be overridden are the software “limit Sw” in control desk and the Hardware “Limits” on the tracker display panel. To override the hardware limits you will need to hold down the “Limits” push button on the dspace panel through this procedure. While these are overridden the skew and trq limit are cleared the same as steps 3 through 13 above.
Skew Fault Remains After Removing Skew
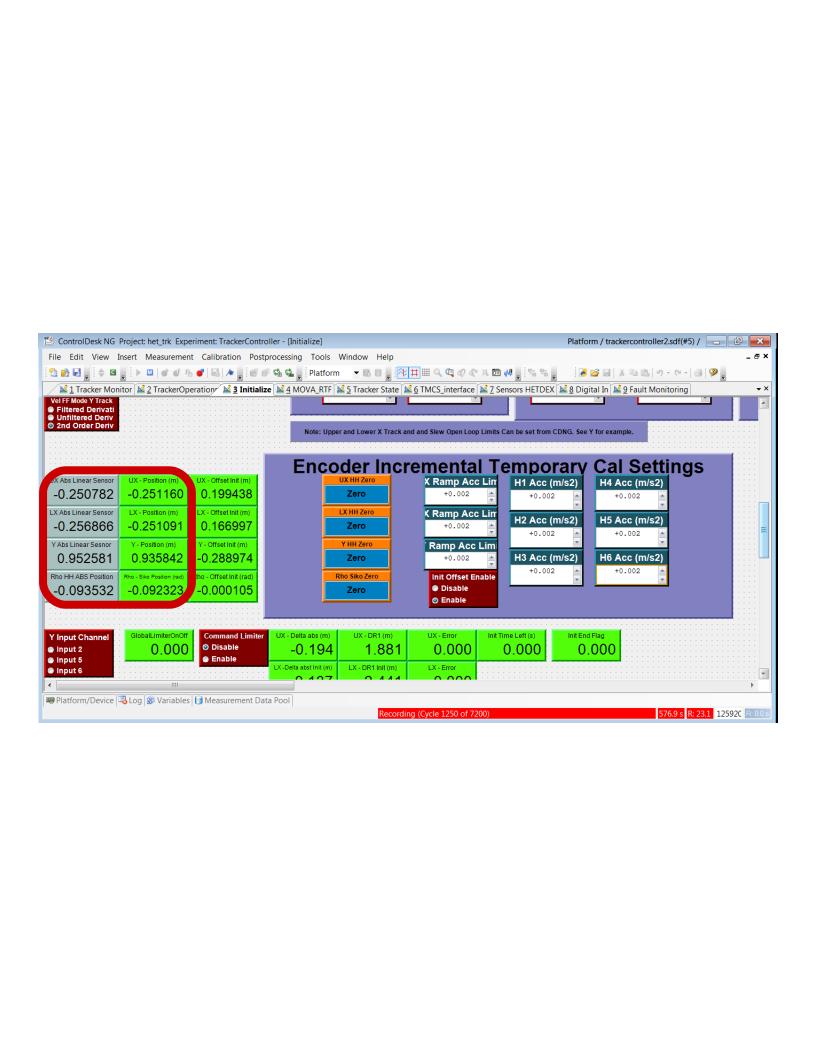
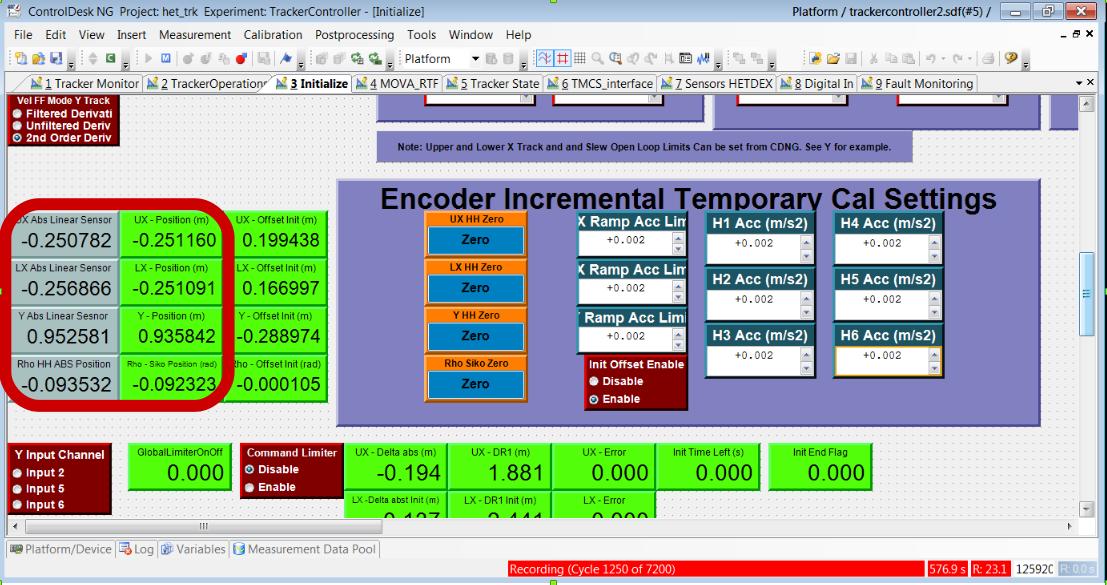
If a skew fault remains after removing the skew that initially caused the fault, then you may need to check the absolute sensor positions and see how they compare to the TMCS software positions. The fix for this will require running open loop moves, so it is recommended that someone who is comfortable with TMCS and the tracker be the ones that make the corrections.
If you think you are in the position where such a fix may be needed, you can find the sensor values under the initialize tab

Figure 7:Initialize tab on Control Desk, compare abs and relative values which should have an offset close to zero.
If the offsets are not close to zero and/or you still have a skew fault/sensor reading after removing the skew, then someone who is familiar with the engineering aspects of TMCS should be called to fix the fault.
Attachments (8)
- SkewIndicator.jpg (190.0 KB) - added by justenp 3 years ago.
- Overrides_Marked.jpg (200.1 KB) - added by justenp 3 years ago.
- RTF_Fast_Track.jpg (201.2 KB) - added by justenp 3 years ago.
- TSF_Fast_Track.jpg (202.3 KB) - added by justenp 3 years ago.
-
Screenshot from 2021-09-23 10-01-31.pdf
(96.4 KB) -
added by nathan 3 years ago.
highlighting absolute sensors
- Screenshot from 2021-09-23 10-01-31.odg (152.5 KB) - added by nathan 3 years ago.
- absolute_sensor_positions.jpg (70.8 KB) - added by nathan 3 years ago.
- absolute_sensor_positions.2.jpg (136.6 KB) - added by nathan 3 years ago.
Download all attachments as: .zip